BionicLoop Instructions for Use (IFU)
This document is intended for study-team review and supervised use preparation. The app screens shown are representative simulator captures from BionicLoop 1.0 (843). The alert and meal-availability reference tables in Part 2 are generated directly from the same controlled source and match the installed software.
Revision History
| Version | Date | Author | Summary of Changes |
|---|---|---|---|
| 1.0 | 2026-03-05 | Team | Initial IFU draft package |
| 1.1 | 2026-03-05 | Team | Expanded operational narrative and alerts |
| 1.2 | 2026-03-05 | Team | Added simulator screenshots and workflow cleanup |
| 1.3 | 2026-03-05 | BionicLoop engineering | Added controlled title page, revision history, generated TOC, and print packaging |
| 1.4 | 2026-04-05 | BionicLoop engineering | Rebuilt as a workflow-driven user guide with refreshed screen set, operational checklists, alert-response guidance, and stronger task coverage |
| 1.5 | 2026-07-09 | BionicLoop engineering | Split into a participant Daily Use Guide and a Clinician & Study-Team Reference; refreshed every capture from the current software; rewrote Manual BG (digit keypad with confirmation tap), meal announcement (guided first step, carb comparison row, in-place timing recovery), and cancel-delivery flows; added Home alert-stack presentation, expanded Recent Dose Steps with status meanings, chart reading guide, and app-generated alert / meal-availability reference tables; added review sign-off page |
| 1.6 | 2026-07-10 | BionicLoop engineering | Added first-launch coverage: new section 10.3 (one-time Device Setup on a new phone, completed before sign-in, with a caution that the target profile starts on Pregnancy), new section 11.2 Clinical Unlock Setup (automatic and setup-code paths, one-time-per-phone behavior, single-use codes, retry pause), sign-in section now distinguishes a set-up phone from a new phone, target-change approval step documented, four new figures; figure index renumbered |
| 1.7 | 2026-07-14 | BionicLoop engineering | Added section 4.1 (If Sensor Readings Stop): fingerstick cadence during a sensor outage (every 2 hours; hourly after a reading over 200 or under 80), the Home countdown line, what Backup Basal Running means, and the due-soon/overdue alert tiers; alert reference tables regenerate from the app source and include the three new outage alerts |
| 1.8 | 2026-07-14 | BionicLoop engineering | Clinical review feedback (C. Powe): first-launch defaults are now Standard profile, 120 mg/dL target, 40-minute TMAX (Fiasp); the first-launch caution flips accordingly (select Pregnancy for participants assigned to the Pregnancy configuration); TMAX described as insulin action time; new section 11.5 Switching to a New Participant (New Participant Reset erases all participant data and sign-in for reused phones; the same-participant algorithm reset is relabeled); app install/reinstall note added; wizard and Clinical Settings figures recaptured; first-launch step regrouped into labeled Participant / Mode & Glucose Target / Insulin Settings boxes with per-mode target defaults (Standard 120, Pregnancy 110) and the review box now shows the mode; New Participant Reset offers to stop a running session first; empty-store loads return first-launch defaults without persisting them; Home chart figures recaptured with the demo live reading aligned to the chart series (no vertical jump at Now); notification-permission guidance added (readiness-checklist item and Section 7 note, 2026-07-14 audit) |
| 1.9 | 2026-07-24 | BionicLoop engineering | Replaced the in-place second-tap Manual BG confirmation with a separate exact-value review alert; Change returns to the entered value and Use confirms it. Direct fingerstick-request states now share the Home gold BG-button emphasis. Added Part 1 Section 7, Using a Temporary Target (Pregnancy Mode): start/review/confirm flow with no preselection, active-state display on Home and the Exercise and Insulin Delivery screen, early end, exact-time automatic end with the Temporary Target Ended notification, activation-block messages, and a study-team note on primary-vs-safety/backup target separation (RA-022, clinical decision 2026-07-24); prior Sections 7-8 renumbered to 8-9. Settings walkthrough lists the new Exercise and Insulin Delivery screen (Temporary Target, Pod Activity suspension guidance, reset-location note). Clinical Settings documents the Standard-to-Pregnancy 90% meal-split draft default (stored values unchanged until Save). Sensor-outage section documents the overdue-fingerstick repeat (about every 15 minutes) and the countdown line flipping to overdue. Recent Dose Steps documents fallback-schedule rows (armed / schedule updated / schedule checked - unchanged, with per-segment rate provenance) and canceled/partial evidence persistence across relaunch per the RA-017 controlled clarification. Alert and meal-availability reference tables regenerated from app source. Three Temporary Target figures pending capture; figure numbers assigned at capture. |
| 1.10 | 2026-07-30 | BionicLoop engineering | Moved the existing Pod suspend/resume control directly onto Exercise and Insulin Delivery and removed its duplicate from normal Pod Settings. Clarified that the selected duration is a reminder only, insulin remains suspended until manually resumed, and suspend alerts open the relocated control. |
| 1.11 | 2026-07-30 | BionicLoop engineering | Moved Exercise and Insulin Delivery above User in Settings, aligned Temporary Target selectors/actions with the app control style, removed the unrelated participant-reset pointer, and added an explicit warning before target-only or duration-only selections are discarded. |
| 1.12 | 2026-07-31 | BionicLoop engineering | Added Dexcom G7 replacement-sensor recovery instructions for the always-visible Scan for new sensor action, persistent replacement progress, and the ten-minute Sensor Not Connected guidance. Clarified that reading age alone never changes the bound sensor. |
| 1.13 | 2026-08-20 | BionicLoop engineering | Clarified that an outlined red drop on the Home chart means a submitted fingerstick BG is waiting for a dosing step, and that the drop fills when the step uses it. |
| 1.14 | 2026-08-21 | BionicLoop engineering | Added deterministic Build 843 captures for Temporary Target selection, confirmation, and the active Home state; refreshed affected Build 843 workflow captures and completed the figure index. |
| 1.15 | 2026-08-27 | BionicLoop engineering | Aligned replacement-sensor instructions with RA-023: keep the study phone next to the intended replacement sensor during acquisition and verify the connected sensor/readings against the intended Dexcom app session before relying on BionicLoop. |
| 1.16 | 2026-09-01 | BionicLoop engineering | Recaptured the complete Build 843 figure set under controlled simulator conditions so all Home-screen figures show the intended FOR INVESTIGATIONAL USE ONLY banner and the exact v1.0 (843) build identity. No product behavior or shipping source changed. |
| 1.16 approval | 2026-09-03 | Camille Powe, MD | Approved IFU-BL-001 revision 1.16 for IDE submission by controlled correspondence. |
| 1.17 | 2026-09-04 | Software Developer | Applied the approved labeling corrections: clarified Pregnancy configuration terminology, corrected Clinical Unlock section references, replaced an internal build-tool instruction, used plain punctuation, and documented the built-in investigational badge shown when no remote banner configuration is available. No product behavior or shipping source changed. |
Table of Contents
Investigational Use Statement
BionicLoop is investigational software and is not approved for independent clinical treatment use.
- Use only under approved study protocol and supervision.
- Use only after protocol-specific training on Dexcom G7, Omnipod DASH, and BionicLoop workflows.
- Do not rely on BionicLoop as the sole basis for treatment decisions outside approved investigational procedures.
- Follow site escalation procedures for therapy-impacting alarms, workflow failures, device faults, and documentation.
How This Guide Is Organized
| Part | Audience | Contents |
|---|---|---|
| Part 1 - Daily Use Guide | Participants and trained supervised operators | The Home screen, entering a fingerstick BG, keeping dosing running when sensor readings stop, announcing meals, stopping a meal delivery, responding to alerts, when to contact the study team |
| Part 2 - Clinician & Study-Team Reference | Clinicians and study staff | System overview, readiness checklists, first launch on a new phone, clinical settings and algorithm session control, device workflows, dose-history review, complete alert and meal-availability reference tables, troubleshooting, documentation and escalation |
This guide does not replace:
- Dexcom G7 app instructions,
- Omnipod DASH setup and safety instructions,
- the study protocol,
- site-specific escalation procedures.
Part 1 - Daily Use Guide
1. The Home Screen
Home is the first screen you see and the place to check before doing anything else.
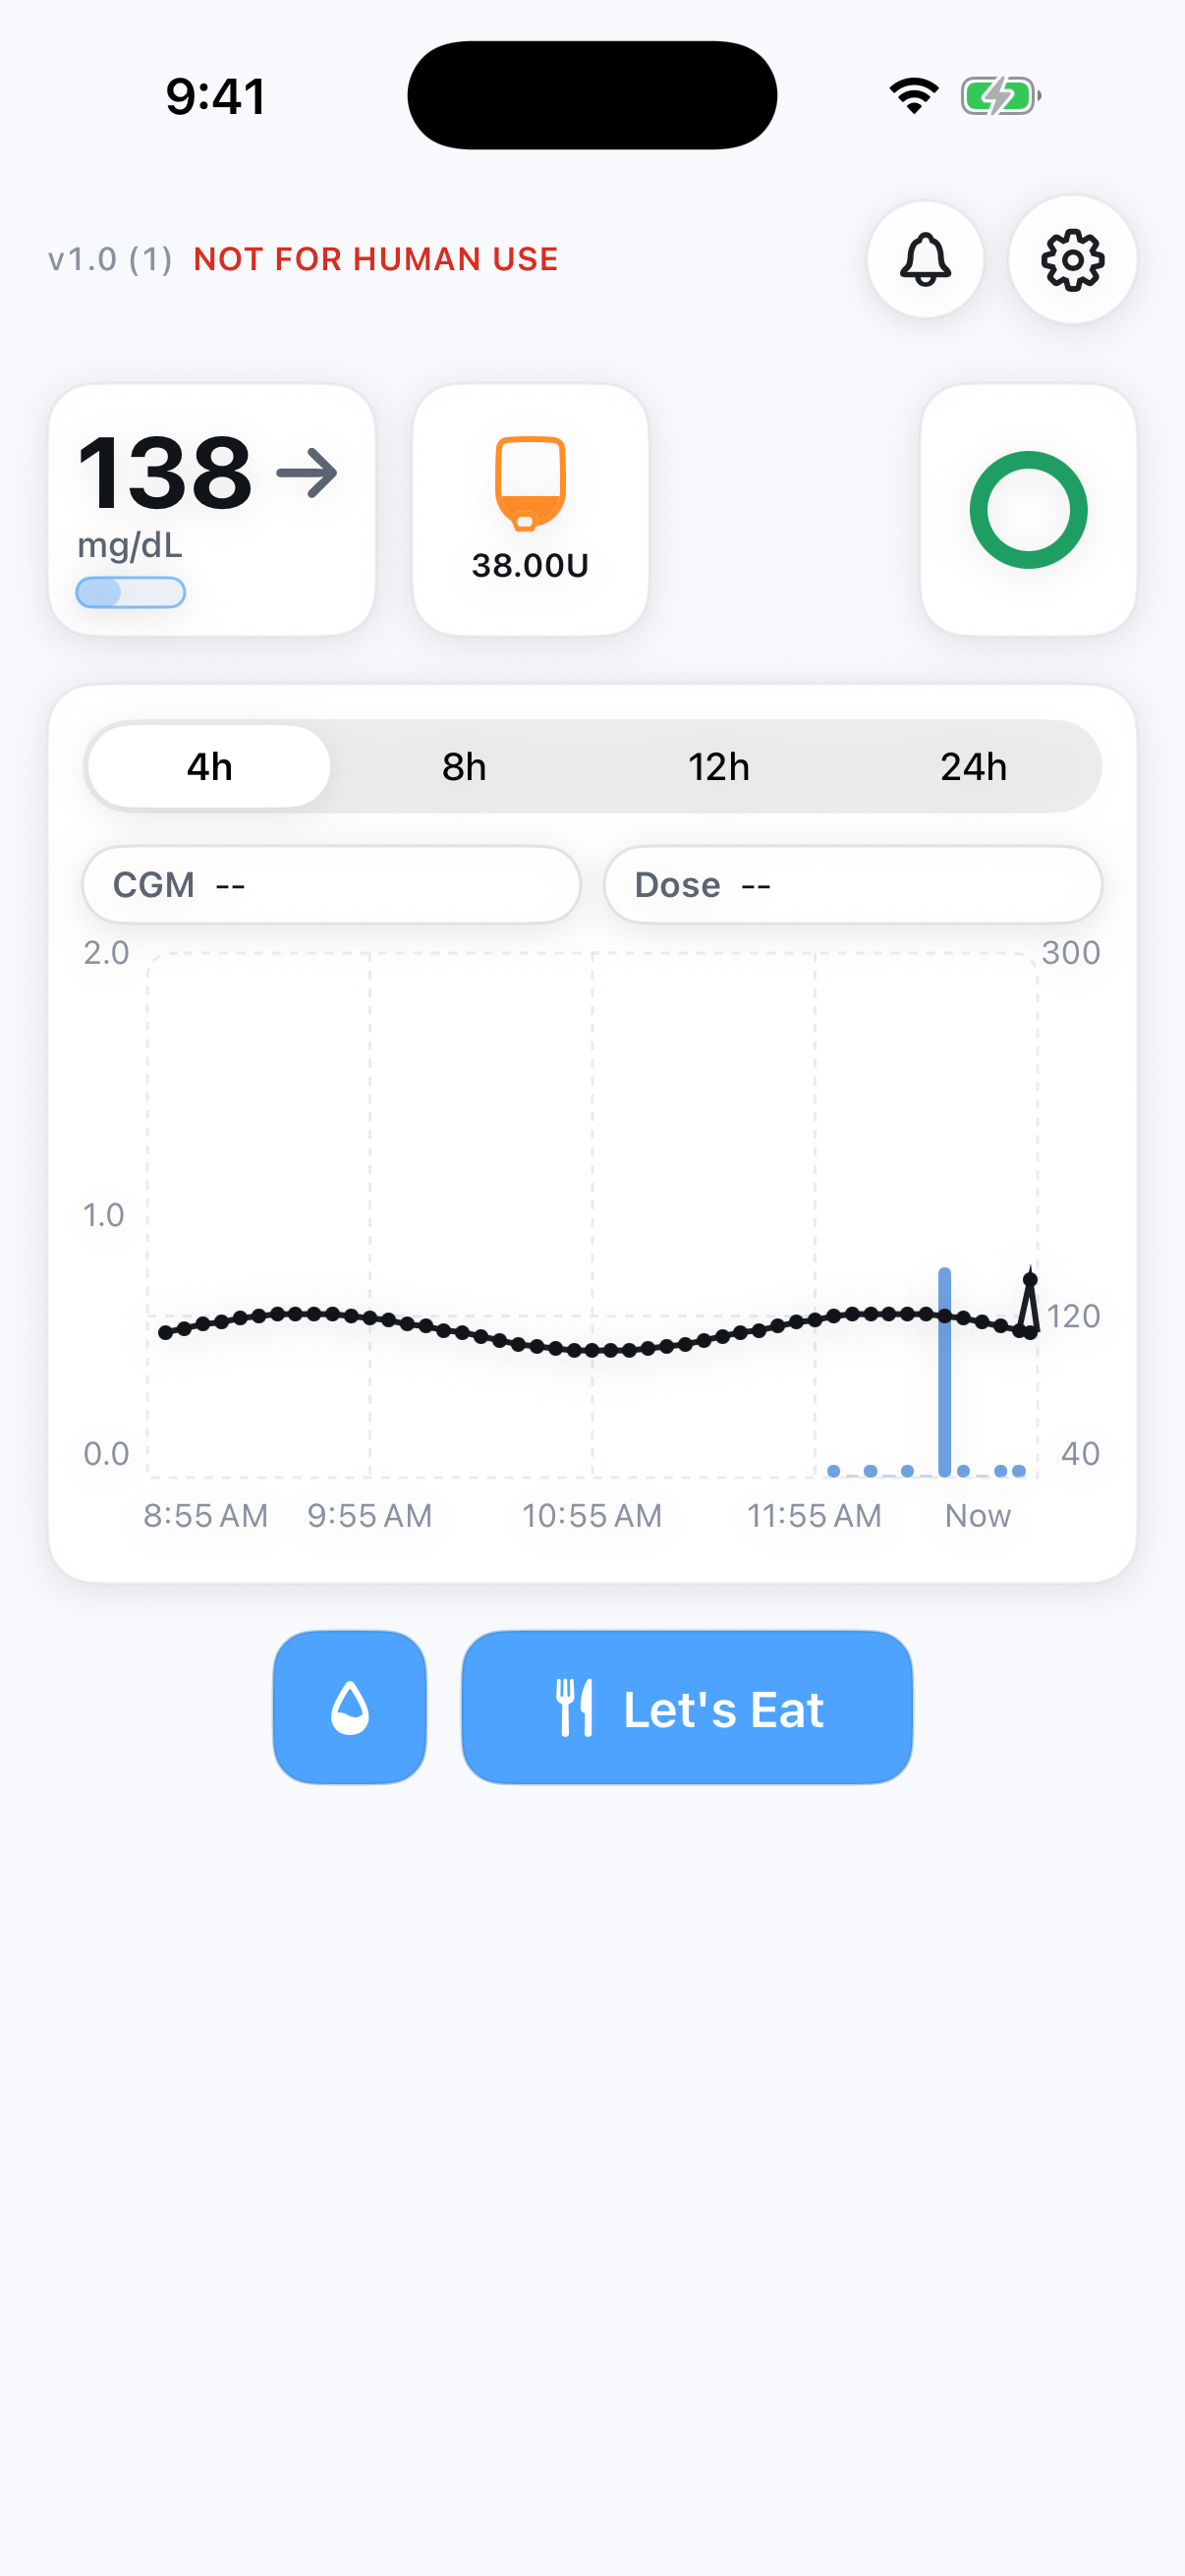
1.1 What Each Area Shows
| Home area | What it tells you |
|---|---|
| Glucose card (top left) | The most recent CGM value and trend arrow |
| Pod card | Insulin remaining in the Pod |
| Status ring (top right) | Green ring: automated dosing is running normally |
| Investigational-use badge | Shows the study-configured label. If no banner configuration is available, Home shows the built-in NOT FOR HUMAN USE label. |
| Alert area (above the chart) | The most important active alert, if any |
| Chart | Recent glucose (dots) and insulin given (bars), with 4h–24h views |
| Droplet button | Enter a fingerstick BG |
| Let's Eat button | Announce a meal |
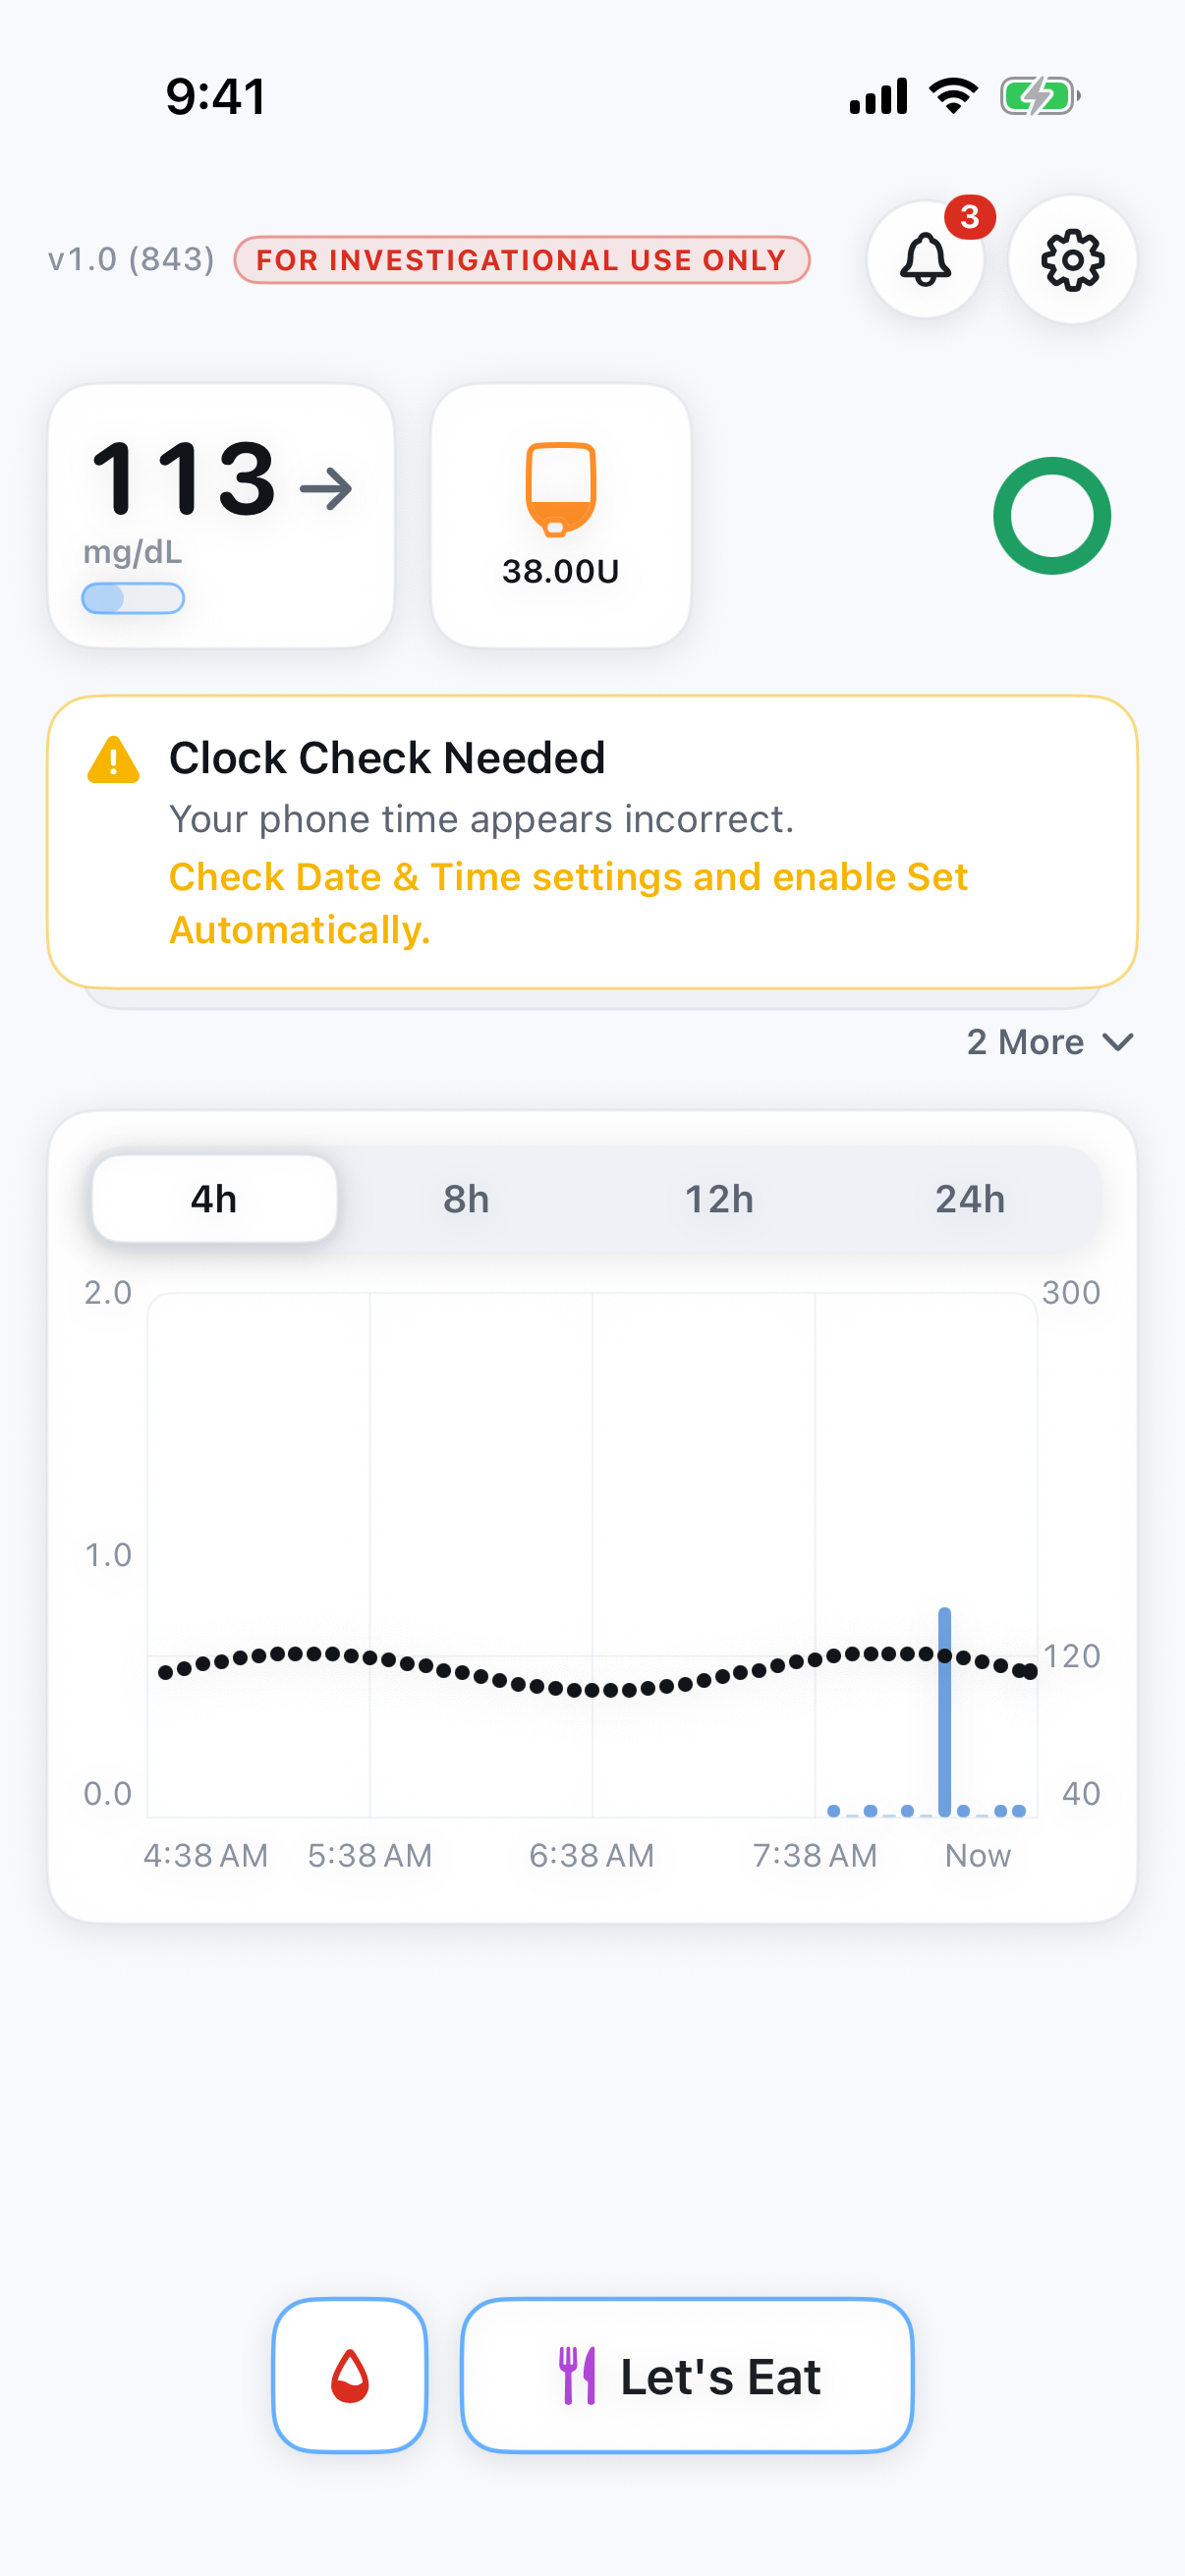
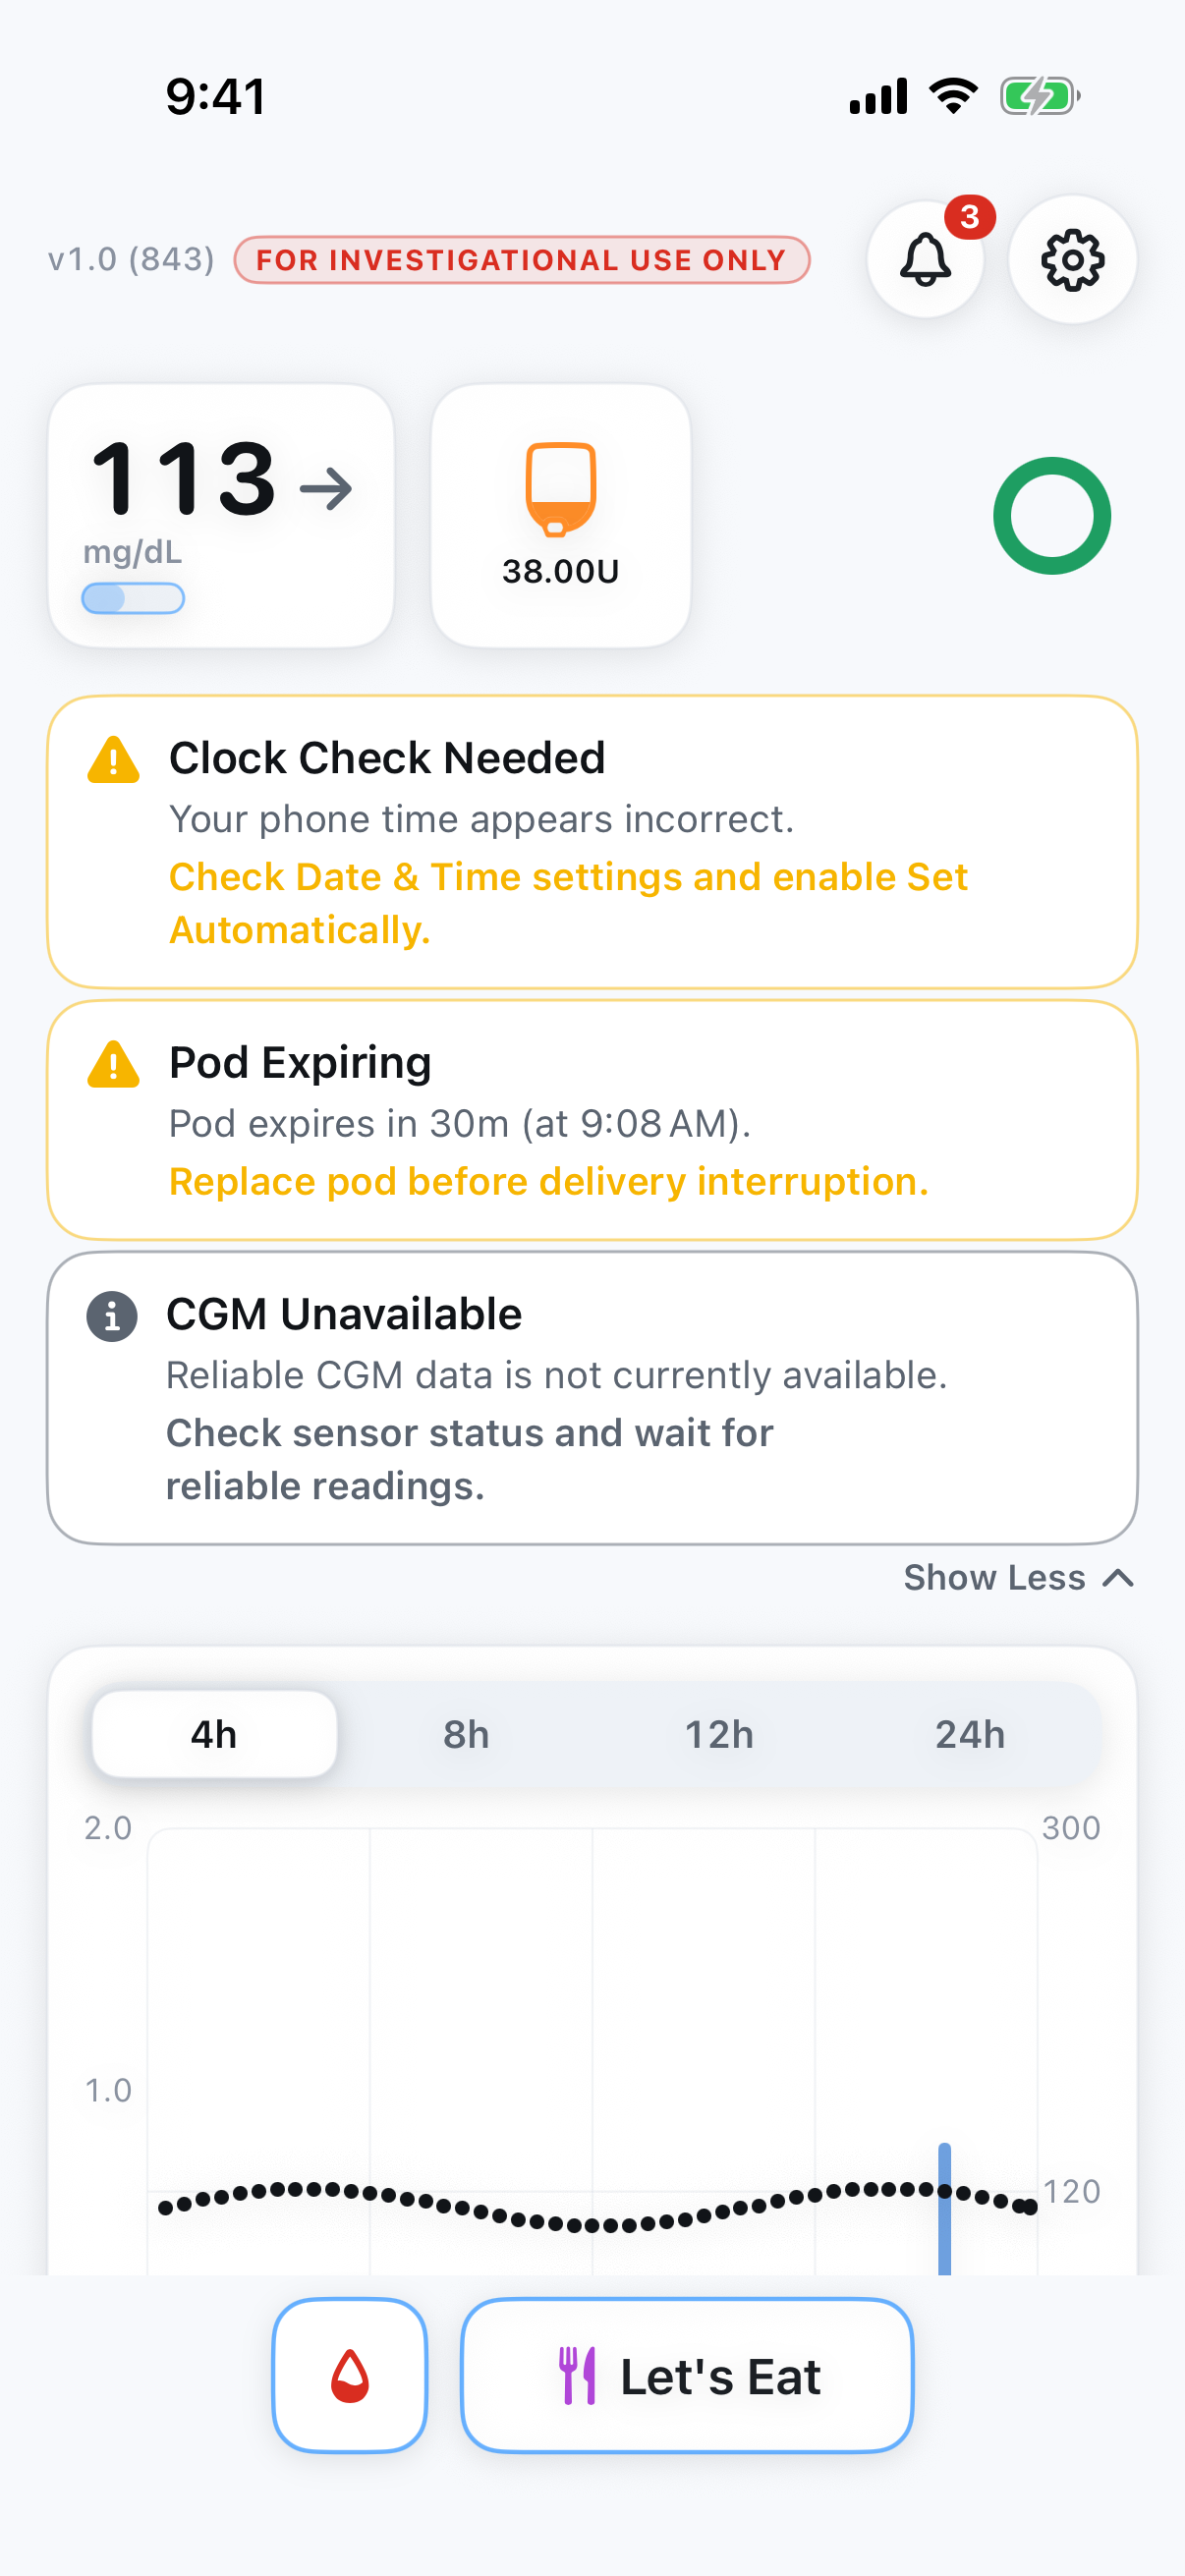
1.2 When Alerts Are Showing
When something needs attention, the most important alert appears as a card above the chart. If more alerts are active, a "2 More" control appears under the card - tap it to see the rest, and "Show Less" to collapse them again. The bell at the top shows the total count and opens the full Alert Center. When a related alert is hidden because the visible alert already explains it, a "1 related alert in Alert Center" link appears under the card - tap it to see everything.
1.3 Before You Act
Do not announce a meal or enter a BG without checking first that:
- a current glucose value is showing (not missing or old),
- the Pod card shows an active Pod,
- no red (safety-critical) alert is unresolved.
If Home does not look ready, read the alert guidance in section 8 or contact the study team.
2. Reading the Chart
The chart shows glucose dots on top and insulin bars along the bottom. A few visual details carry meaning:
| What you see | What it means |
|---|---|
| Solid colored bar | Insulin was given at that step |
| Bar with a yellow outline extending above it | Less insulin was given than planned - the outline shows the planned amount |
| Lighter, faded bars | Catch-up records added after a connection gap; the insulin was already accounted for |
| Small tick at the baseline | The app ran on schedule and no insulin was needed |
| Nothing at all | No dosing step ran at that time |
| Outlined red drop | A fingerstick BG was submitted and is waiting for a dosing step |
| Filled red drop | A dosing step used the submitted fingerstick BG |
Touch and hold the chart to scrub: readouts appear above the chart showing the glucose and insulin values at the time under your finger, and disappear when you let go.
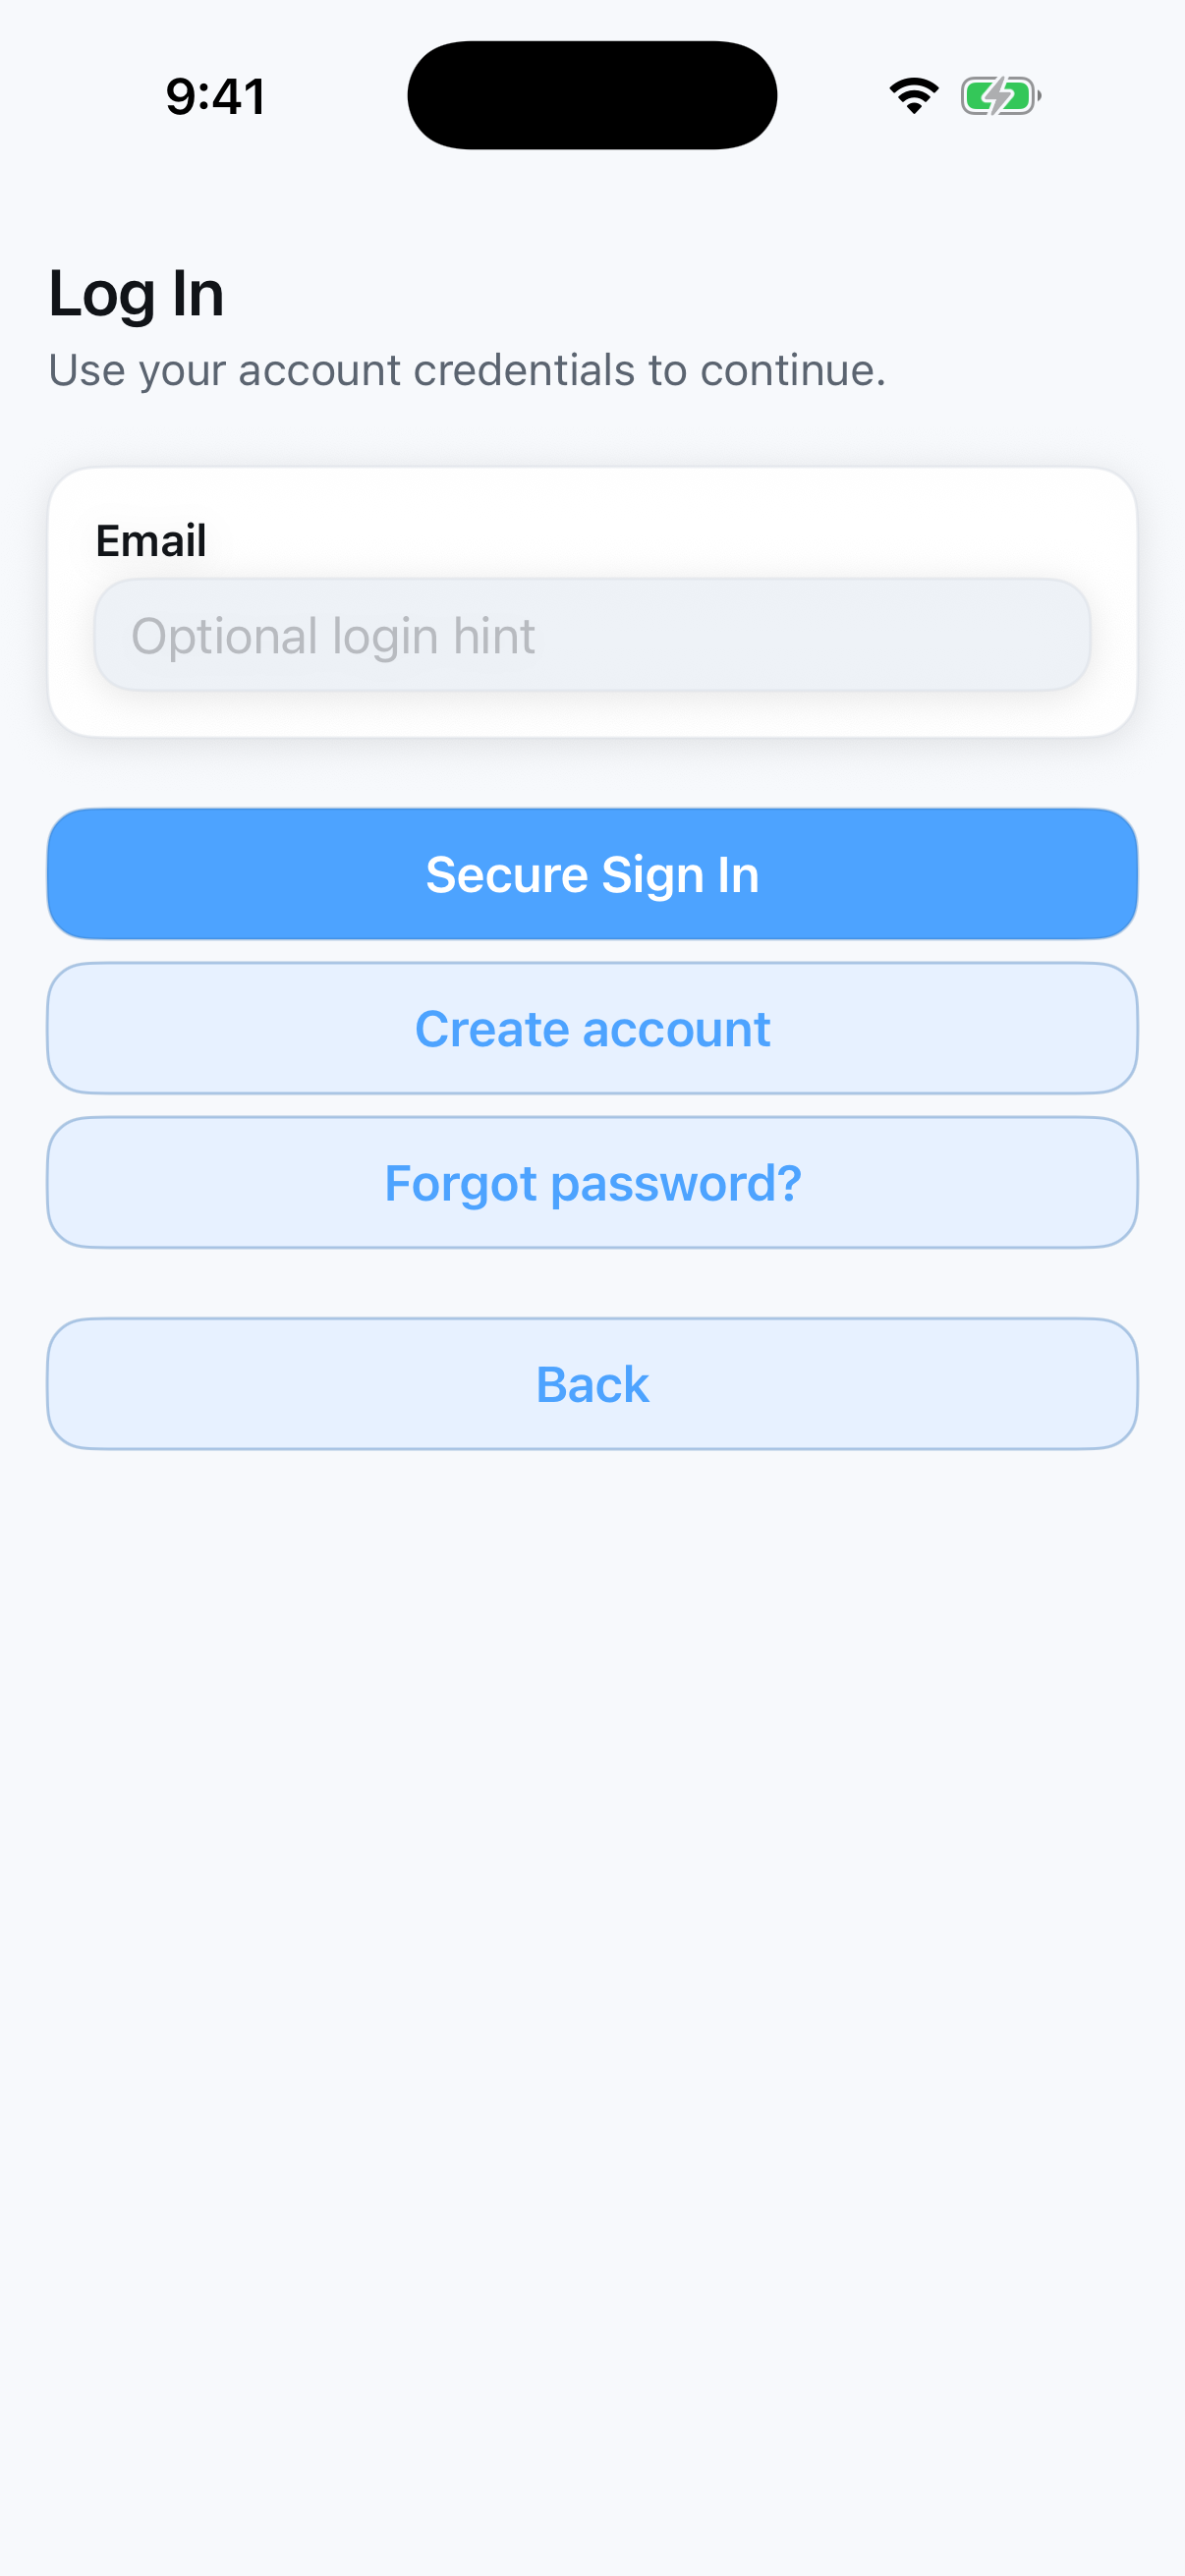
3. Signing In
On a phone that is already set up for the study, launching the app goes straight to sign-in. (The very first launch on a new phone instead asks for clinical settings before sign-in - that one-time setup is a study-team task, described in Part 2, Section 11.3.)
- Launch the app.
- Enter the account identifier provided by the study team.
- Tap
Secure Sign In. - Use
Create accountorForgot password?only when the study team directs you to. - If you cannot sign in, contact the study team - do not keep retrying.
If the app asks you to log in again while you are wearing the Pod, insulin delivery is not interrupted - signing back in restores remote monitoring for the study team. Sign back in when you can.
4. Entering a Fingerstick BG
Use the droplet button when the study workflow calls for a fingerstick blood glucose value. The value may be used for dosing decisions. It does not calibrate the CGM sensor.
- On Home, tap the red droplet button.
- Type the value on the keypad. The entry starts empty - the full value must be typed.
- Tap
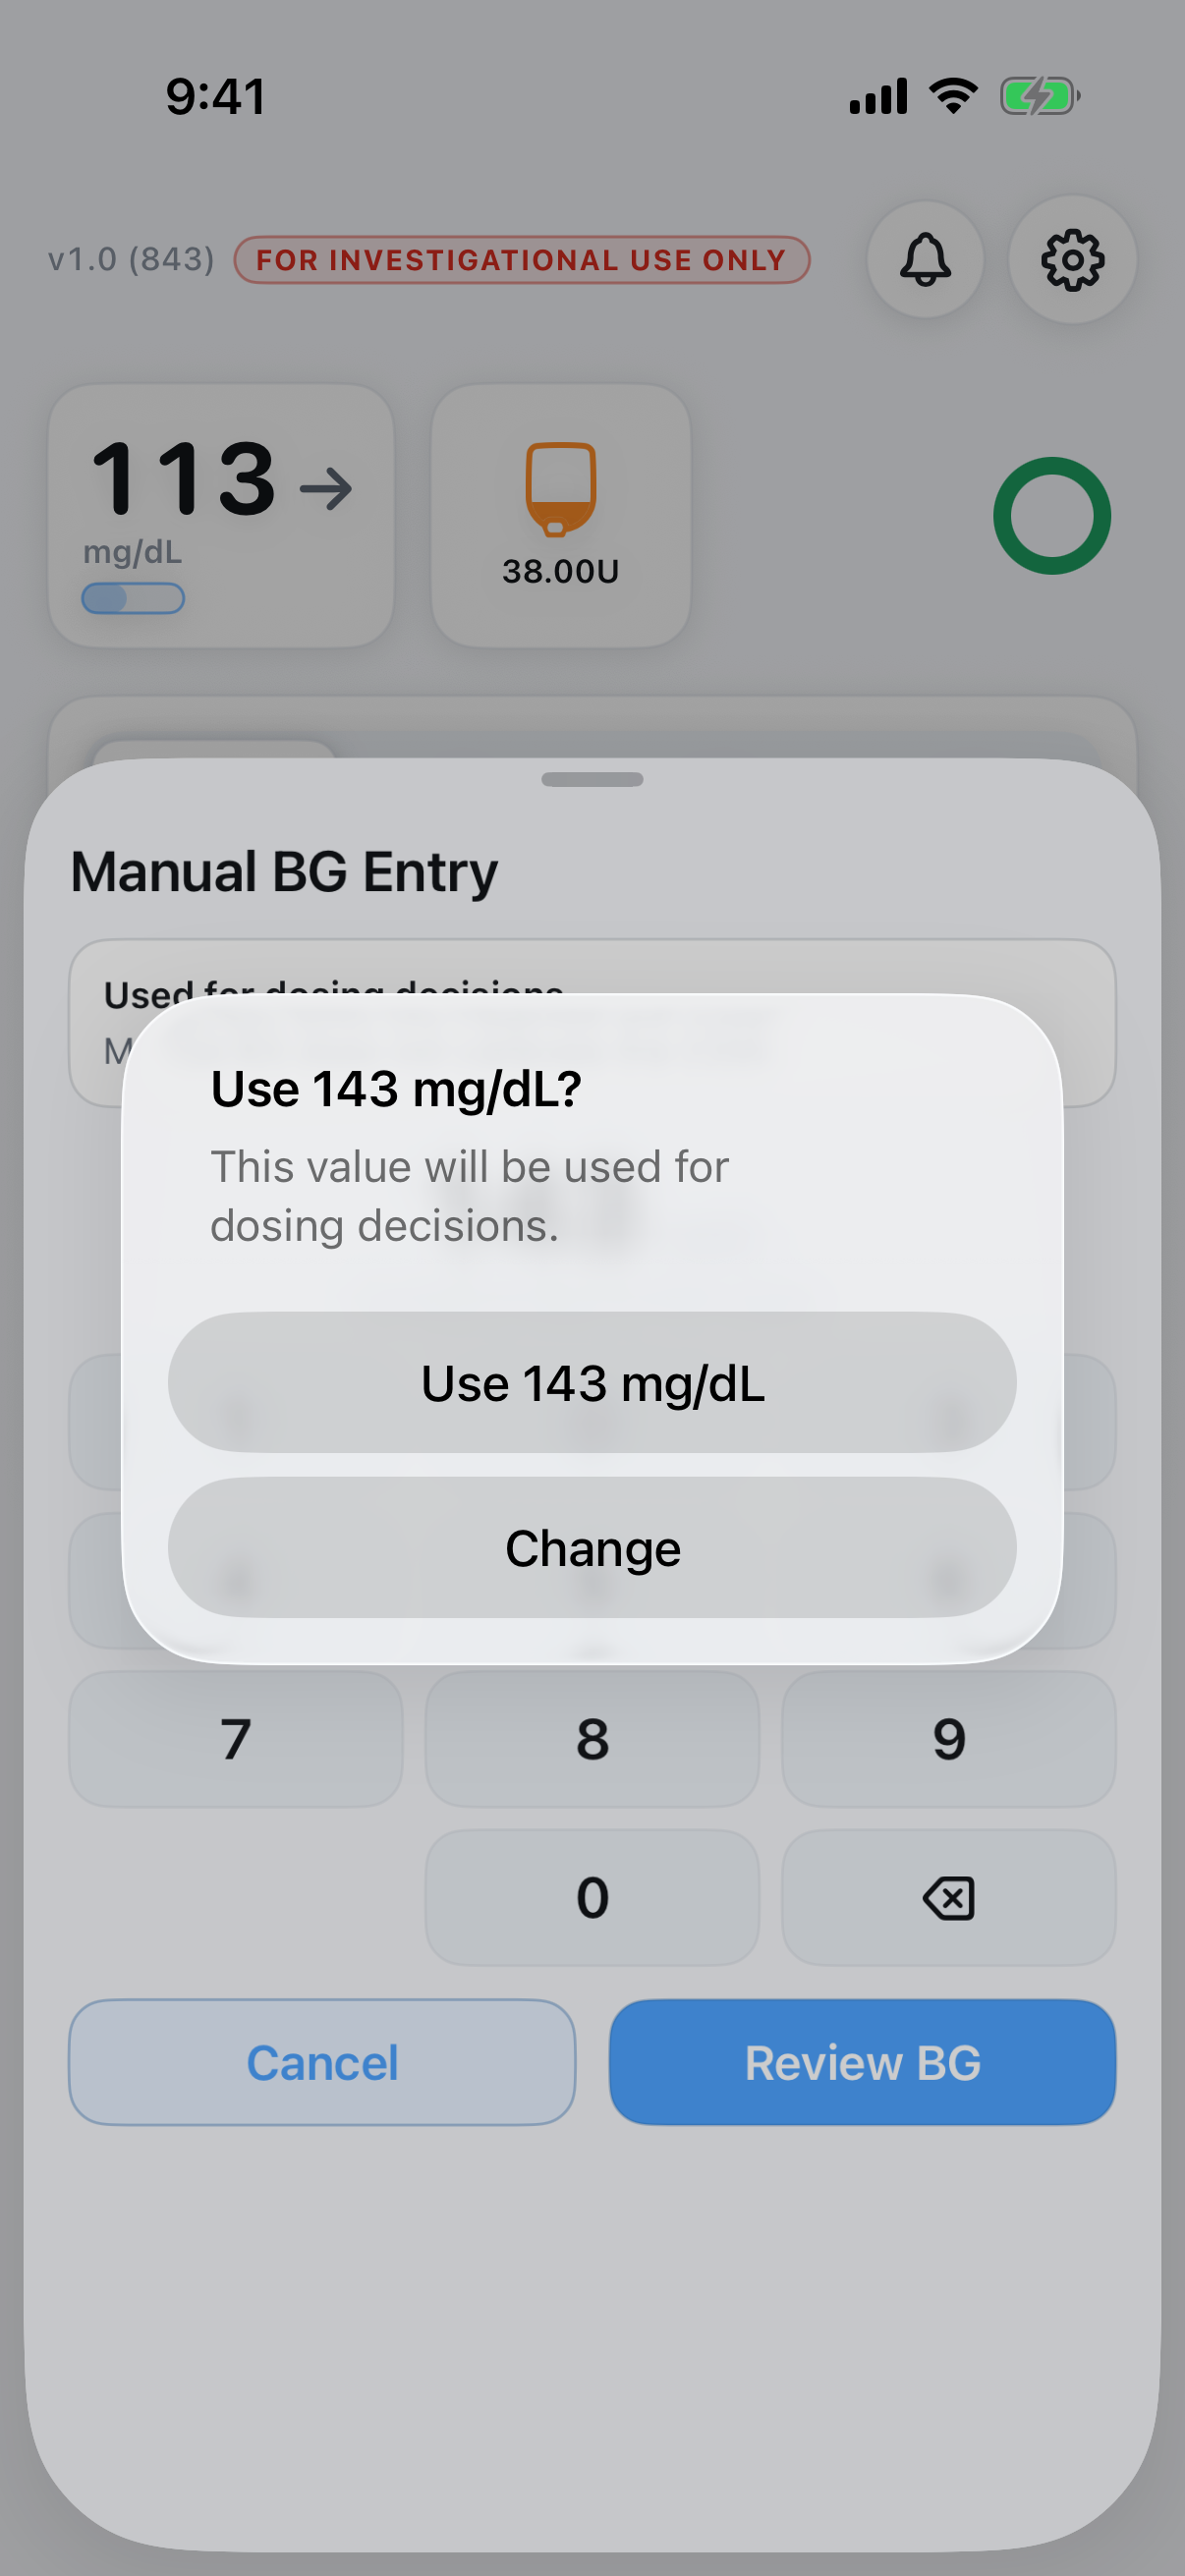
Review BG. - Check the exact value in the review alert (for example,
Use 143 mg/dL?). TapUse 143 mg/dLto submit, or tapChangeto return to the keypad without clearing the value. - Tap
Cancelat any time to close without submitting.
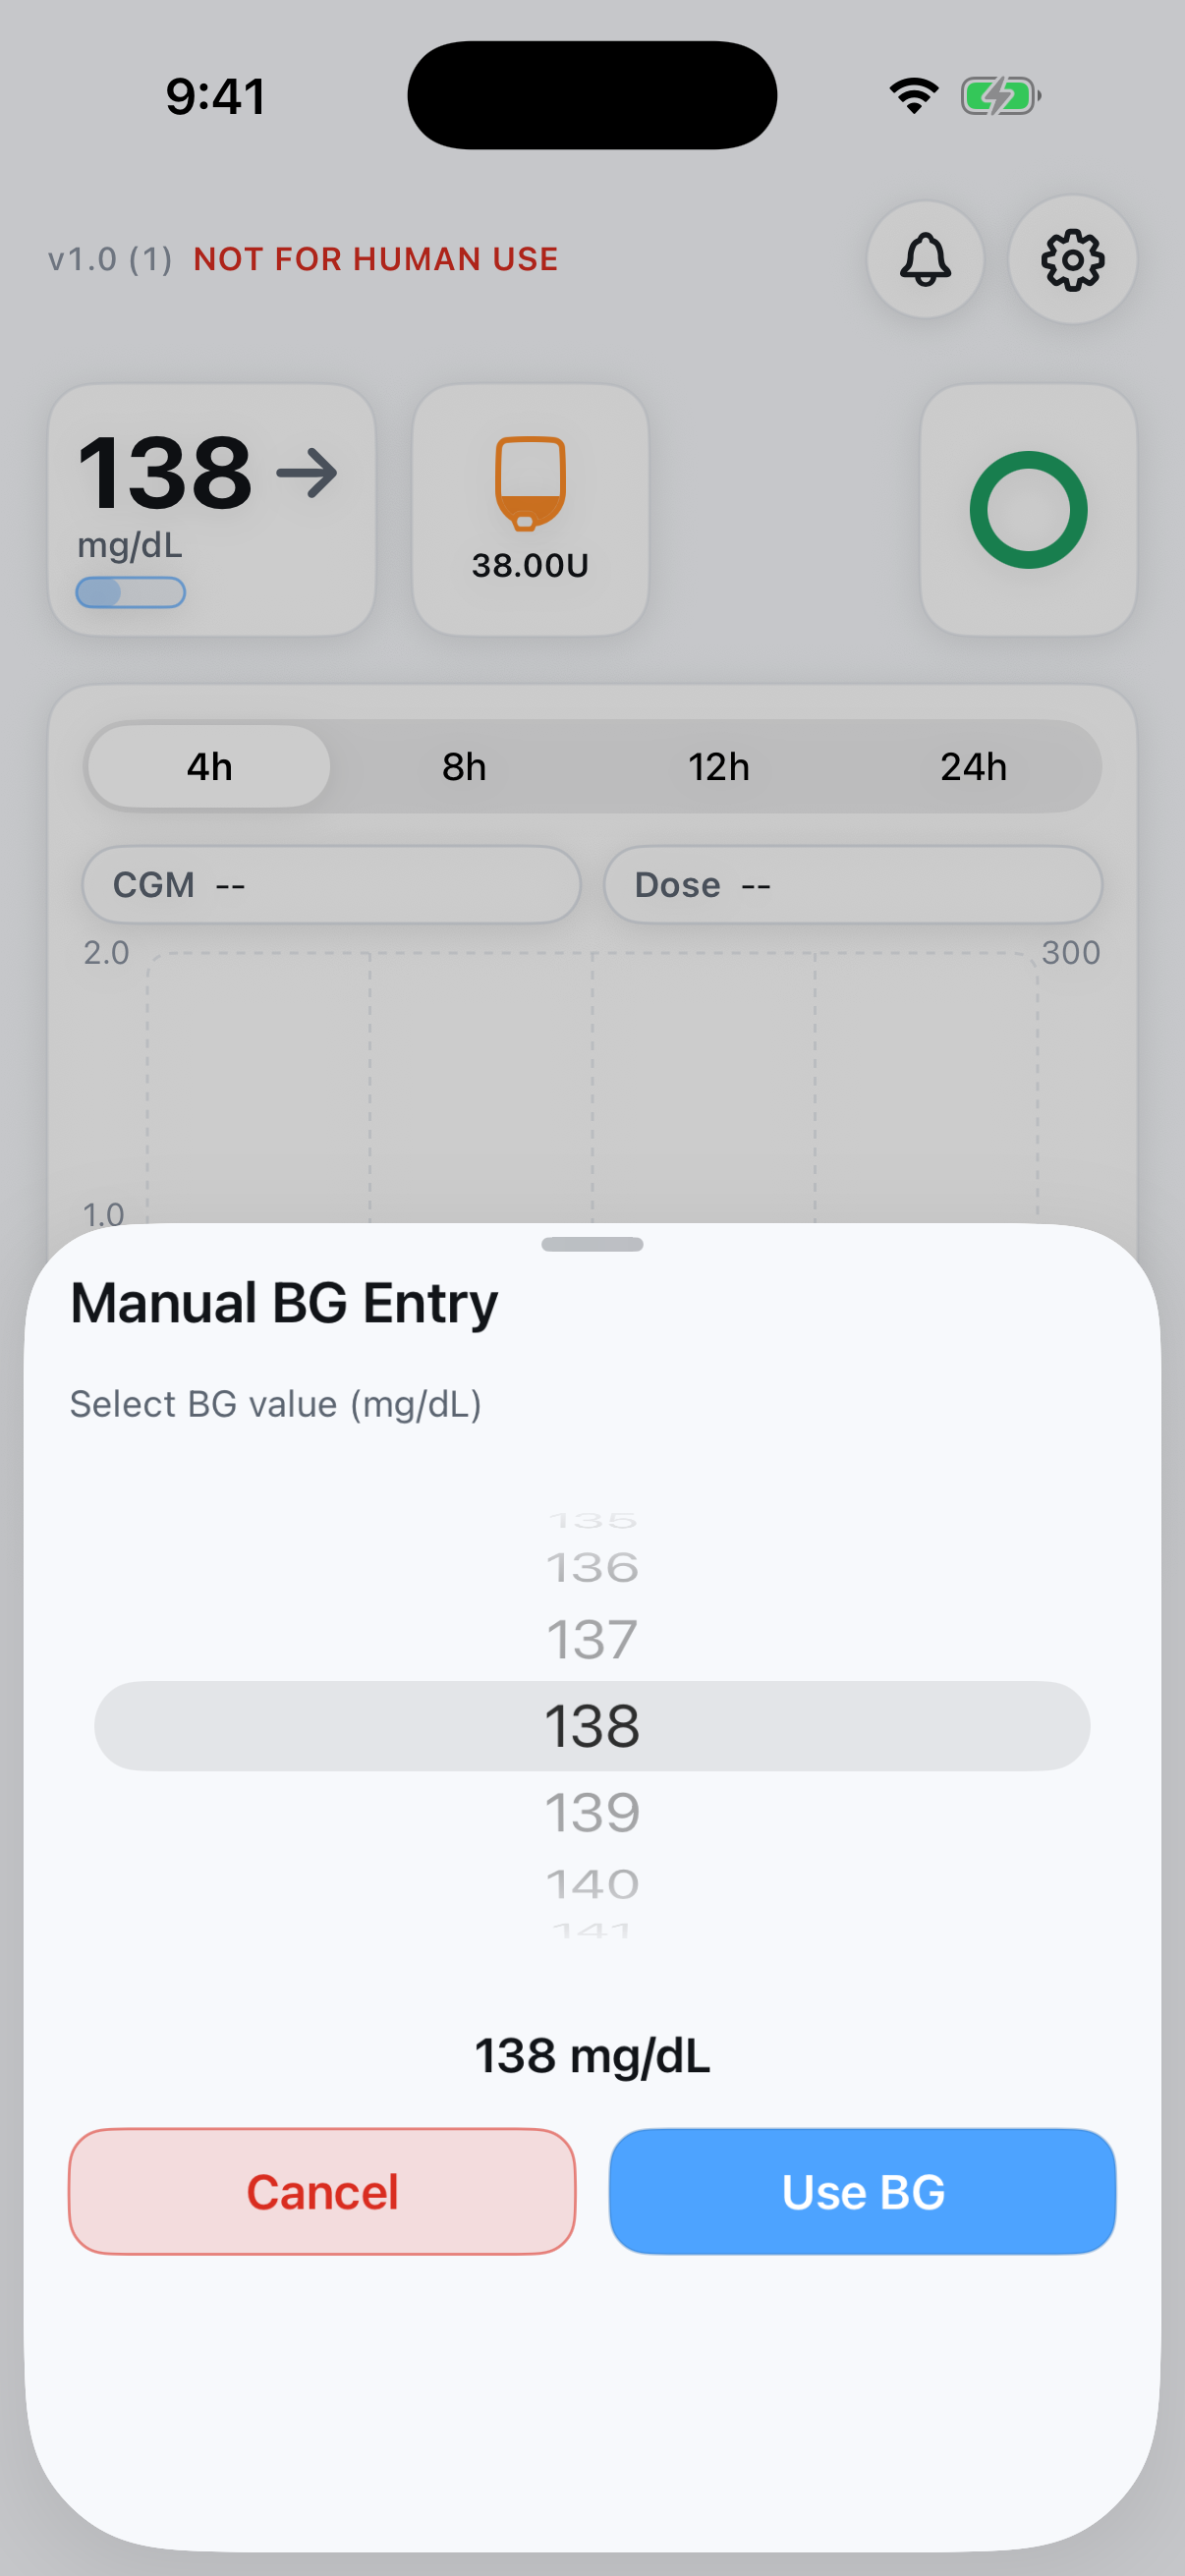
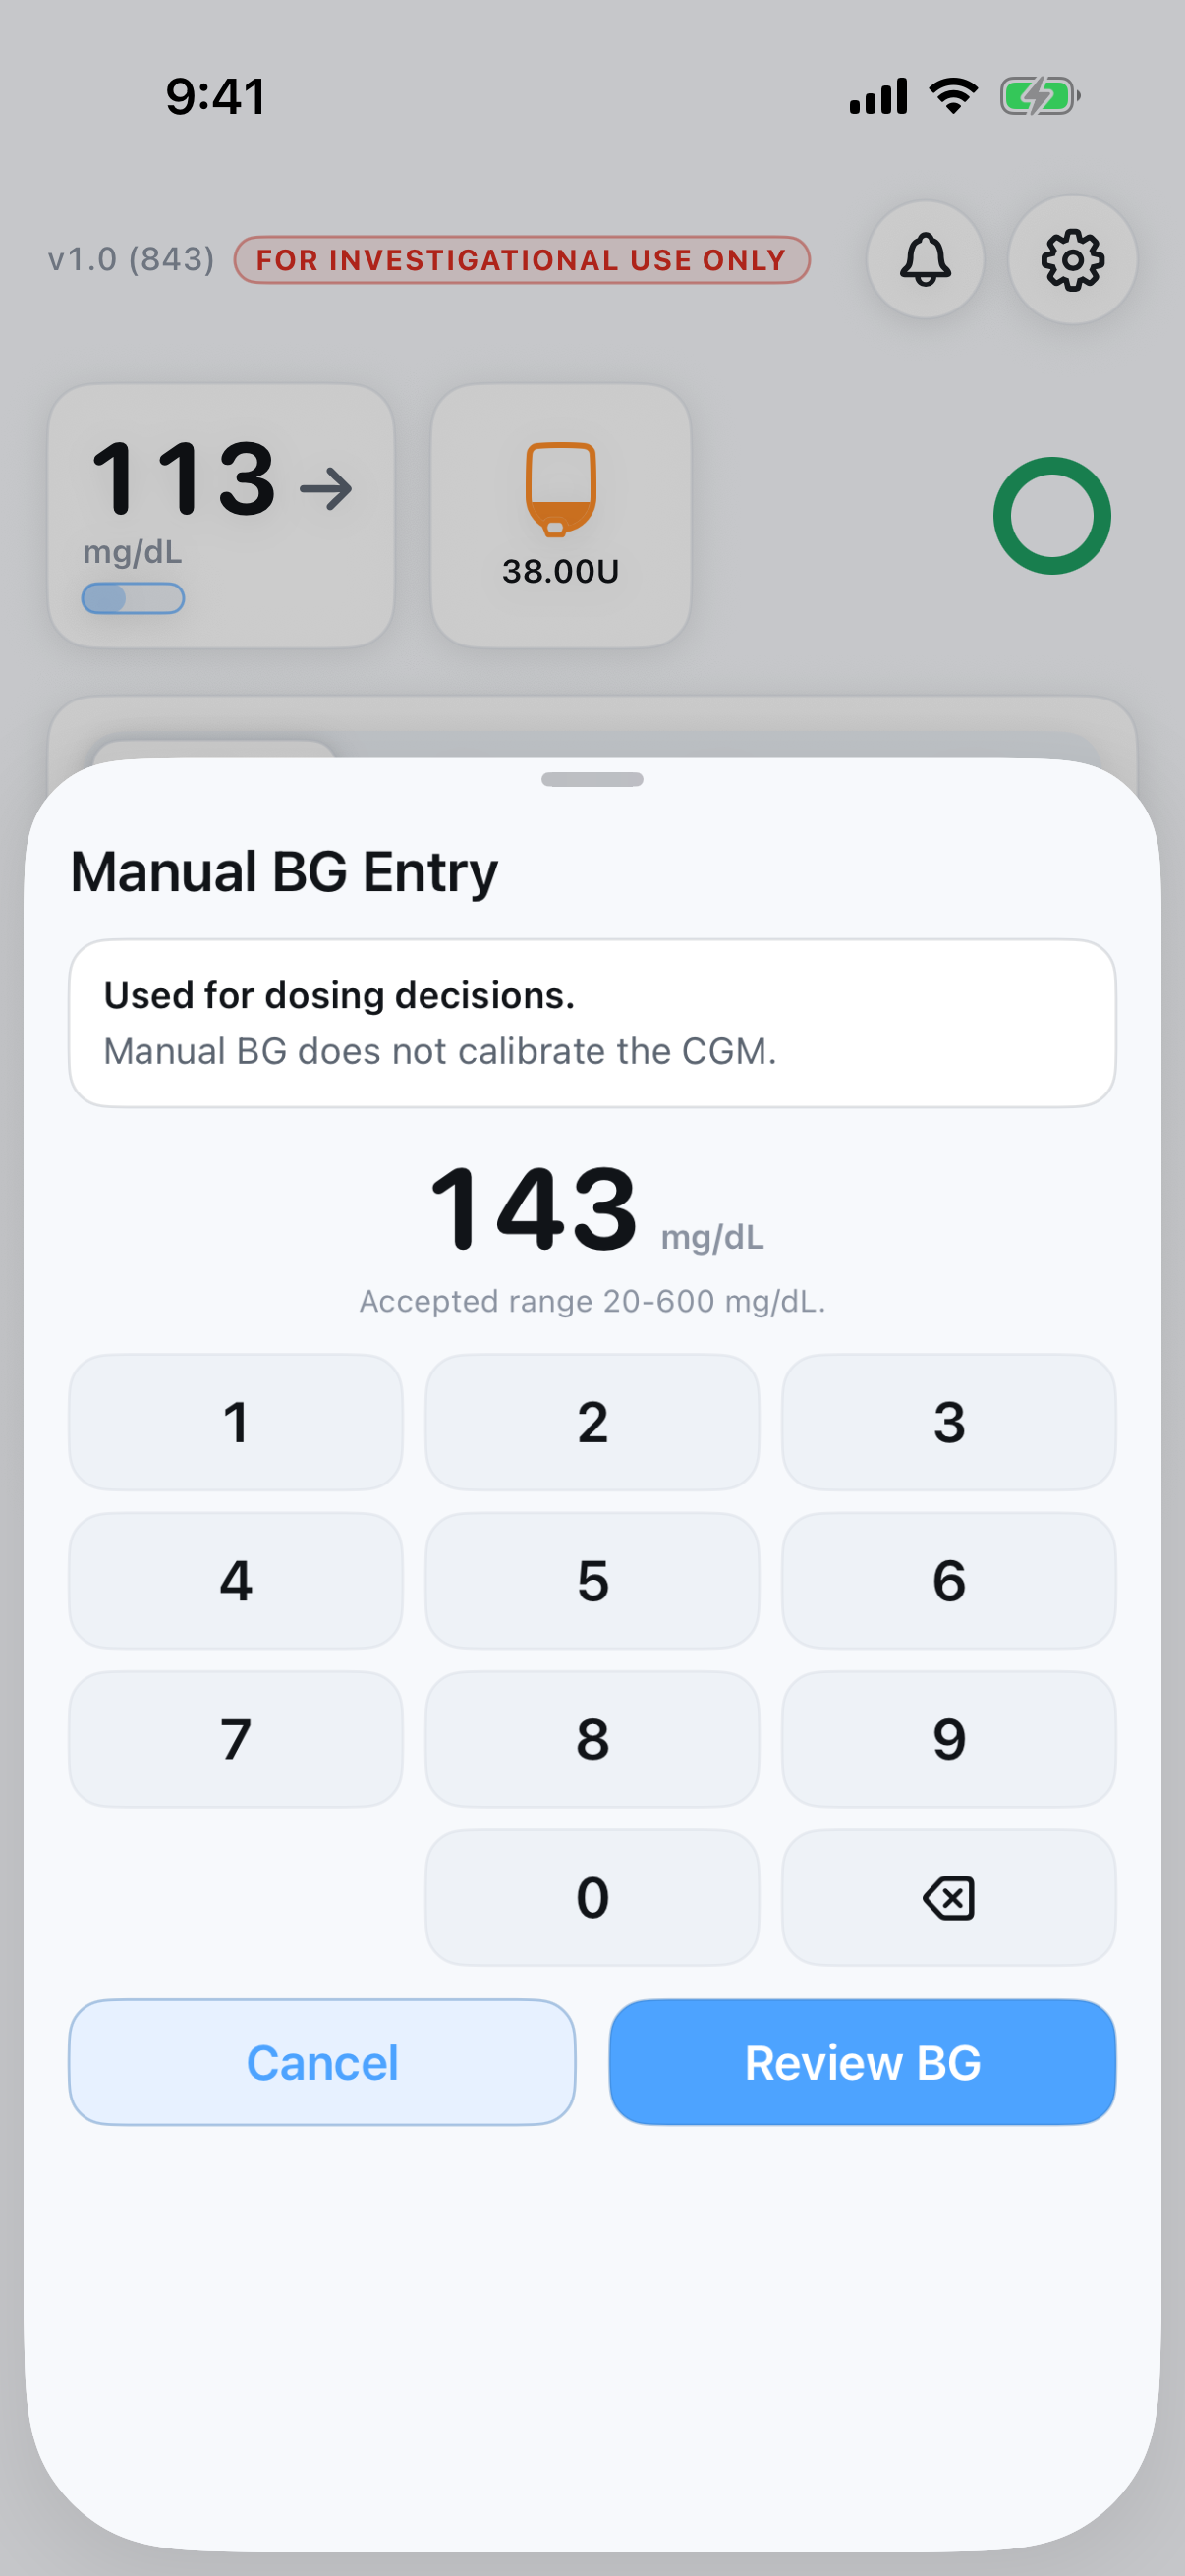
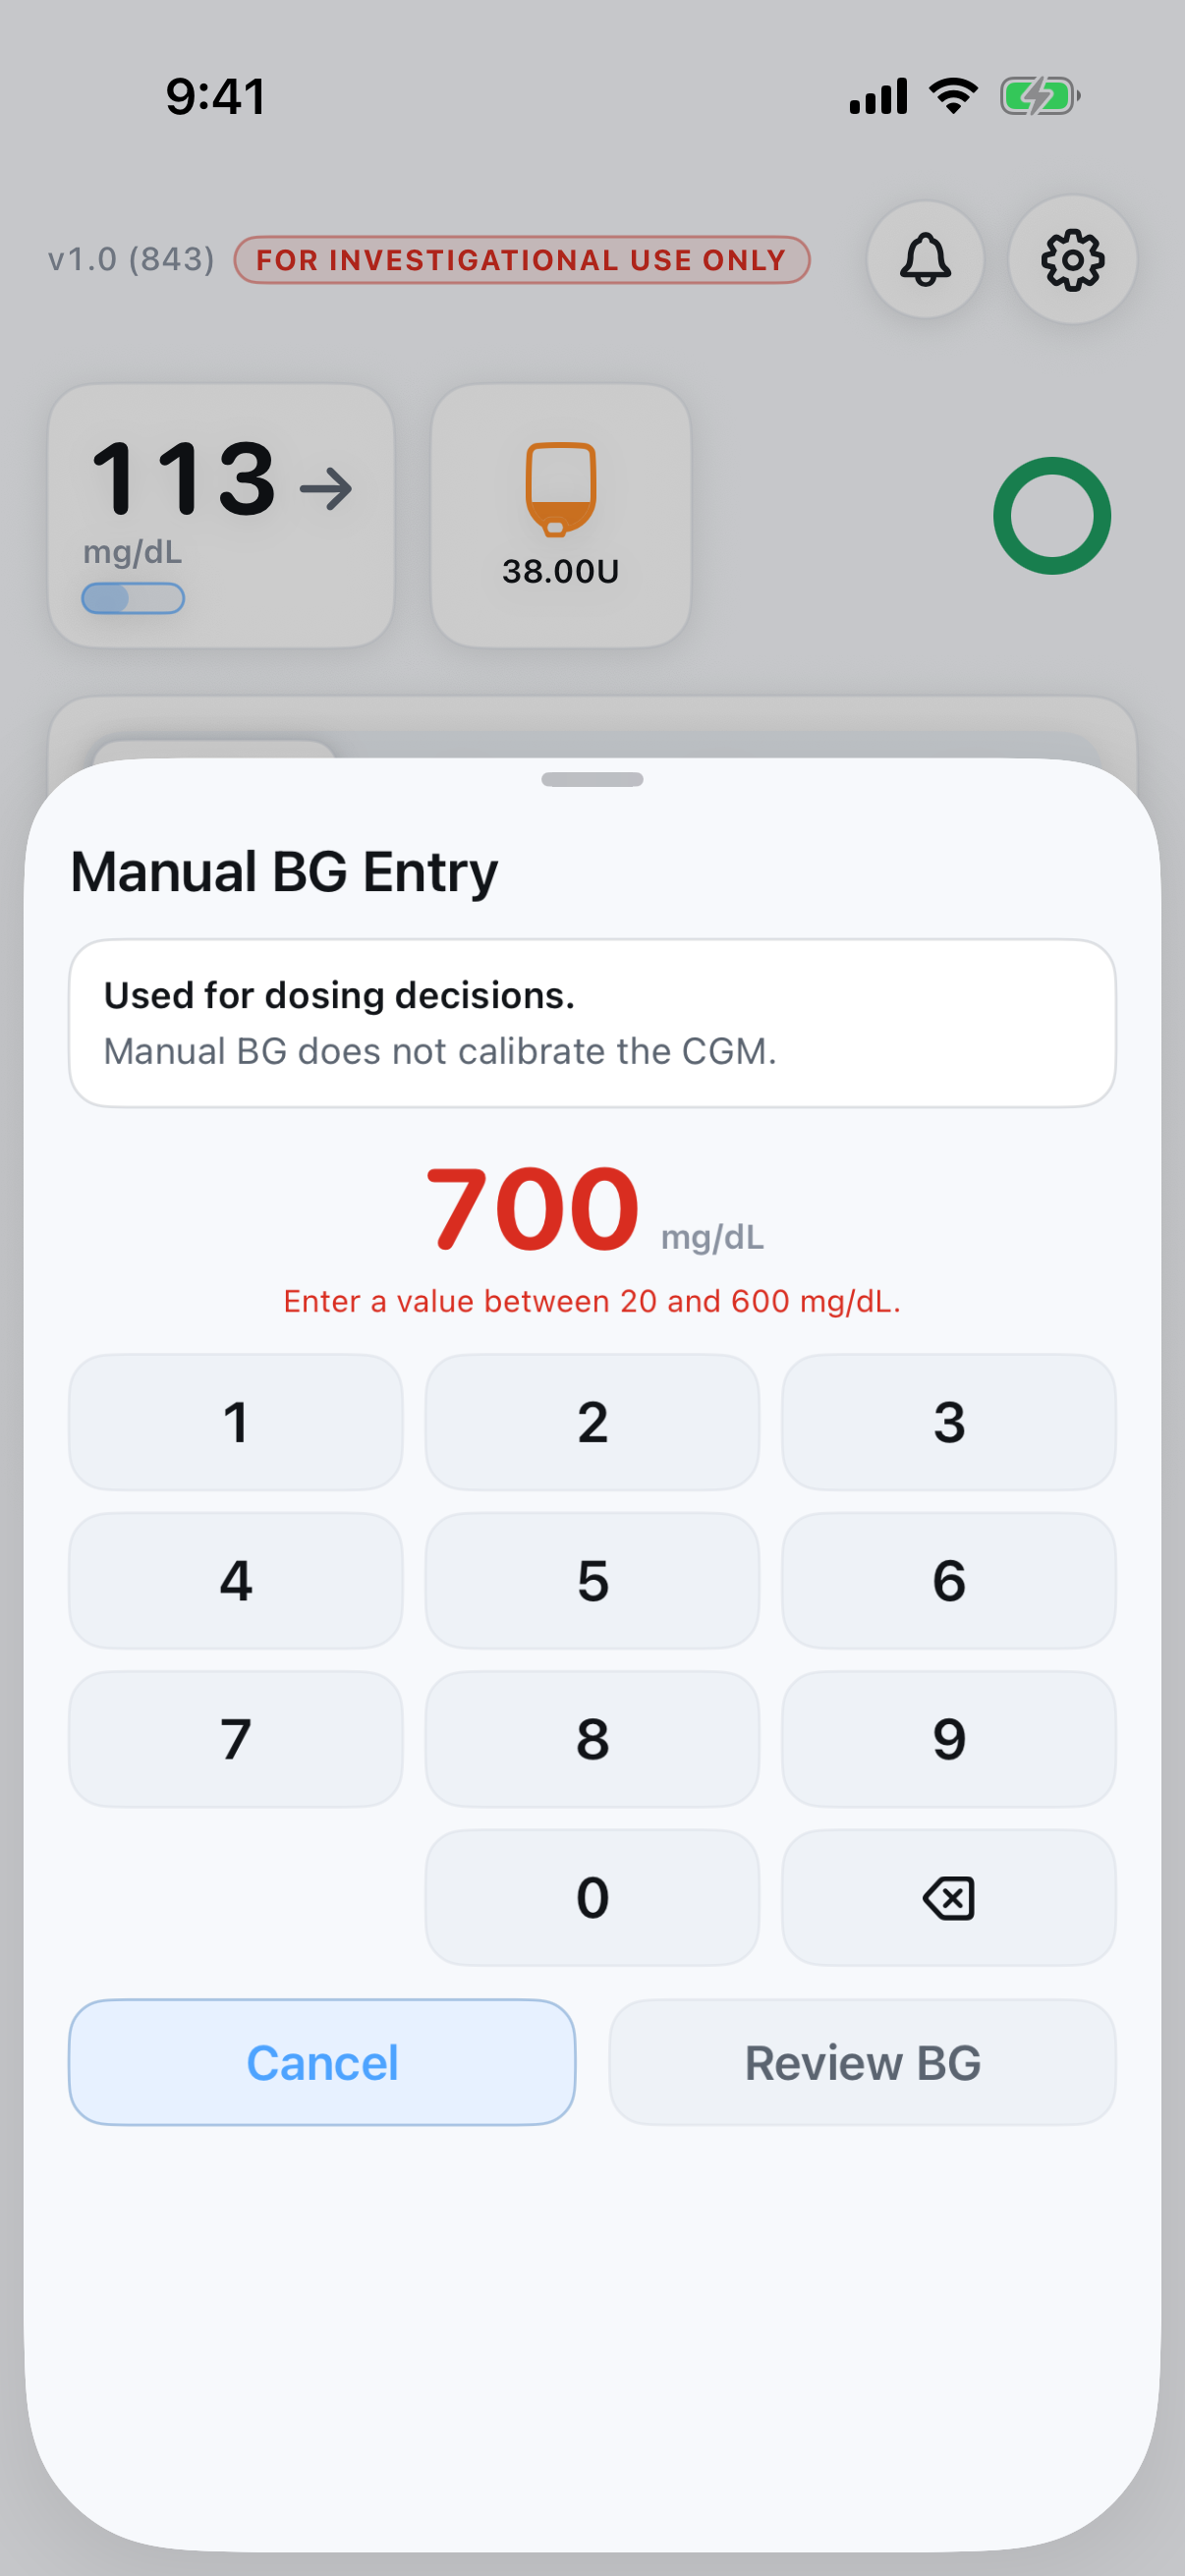
Accepted values are 20–600 mg/dL. A value outside that range shows a red message and cannot be submitted.
4.1 If Sensor Readings Stop
If the sensor stops sending readings, the app keeps automated dosing running as long as you enter fingerstick BGs on schedule:
- Home shows a line telling you when the next fingerstick is due ("Next fingerstick due by ..."). Enter a BG by that time using the red droplet button. Once the due time passes, the same line shows the check as overdue.
- Checks are due every
2 hours. After a reading over200or under80 mg/dL, the next check is due in1 hourinstead. - You will get a reminder about
15 minutesbefore a check is due. If a check becomes overdue, you will get an urgent alert, and it repeats about every15 minutesuntil a BG is entered - enter one as soon as you can, or contact the study team. - If more than about an hour passes without any reading, the Pod switches to its steady backup basal rate and Home shows "Backup Basal Running." This is expected - entering a fingerstick BG puts automated dosing back in charge right away.
- When sensor readings return, everything clears on its own and no action is needed.
There is no time limit: automated dosing continues as long as scheduled BGs keep coming in.
5. Announcing a Meal
Announce a meal just before eating, when Home is ready.
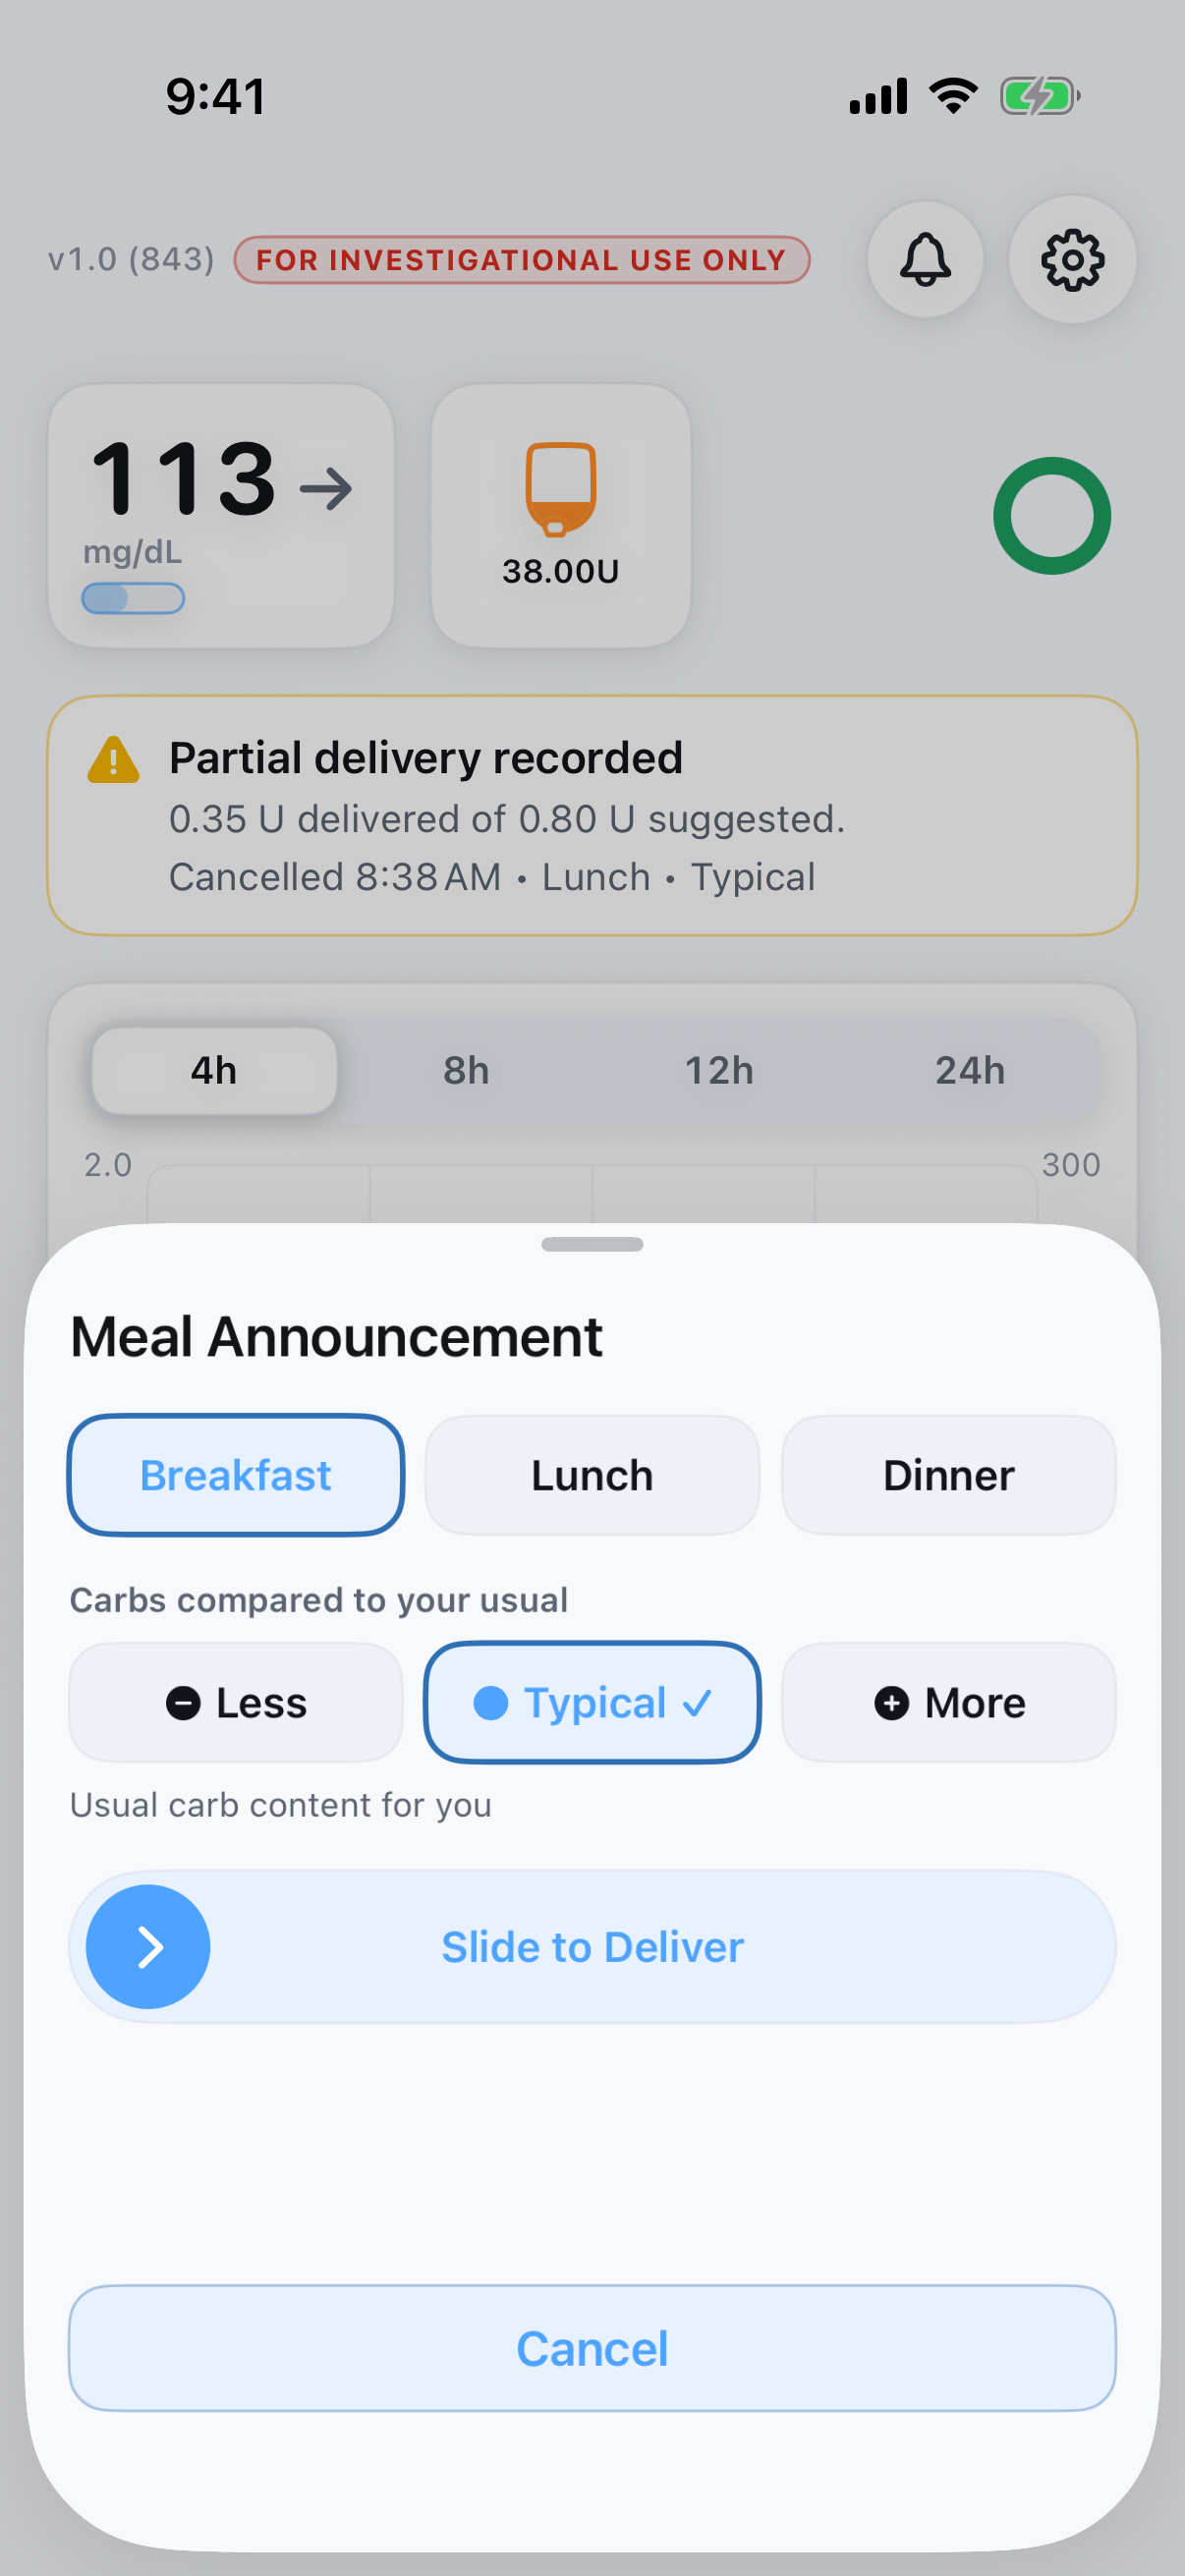
- On Home, tap
Let's Eat. - Choose the meal: Breakfast, Lunch, or Dinner. The meal buttons pulse gently until you choose - that is the first required step.
- Choose how the meal's carbs compare to your usual for that meal:
Less,Typical, orMore.Typicalis preselected. - When the announcement is correct, slide the delivery control to deliver.
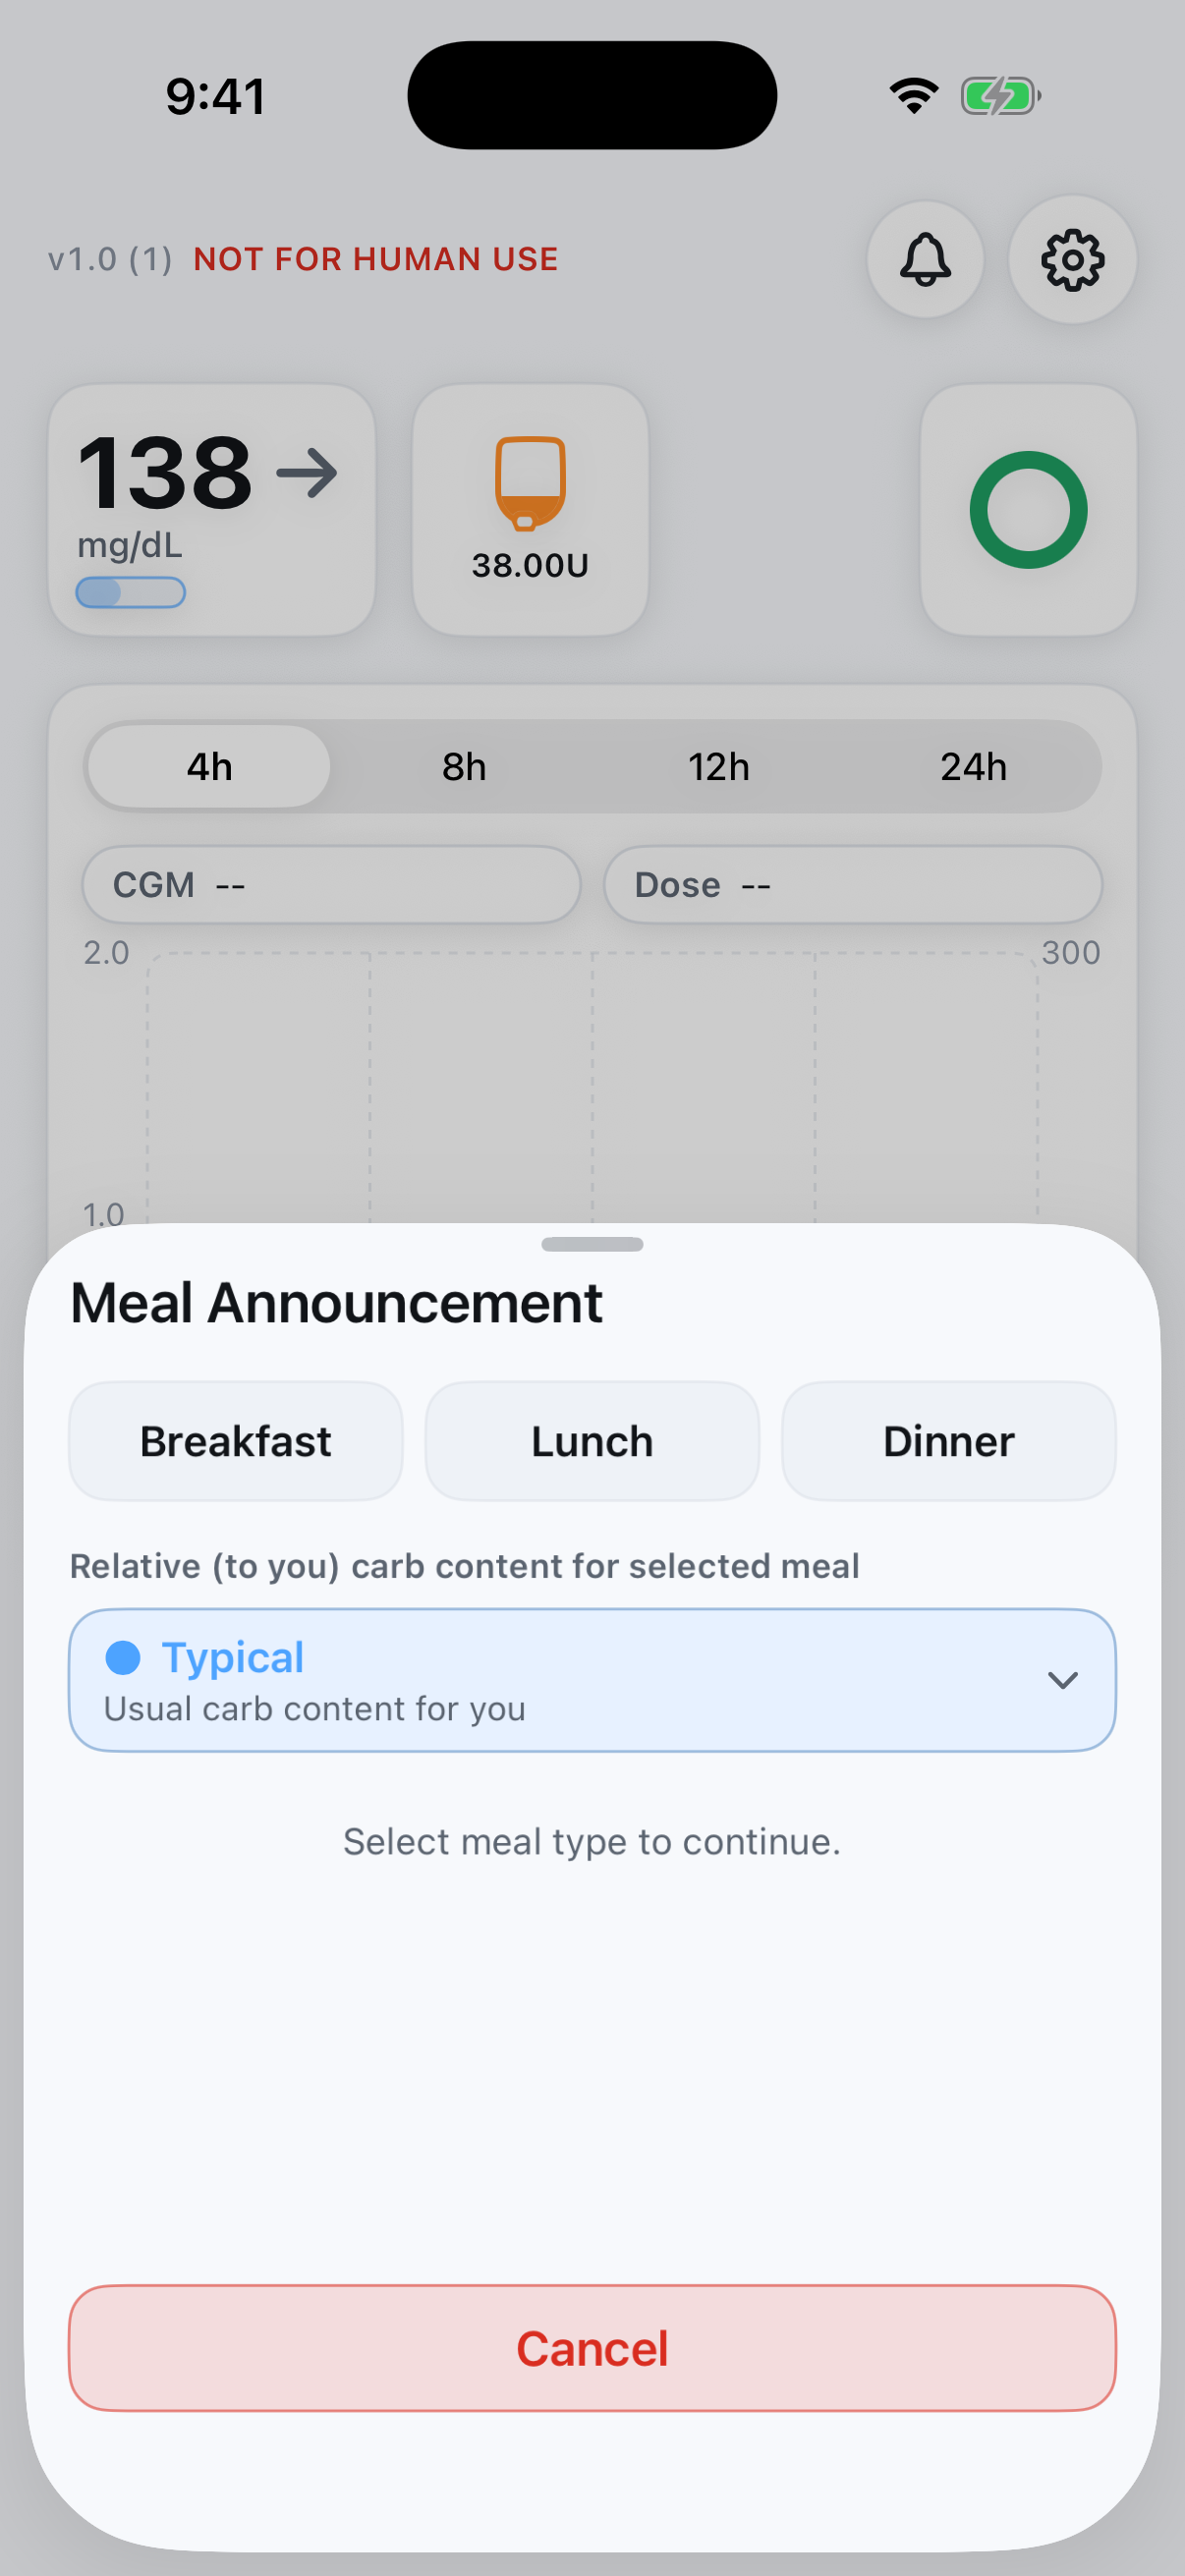
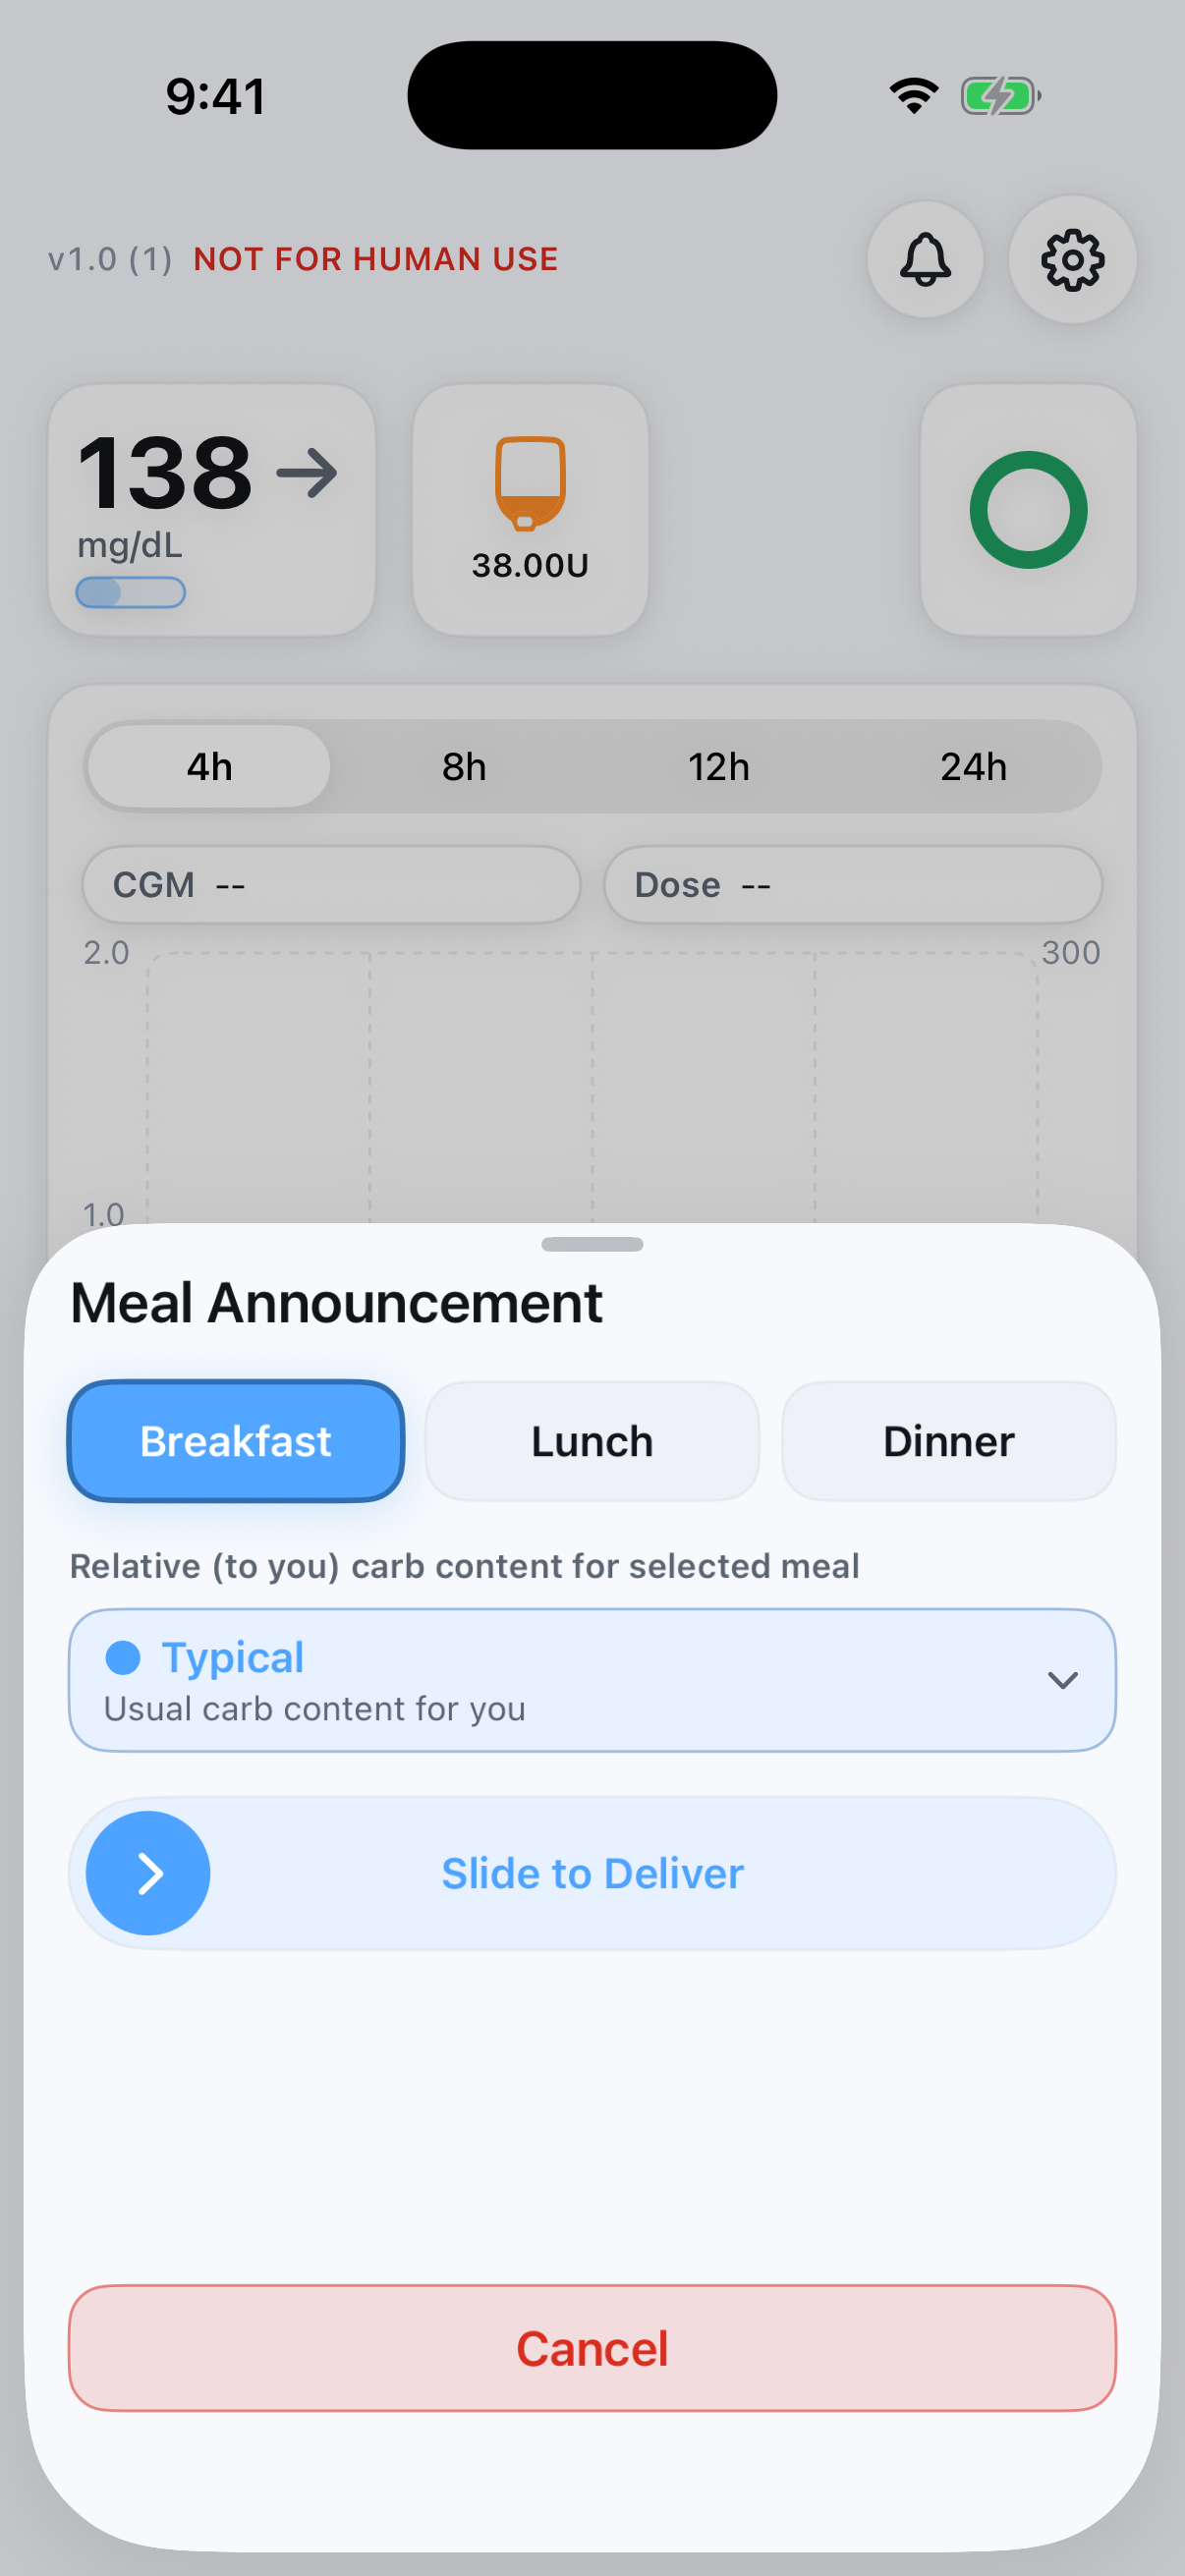
While the sheet is open you may briefly see "Timing updated - a loop step just ran." This is normal: the app re-checked its timing and kept your selections. Continue where you left off.
If meal announcement is not available right now, the app says why (for example, the Pod is still delivering, or a recent delivery has not been confirmed yet) and, when the reason is time-based, when to try again. The full list of these messages is in Part 2, section 16.
6. Stopping a Meal Delivery
If a meal announcement is delivering and needs to stop, the meal sheet shows the delivery in progress with a red Cancel Delivery slider.
- Tap
Let's Eatif the meal sheet is not already open. While a meal delivery is in progress it opens to the delivery-in-progress view. - Confirm this is the delivery you intend to stop.
- Slide
Cancel Delivery. - Wait for Home to show the summary of what was actually delivered.
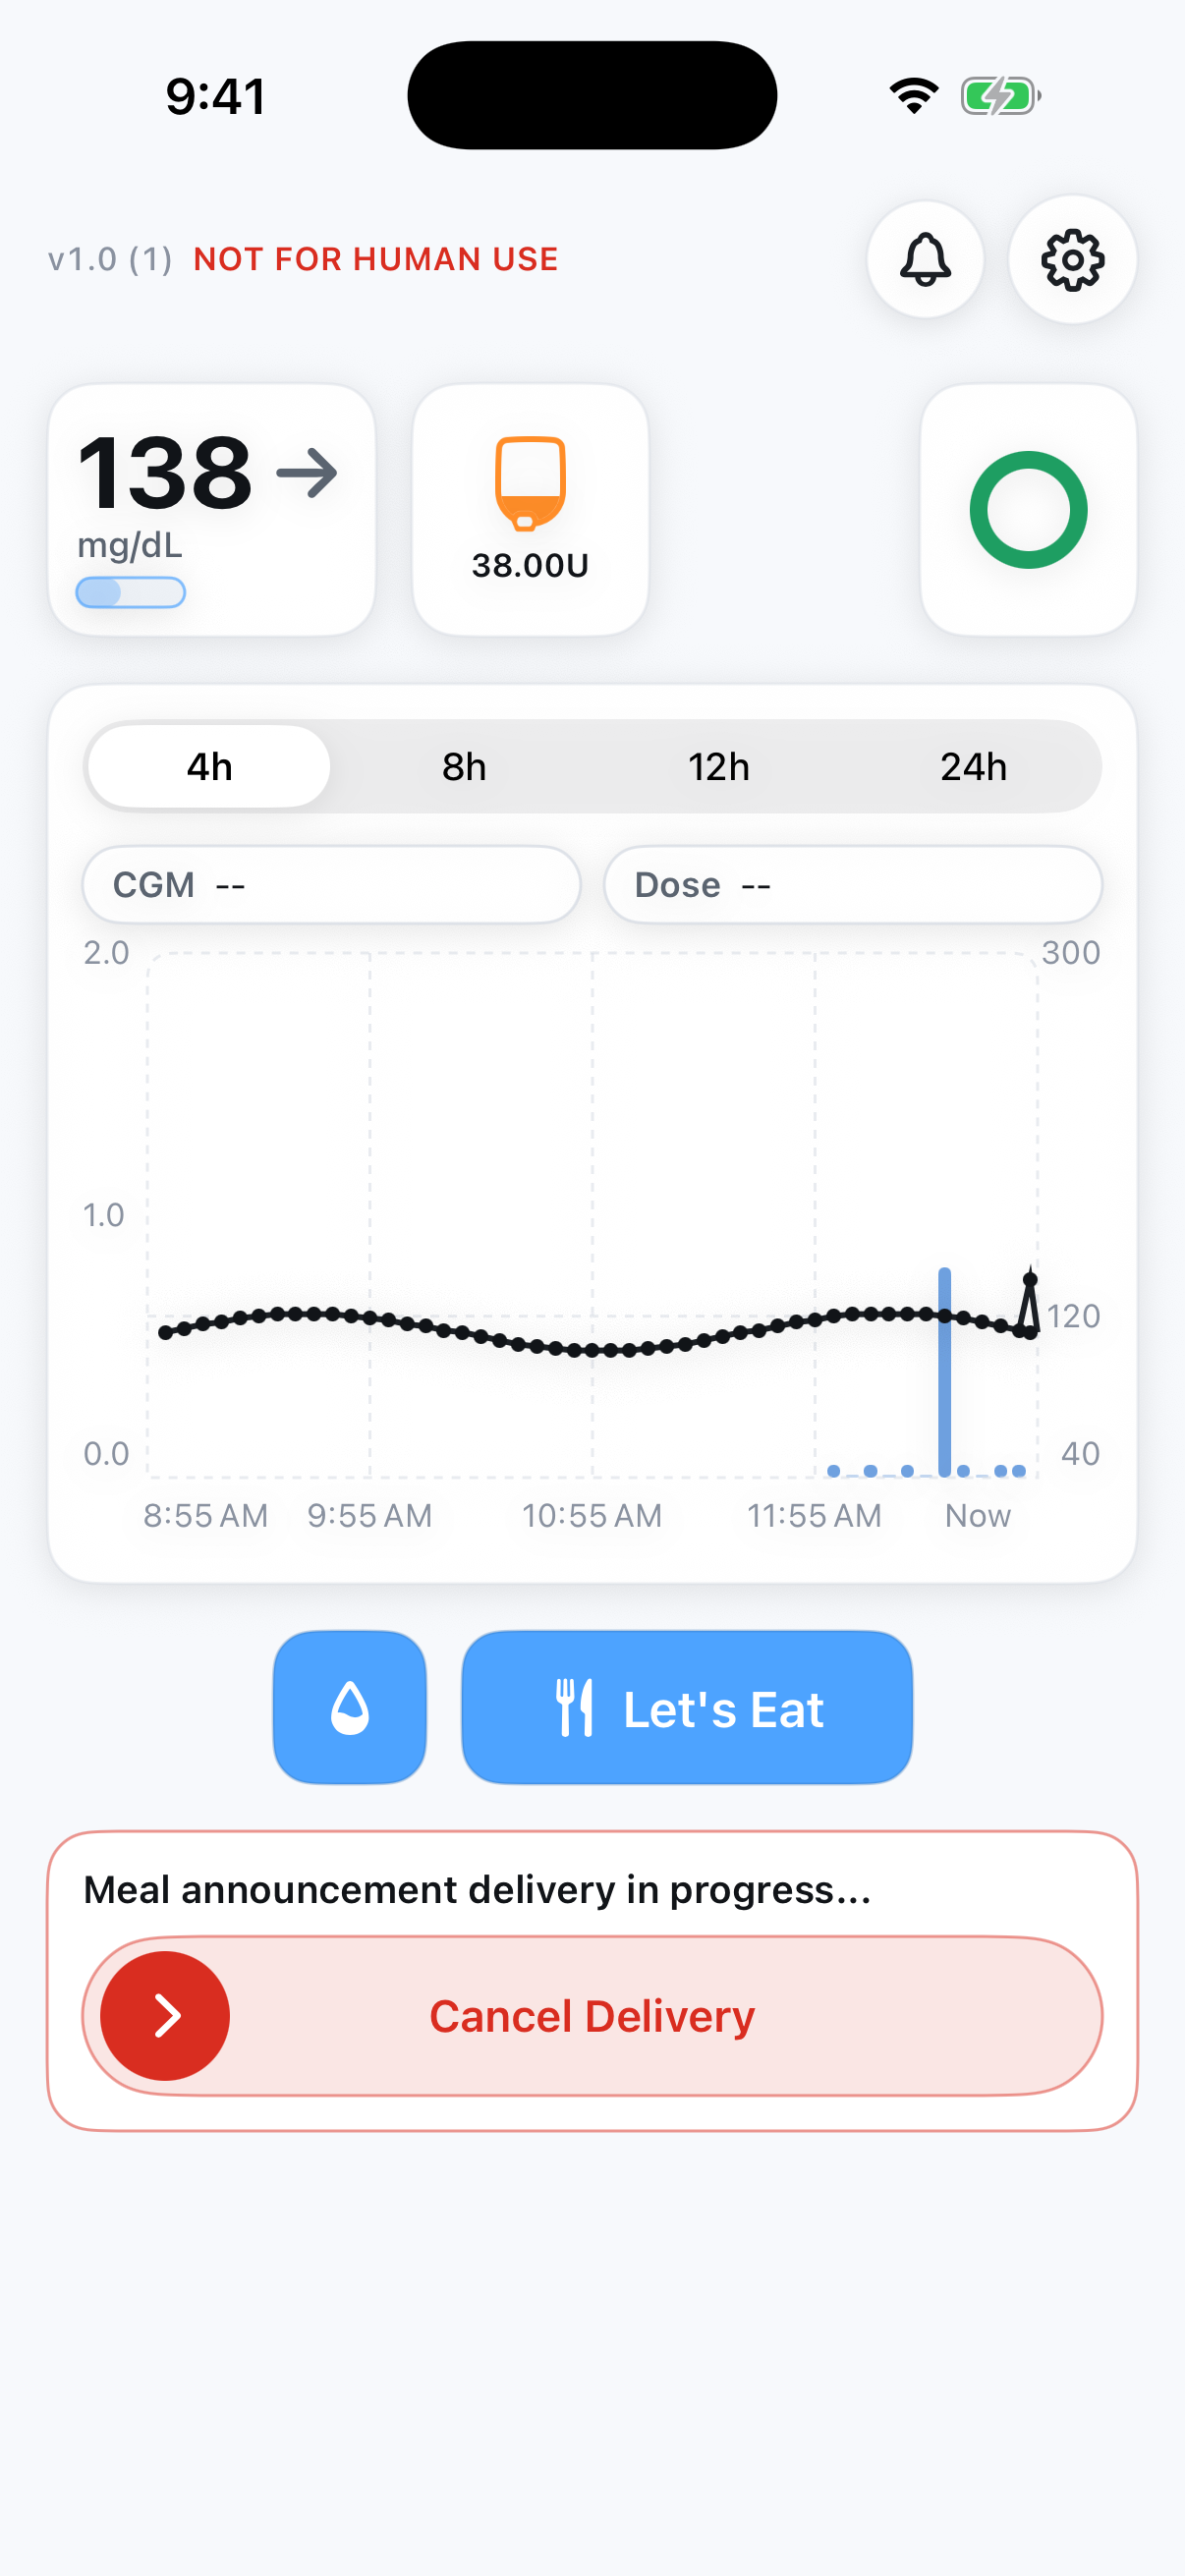
After cancelling, Home shows an orange summary above the chart with the amount requested and the amount actually delivered before the stop.
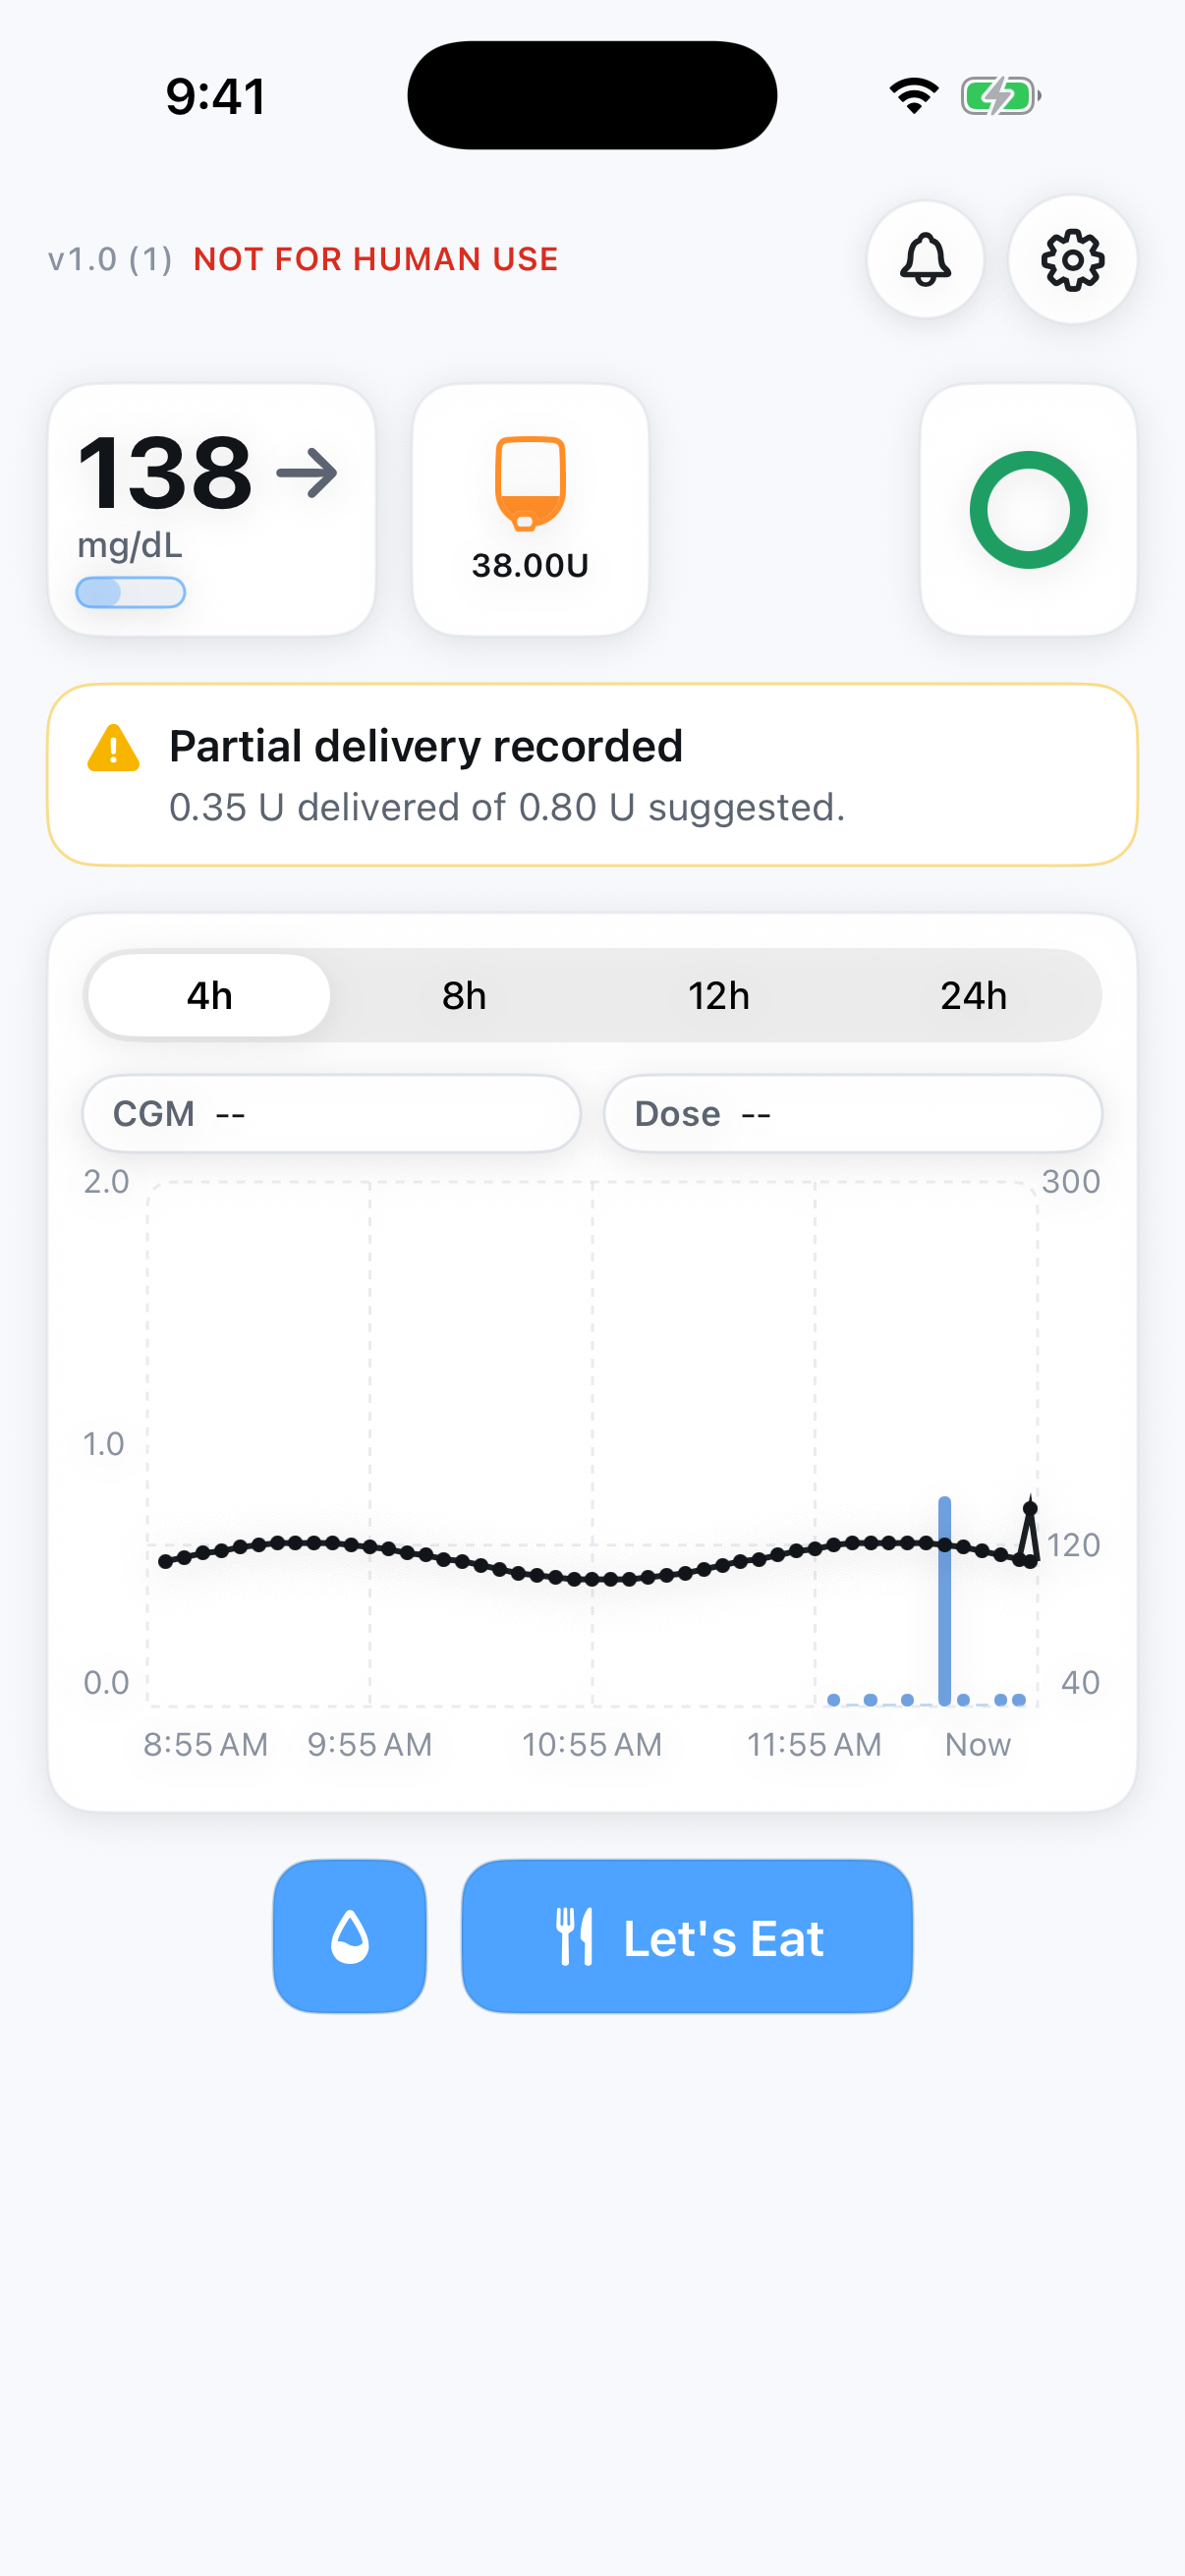
What the summary means:
- the delivered amount is what reached the Pod before the stop,
- that insulin stays part of the recorded history and is accounted for in later dosing,
- the summary stays visible long enough to review and then clears on its own.
If a meal announcement is still needed after a cancellation, open Let's Eat again and enter it deliberately.
7. Using a Temporary Target (Pregnancy Mode)
A Temporary Target raises your glucose target for a short, fixed time - for example around exercise - without changing your regular settings. It is available only when the phone is configured in Pregnancy mode; in Standard mode the screen shows "Temporary Target is available in Pregnancy mode." and no selection is offered.
7.1 Start a Temporary Target
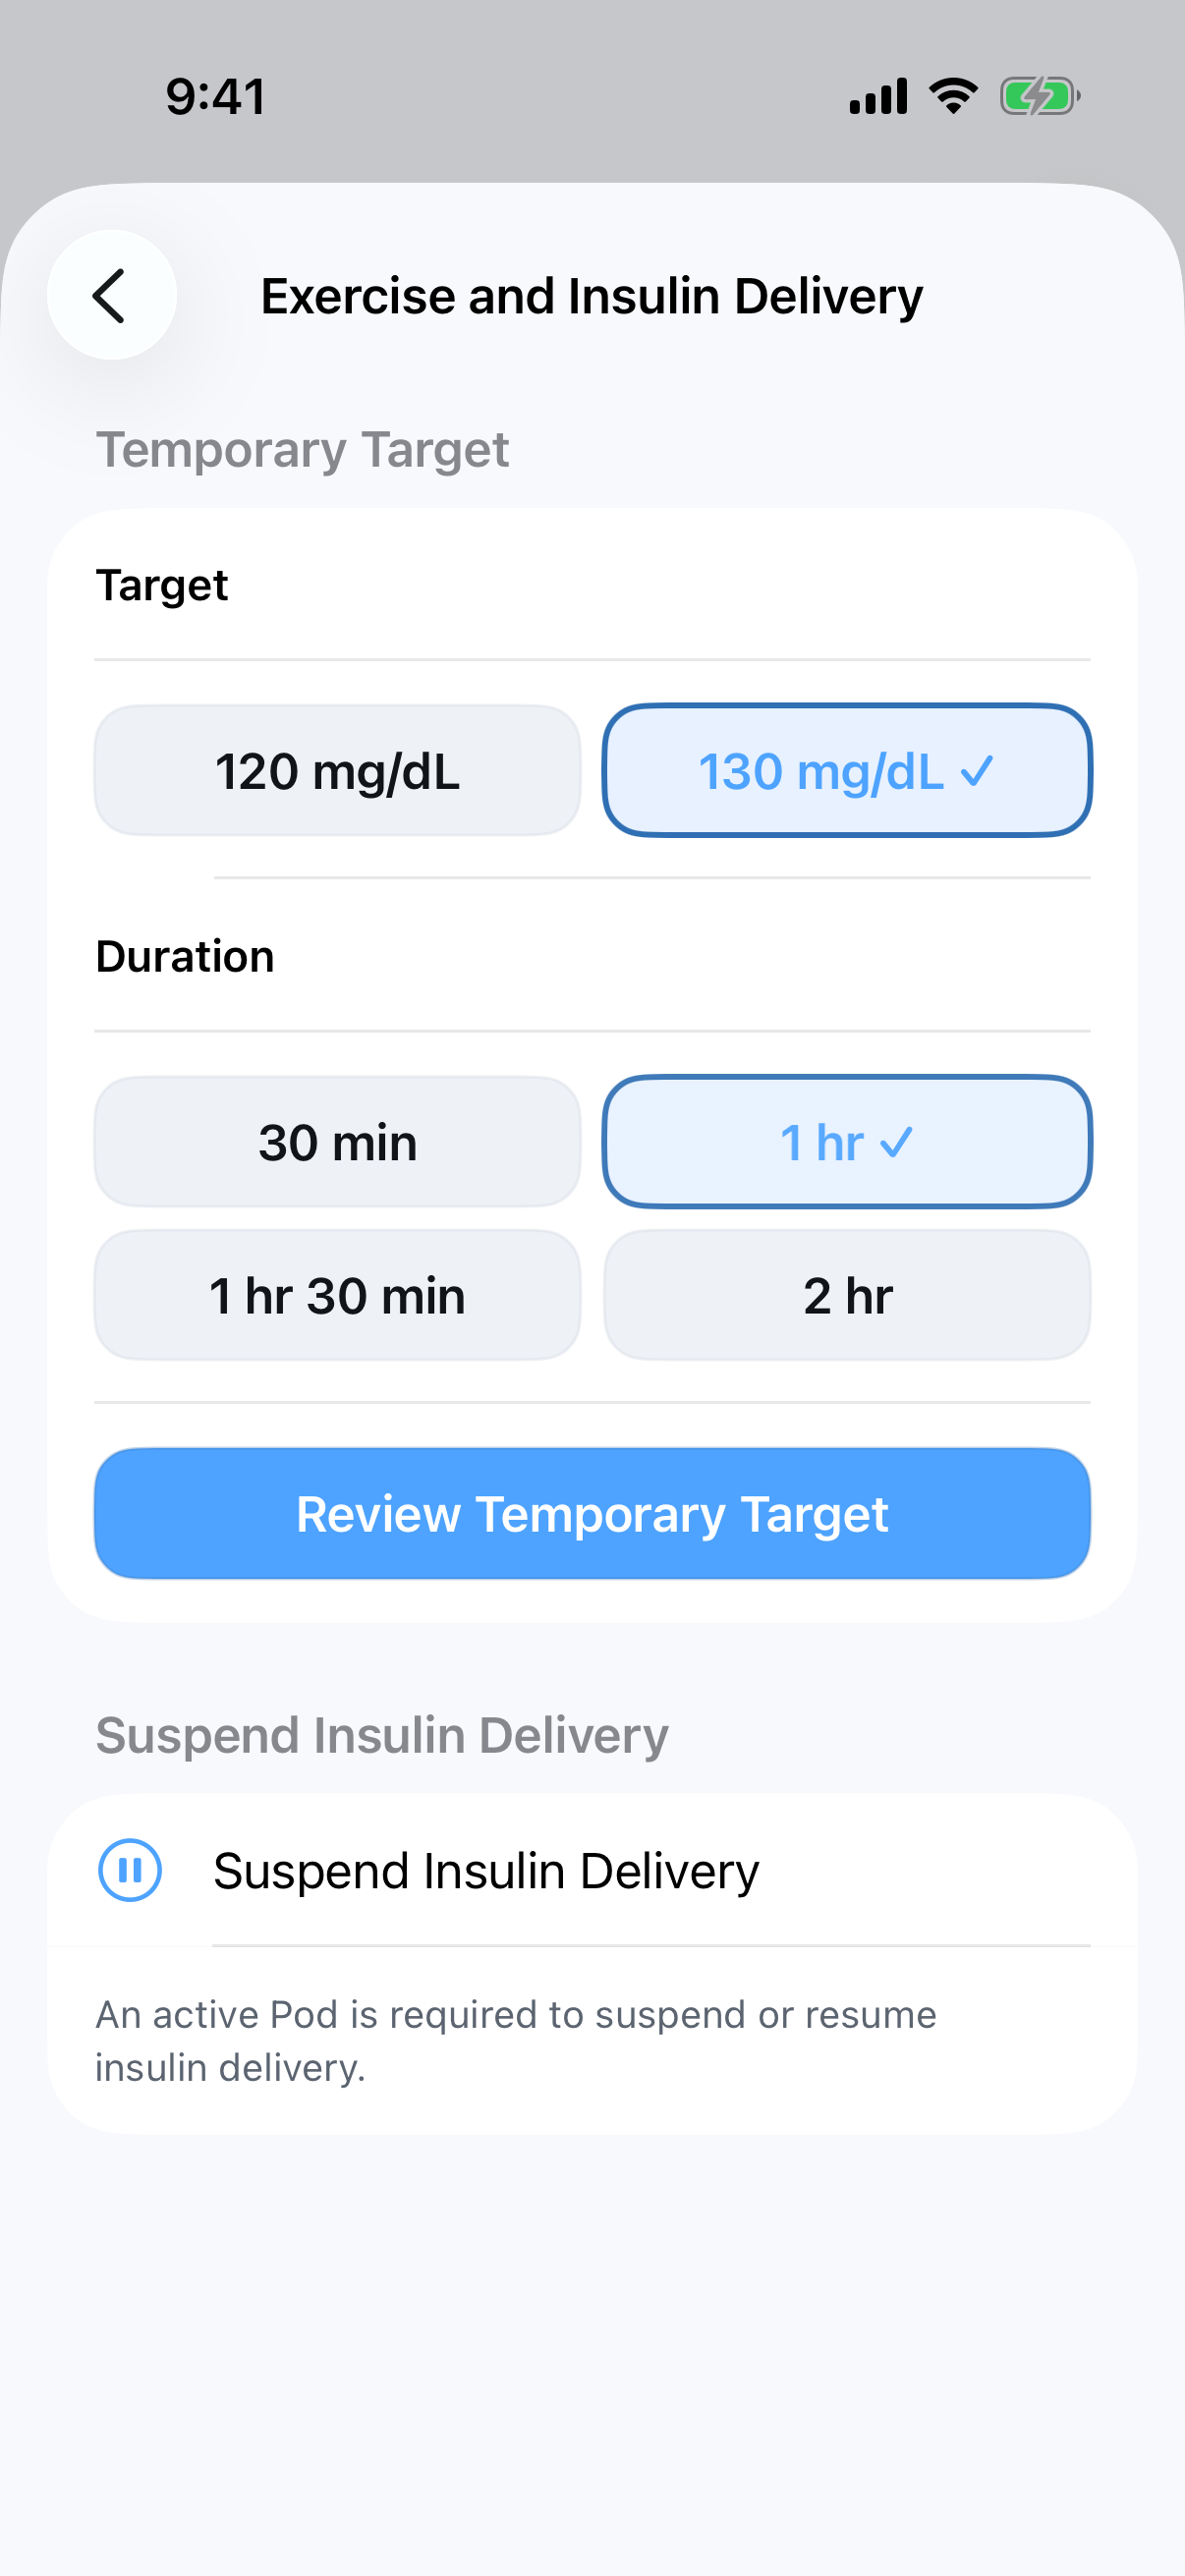
- Open Settings (the gear on Home), then
Exercise and Insulin Delivery. - Under
Temporary Target, choose a target:120 mg/dLor130 mg/dL. - Choose a duration:
30 min,1 hr,1 hr 30 min, or2 hr. Nothing is preselected - both choices are always yours to make. - Tap
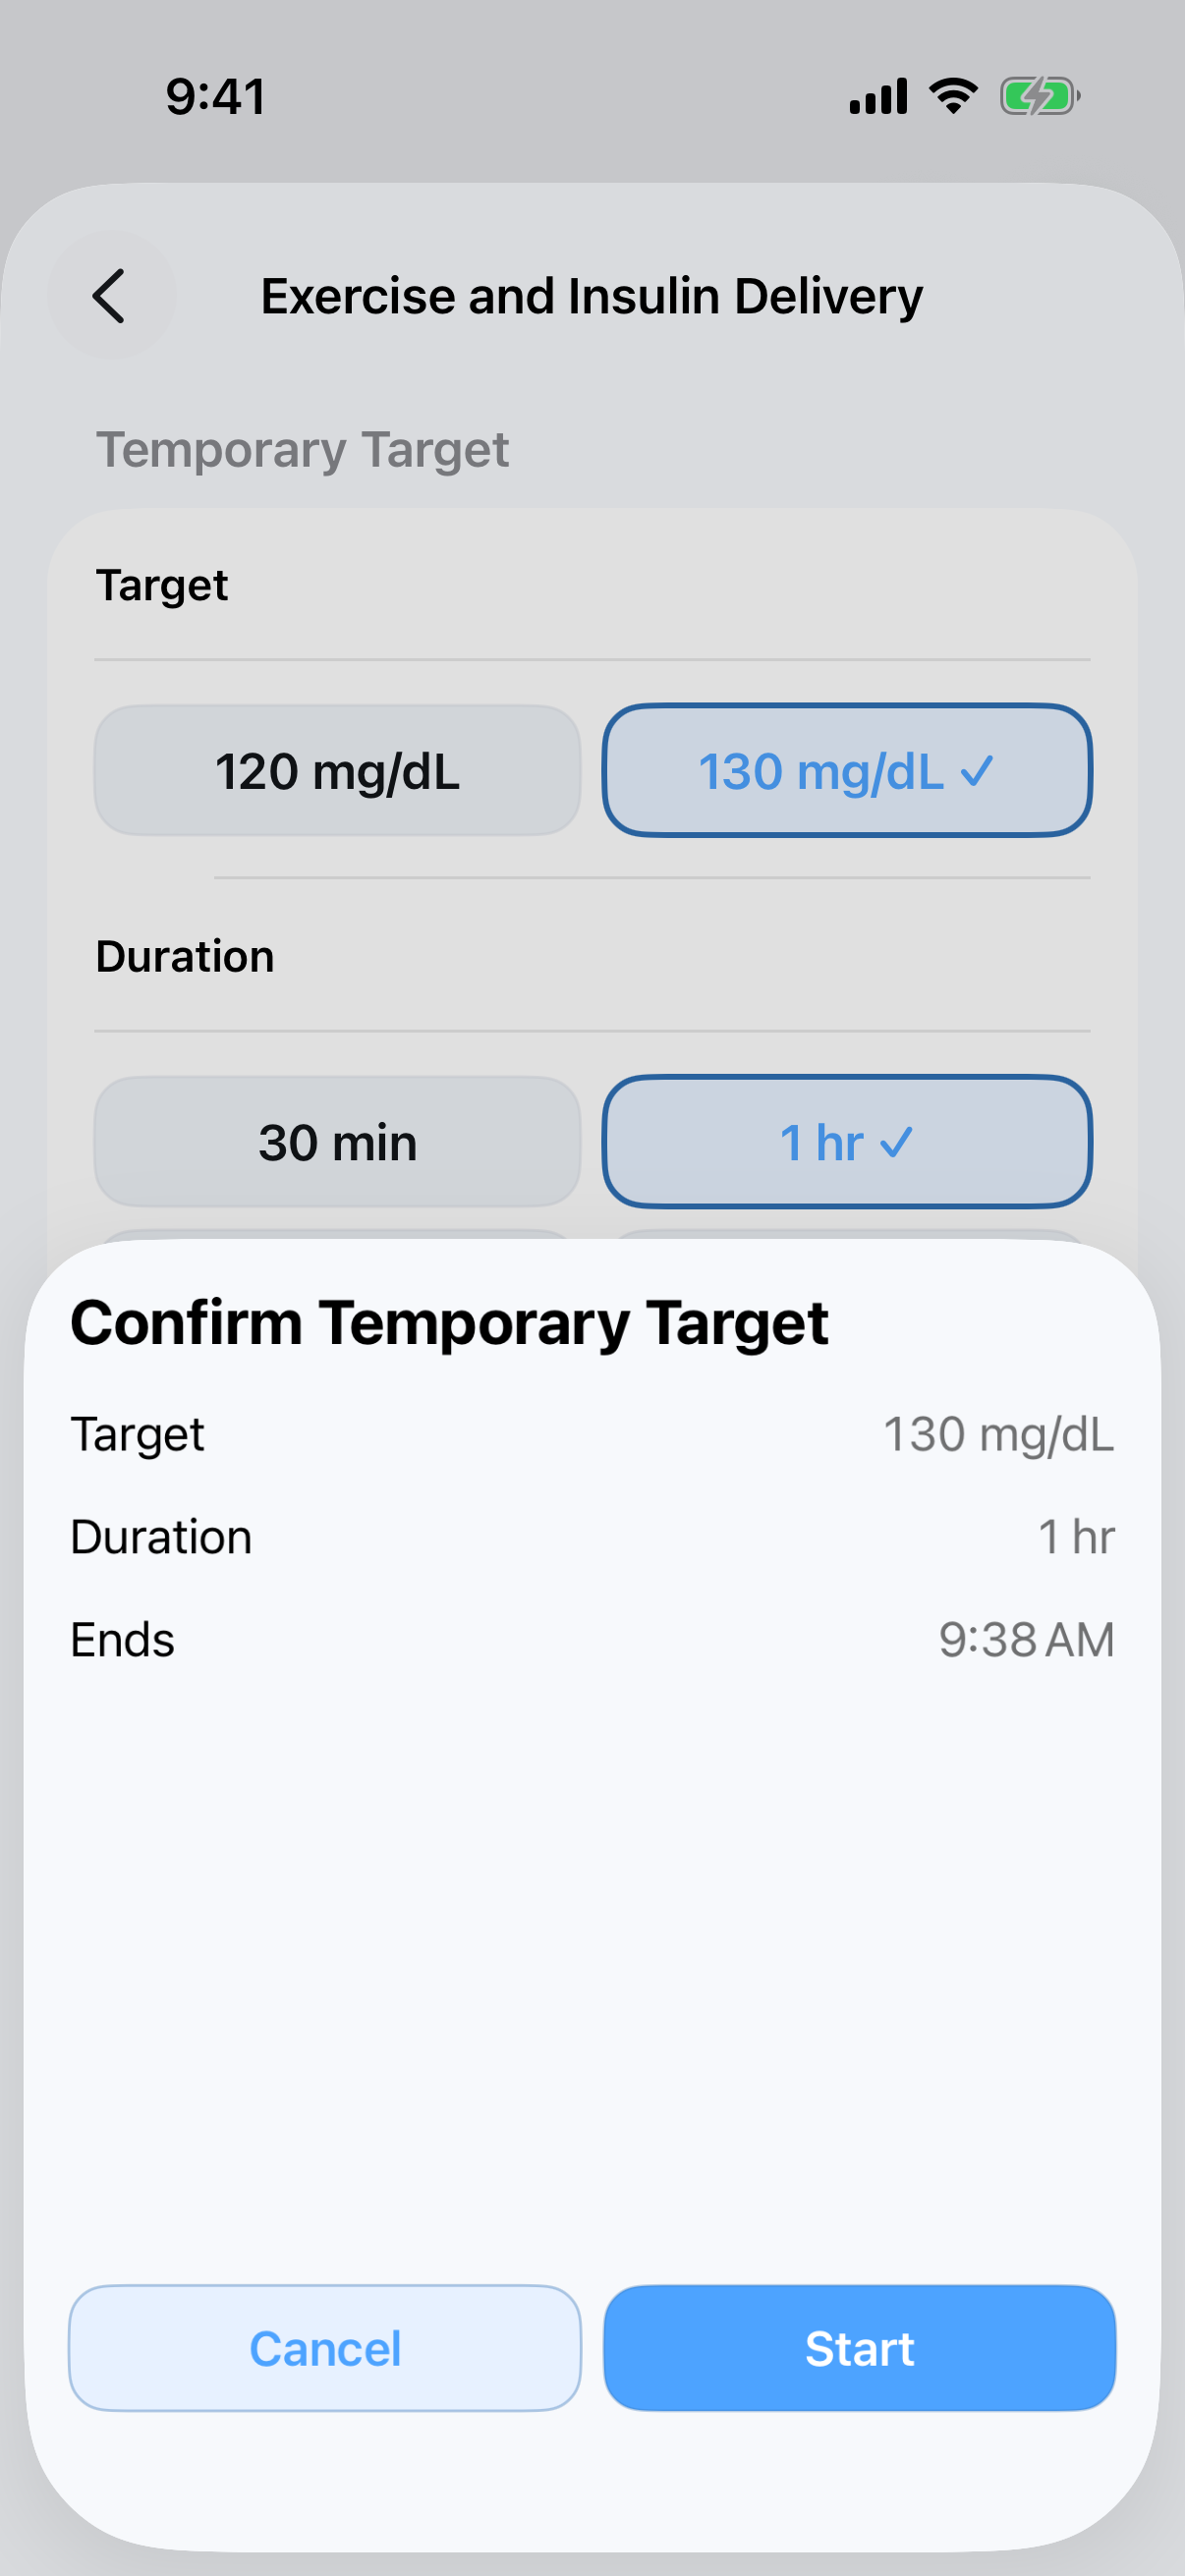
Review Temporary Target. A confirmation sheet shows the target, the duration, and the exact end time. - Tap
Startto begin, orCancelto go back without changing anything.
If you select either a target or duration and then try to leave this screen
before starting, the app warns that the selections will be lost. Tap Keep
Editing to return, or Discard Selections to leave without starting a
Temporary Target.
If the app cannot start a Temporary Target, it says why:
| Message | What it means |
|---|---|
| Start the algorithm before using Temporary Target. | The algorithm session is not running. Starting it is a study-team task (Part 2, Section 12.4). |
| Set up a Pod before using Temporary Target. | No active Pod (Part 2, Section 13.3). |
| Wait for backup insulin recovery to finish, then try again. | The app is still reconciling backup-basal delivery after a connection gap. Wait for Home to settle, then retry. |
| Choose a target and duration, then try again. | One of the two selections is missing. |
7.2 While a Temporary Target Is Active
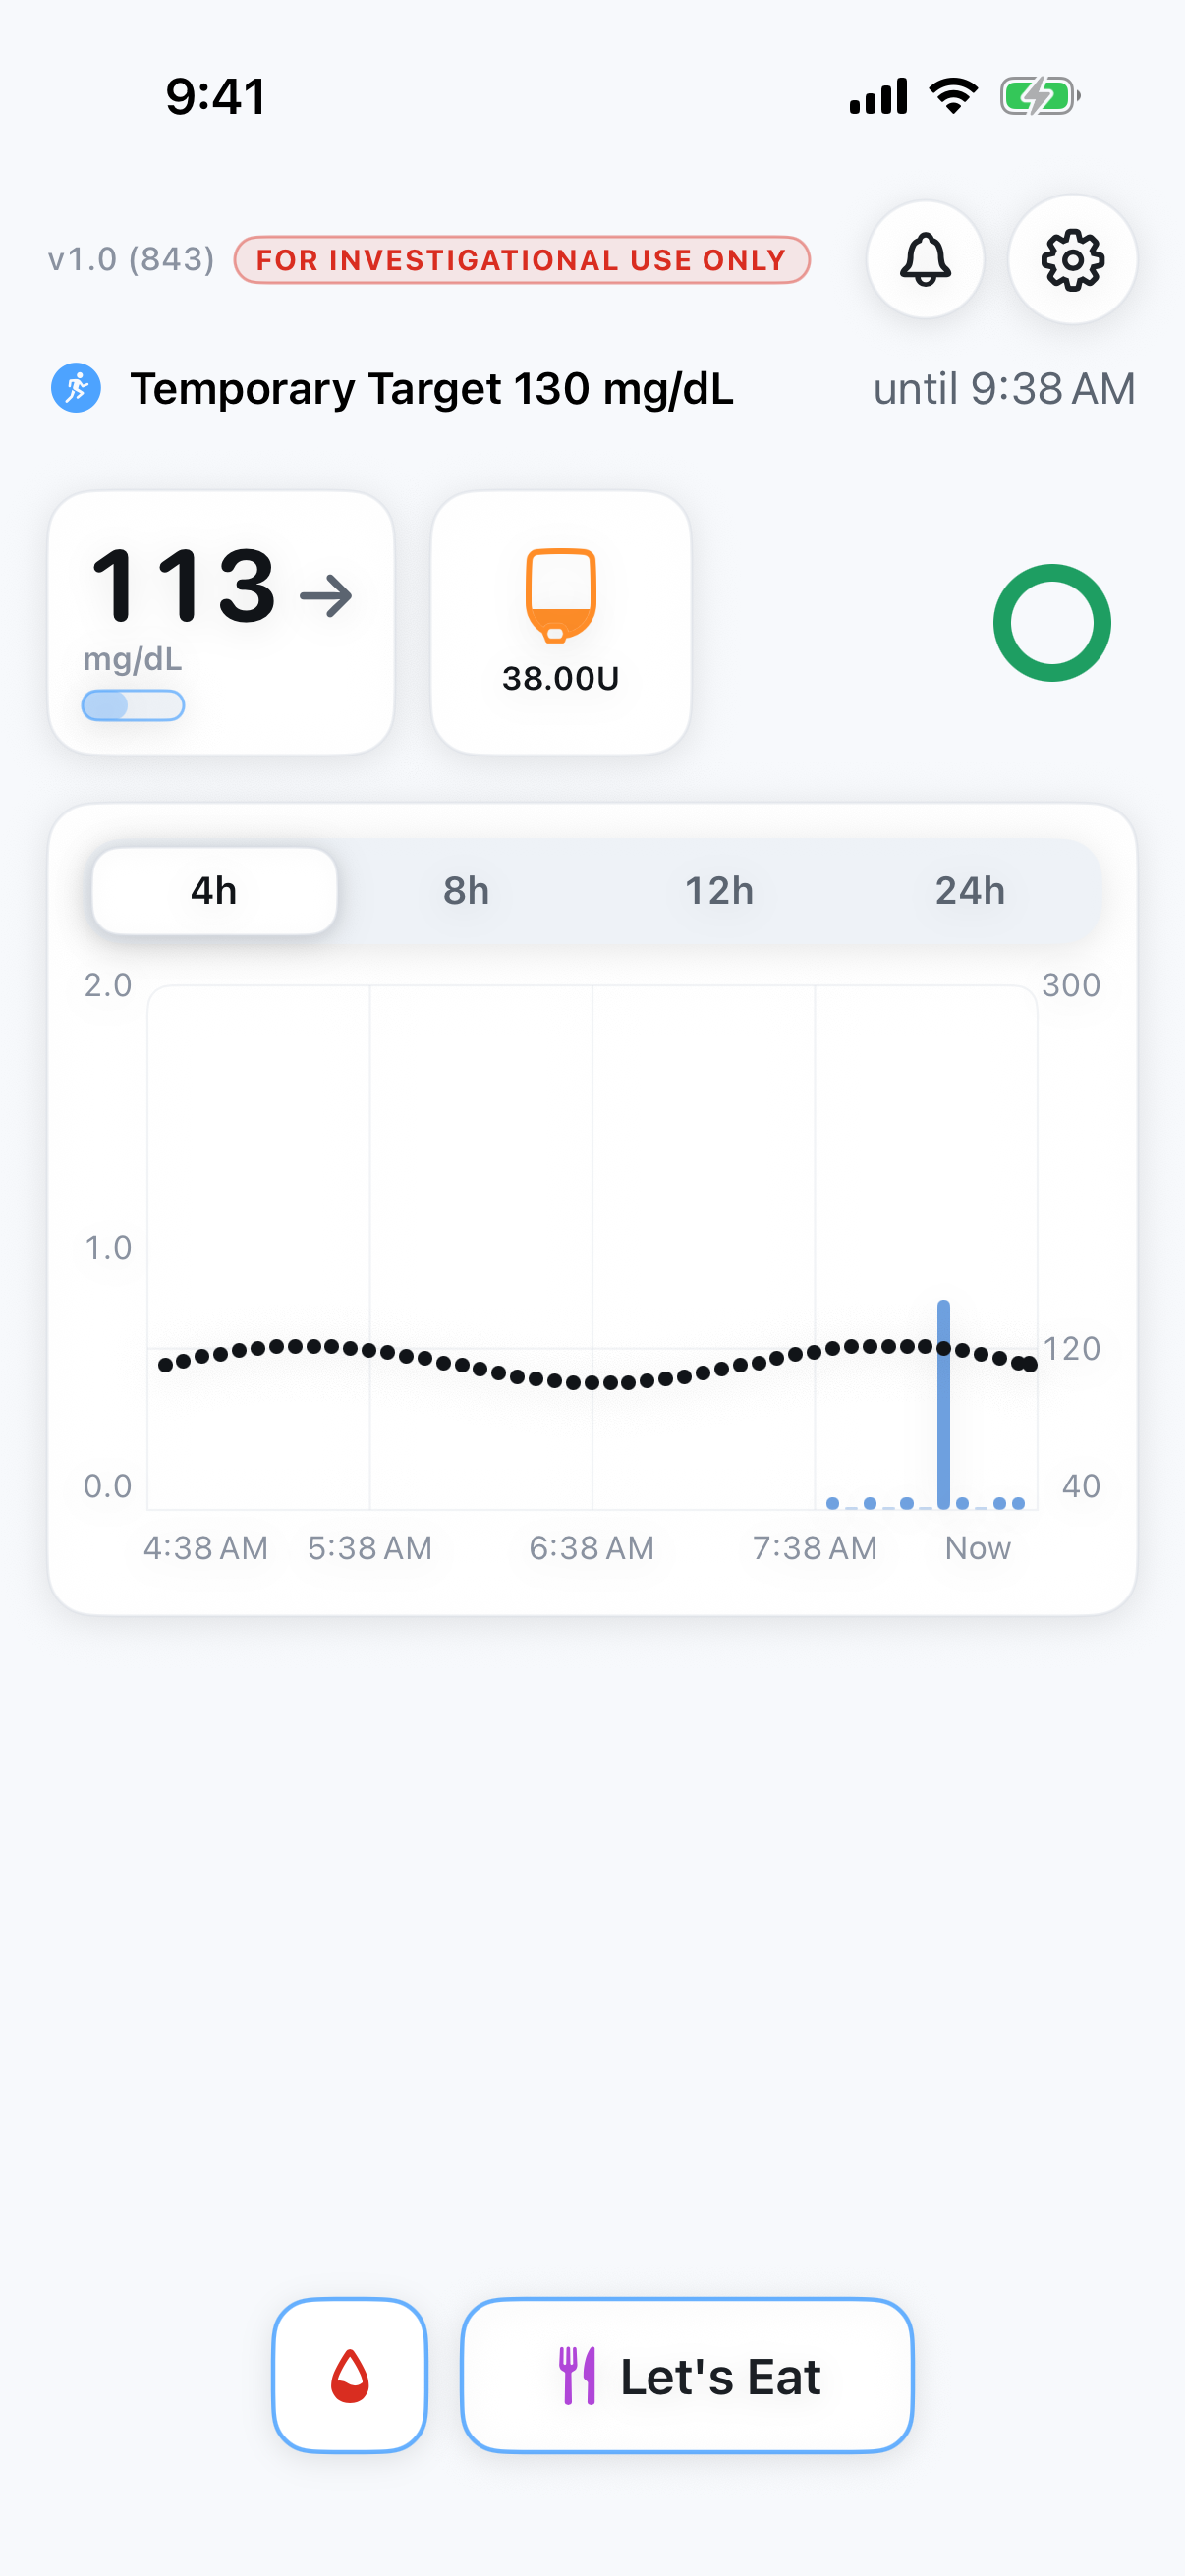
- Home shows a status line with the target and end time - for example, "Temporary Target 120 mg/dL · until 3:45 PM".
- The
Exercise and Insulin Deliveryscreen shows theTarget, when itEnds, and "Temporary Target is active", with anEnd Temporary Targetbutton. - Automated dosing continues and aims at the temporary target. Safety checks and the Pod's backup basal schedule stay on your permanent settings (see the study-team note below).
7.3 How a Temporary Target Ends
- On its own: it ends exactly at the end time, even if the phone was locked or the app was closed in between. A notification says "Temporary Target Ended - Your usual glucose target is active again."
- Early: tap
End Temporary Targeton the same screen, then confirm ("Your usual glucose target will be active again."). - It also ends automatically if the algorithm session is stopped, the target profile is changed, or a participant reset is performed.
7.4 Also on the Exercise and Insulin Delivery Screen
Suspend Insulin Delivery: choose a reminder for 30 minutes, 1 hour, 1 hour 30 minutes, or 2 hours. Insulin delivery stops and remains suspended until you return to this screen and tapResume Insulin Delivery; the reminder does not resume insulin automatically.- If no usable Pod is active, or the Pod is still changing its delivery state, the suspend/resume action is unavailable until the Pod is ready.
Note for the study team. Only the primary dosing target follows the Temporary Target, and it is resolved by each algorithm step's execution time: the first step at or after the end time uses the permanent target even if the end notification was never delivered. The safety controller and the Pod's programmed backup-basal schedule remain on the permanent Pregnancy configuration throughout (clinical decision 2026-07-24; risk analysis RA-022).
8. Responding to Alerts
- Read the alert card on Home. Each alert says what is happening and what to do.
- Handle the top alert first - it is the most important one and often explains the others.
- Tap the bell to open Alert Center for the complete list, including recently cleared alerts.
- Do not assume things are back to normal until Home shows the alert has cleared.
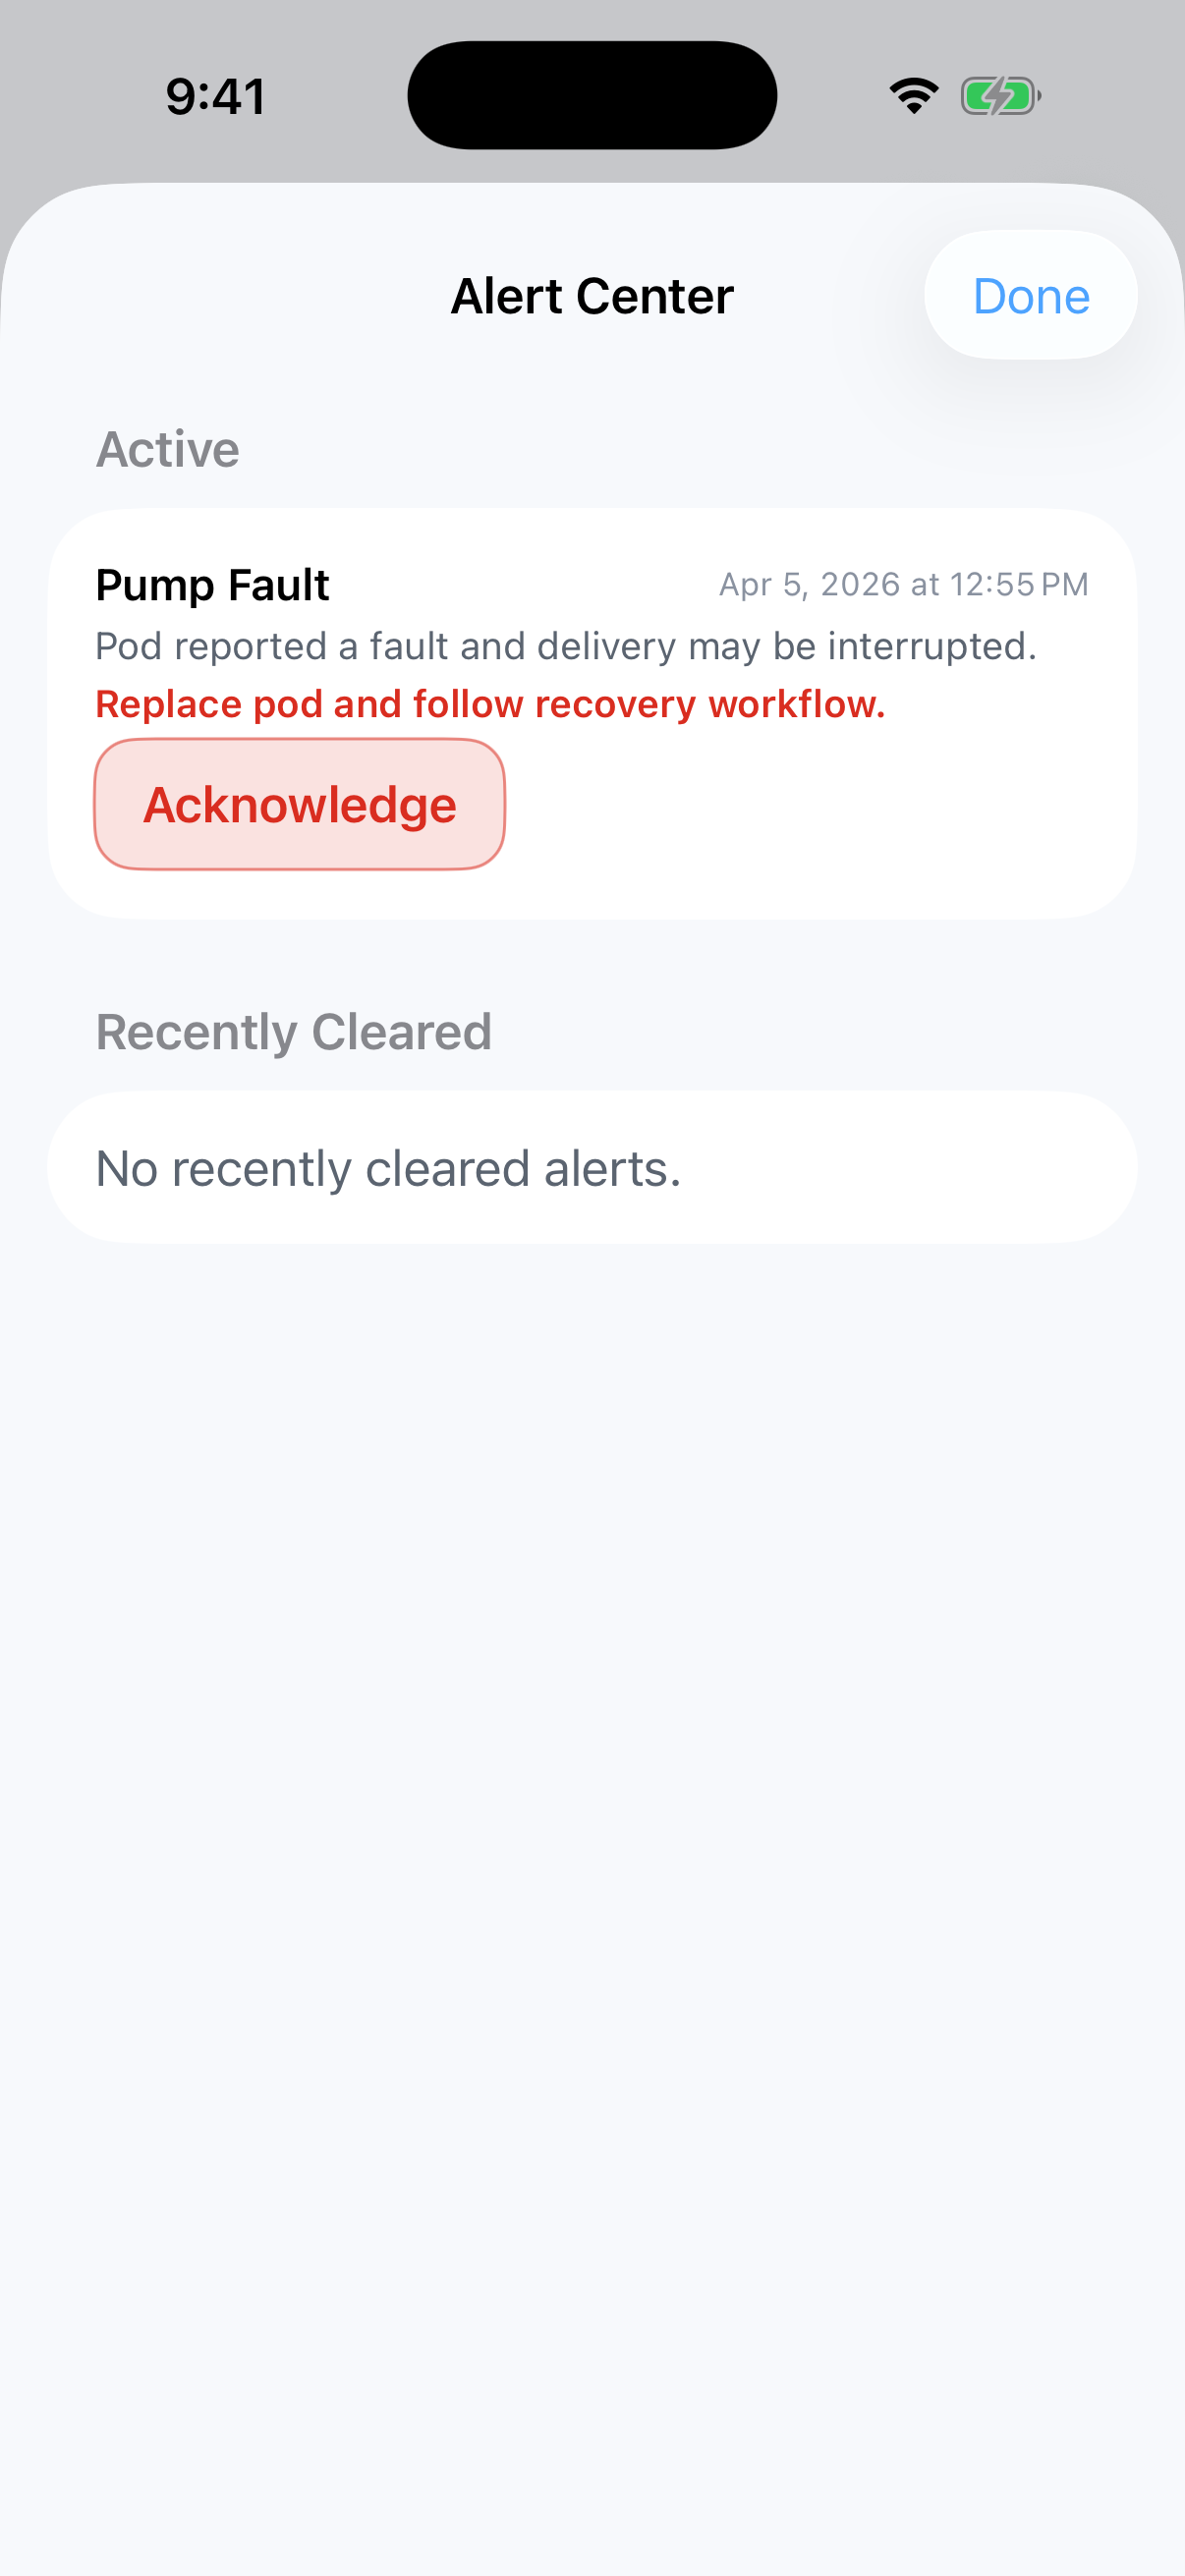
Glucose alarms come from the Dexcom app. BionicLoop's CGM messages are extra context inside the app only - BionicLoop does not sound alarms for low or high glucose. Keep the Dexcom G7 app's alarms configured as the study team directed.
Keep BionicLoop notifications on. Fingerstick-due and overdue reminders arrive as iPhone notifications when the app is in the background. If notifications are turned off for BionicLoop in iPhone Settings, those reminders will not appear. The study team confirms this permission during setup - tell them if it has been changed.
9. When to Contact the Study Team
Contact the study team rather than retrying when:
- a red (safety-critical) alert does not clear after following its guidance,
- the app and the physical devices disagree (for example, the app shows an active Pod but no Pod is worn),
- a delivery outcome is reported as unconfirmed and does not resolve,
- you cannot sign in and the app is needed for the study workflow,
- anything about dosing looks wrong to you - when in doubt, call.
Before calling, if possible: note the time, what you were doing, and take a screenshot of Home and the alert.
Part 2 - Clinician & Study-Team Reference
10. System Overview
BionicLoop is a research closed-loop app that uses Dexcom G7 glucose data, Omnipod DASH pump connectivity, and a 5-minute algorithm step cadence to run algorithm-directed insulin dosing under study supervision.
10.1 System Components
| Component | Role in workflow |
|---|---|
| iPhone running BionicLoop | Home view, settings, meal/BG entry, alert presentation, telemetry |
| Dexcom G7 sensor and Dexcom ecosystem | Source of glucose data and primary CGM alarm handling |
| Omnipod DASH Pod | Insulin delivery path |
| BionicLoop cloud/telemetry path | Remote monitoring and quality review support when configured |
10.2 What BionicLoop Does
- runs the dosing algorithm on a 5-minute step cadence during an active session,
- displays current CGM, Pod, and loop status on Home,
- supports clinical configuration and algorithm session control,
- accepts manual BG entry and meal announcements,
- records recent algorithm/dosing steps for review,
- presents in-app alerts and recent alert history.
10.3 What BionicLoop Does Not Do
- BionicLoop does not replace Dexcom G7 app alarming.
- BionicLoop does not send OS notifications for CGM alerts.
- BionicLoop CGM alerts are informational on Home / Alert Center.
- The Dexcom G7 app remains the source of truth for CGM alarms and should be configured per protocol.
11. Before First Use
11.1 Training and Readiness Checklist
- The user has been trained on the study workflow and escalation rules.
- The iPhone is charged and Bluetooth is enabled.
- BionicLoop notifications are allowed on the iPhone (Settings > Notifications > BionicLoop). Safety reminders - like a fingerstick coming due during a sensor outage - arrive as phone notifications and stay silent if this permission is off.
- The user can sign in or site login support is available.
- Dexcom G7 app access is available for pairing and sensor management.
- Pod supplies and site procedures are available.
- Subject ID, weight, and approved clinical settings are available. On a new phone, the one-time first-launch setup (Section 11.3) is complete or scheduled.
- The user understands that unresolved therapy-impacting issues require escalation, not repeated blind retries.
11.2 Daily Start-of-Shift Checks
- Launch BionicLoop and confirm the correct subject context.
- Confirm CGM value freshness and trend availability.
- Confirm Pod presence and connection state.
- Review active alerts before announcing a meal or entering BG.
- If using remote monitoring, confirm login/session continuity.
11.3 First Launch on a New Phone (One-Time Setup)
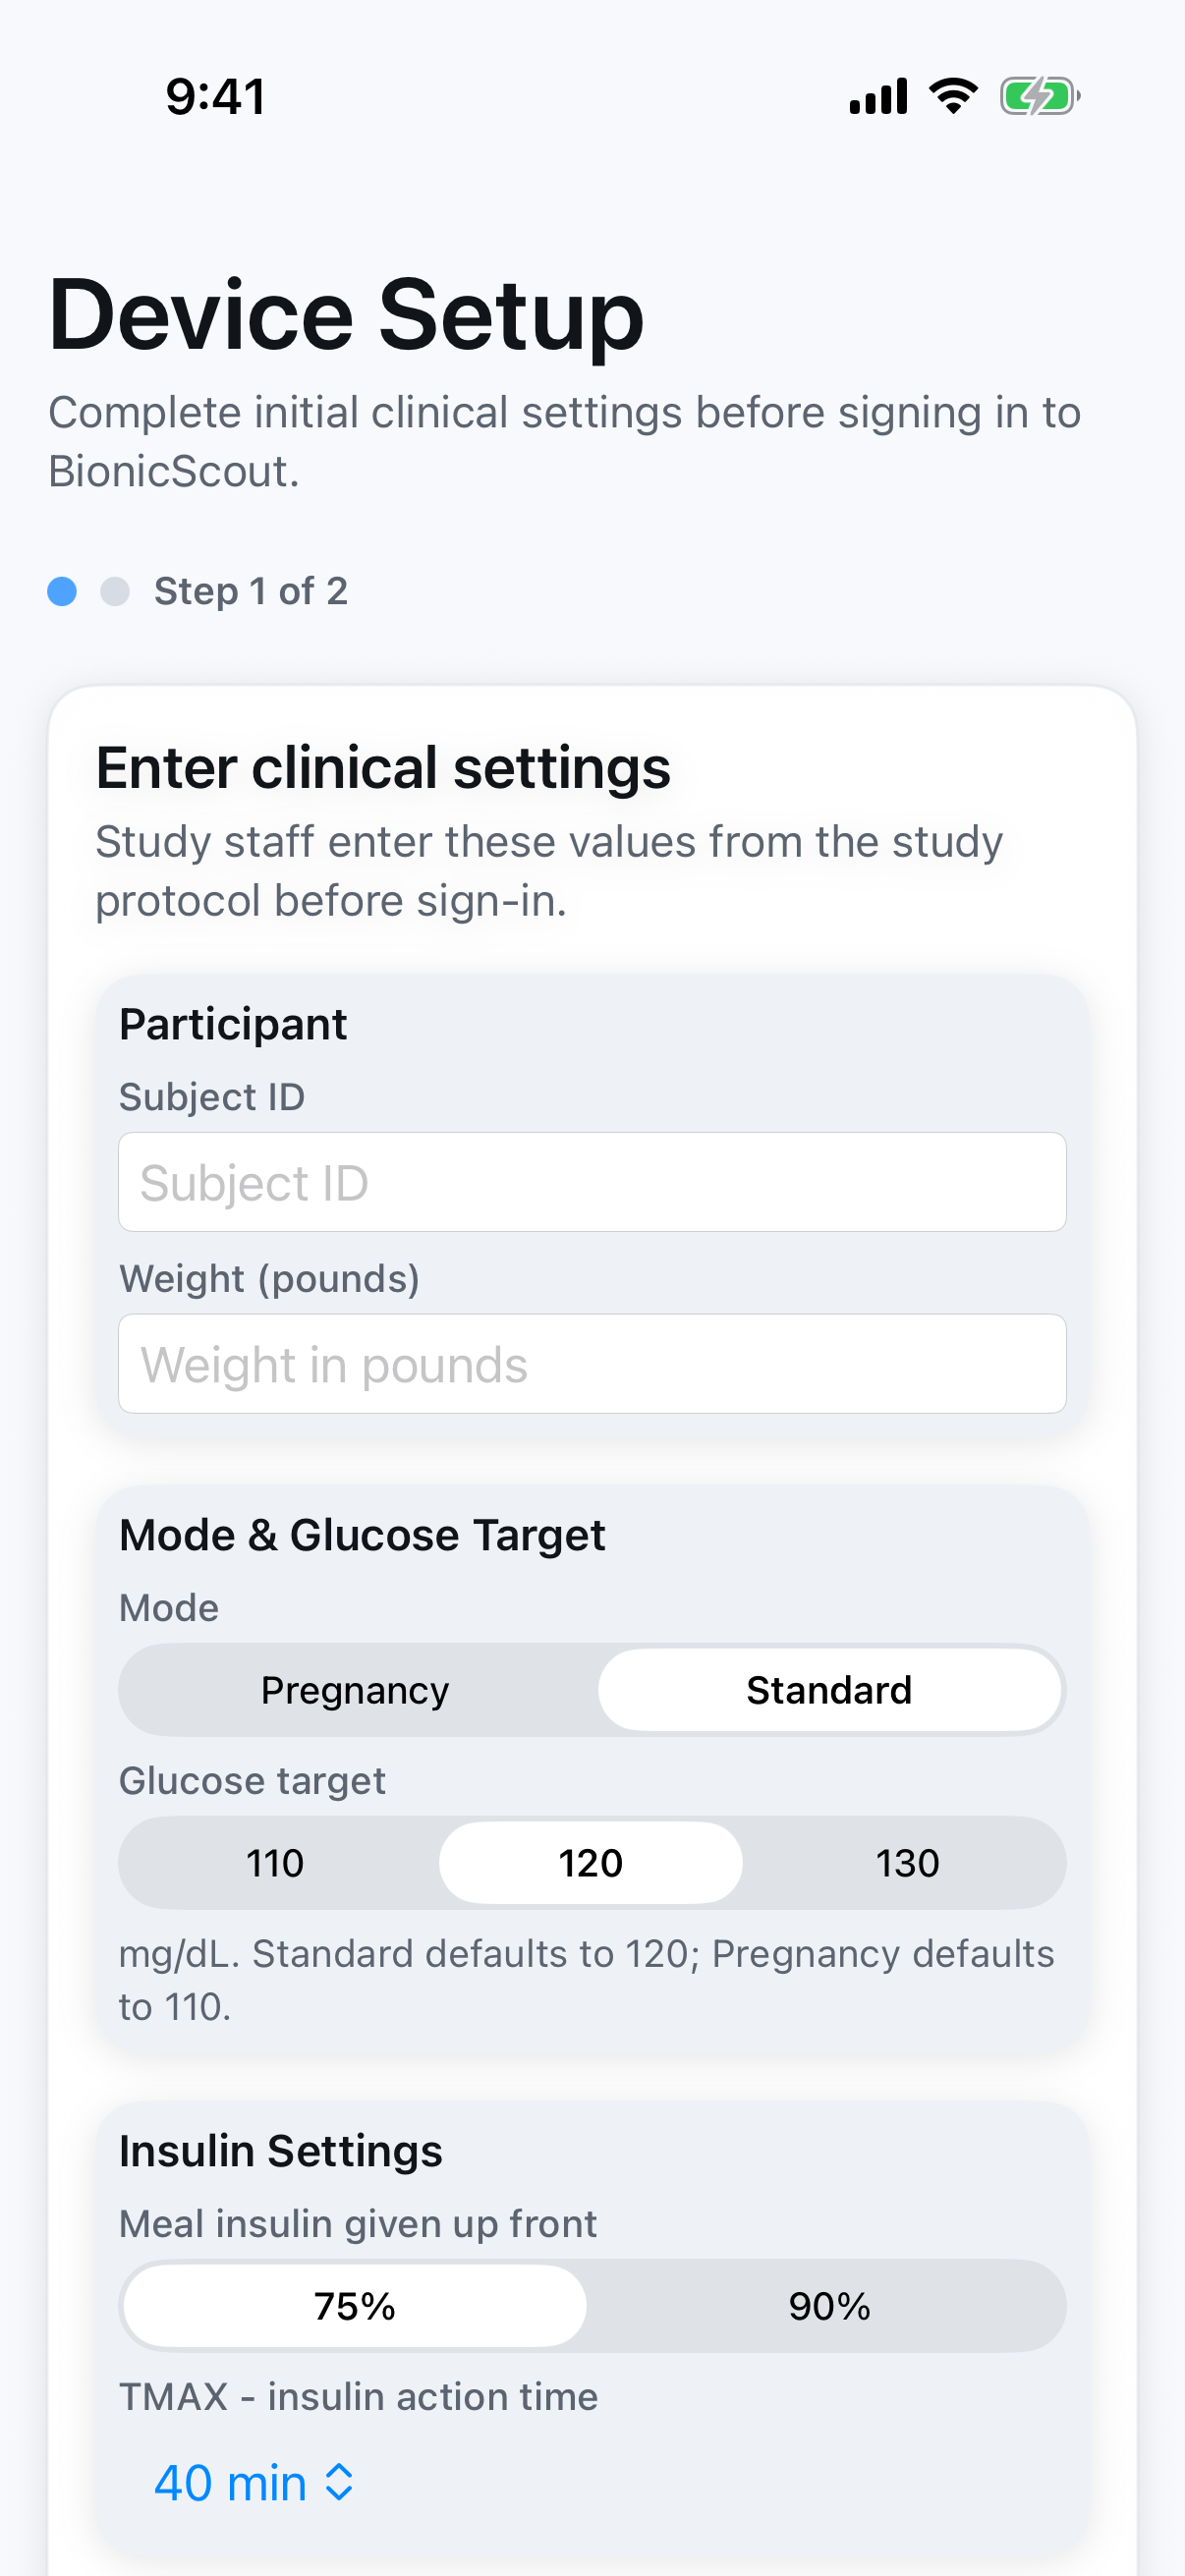
The very first time BionicLoop opens on a new phone, it shows a two-step Device Setup screen before sign-in. This is a study-team task, done once per phone. The app cannot reach the Home screen until this setup and the first sign-in are complete.
- Launch BionicLoop. The
Device Setupscreen appears (Step 1 of 2 - Enter clinical settings). - In
Participant, enter the Subject ID and weight (in pounds) from the approved subject plan. - In
Mode & Glucose Target, pick the mode: starts onStandard(target defaults to120 mg/dL). SelectingPregnancyswitches the target options and defaults to110. Change the target only if the approved subject plan says so. - In
Insulin Settings, set the meal insulin given up front (75%or90%) and TMAX - the insulin action time (defaults to40minutes for Fiasp). - Check the
Reviewbox - it repeats the mode and every value you are about to save. - Tap
Save Settings.
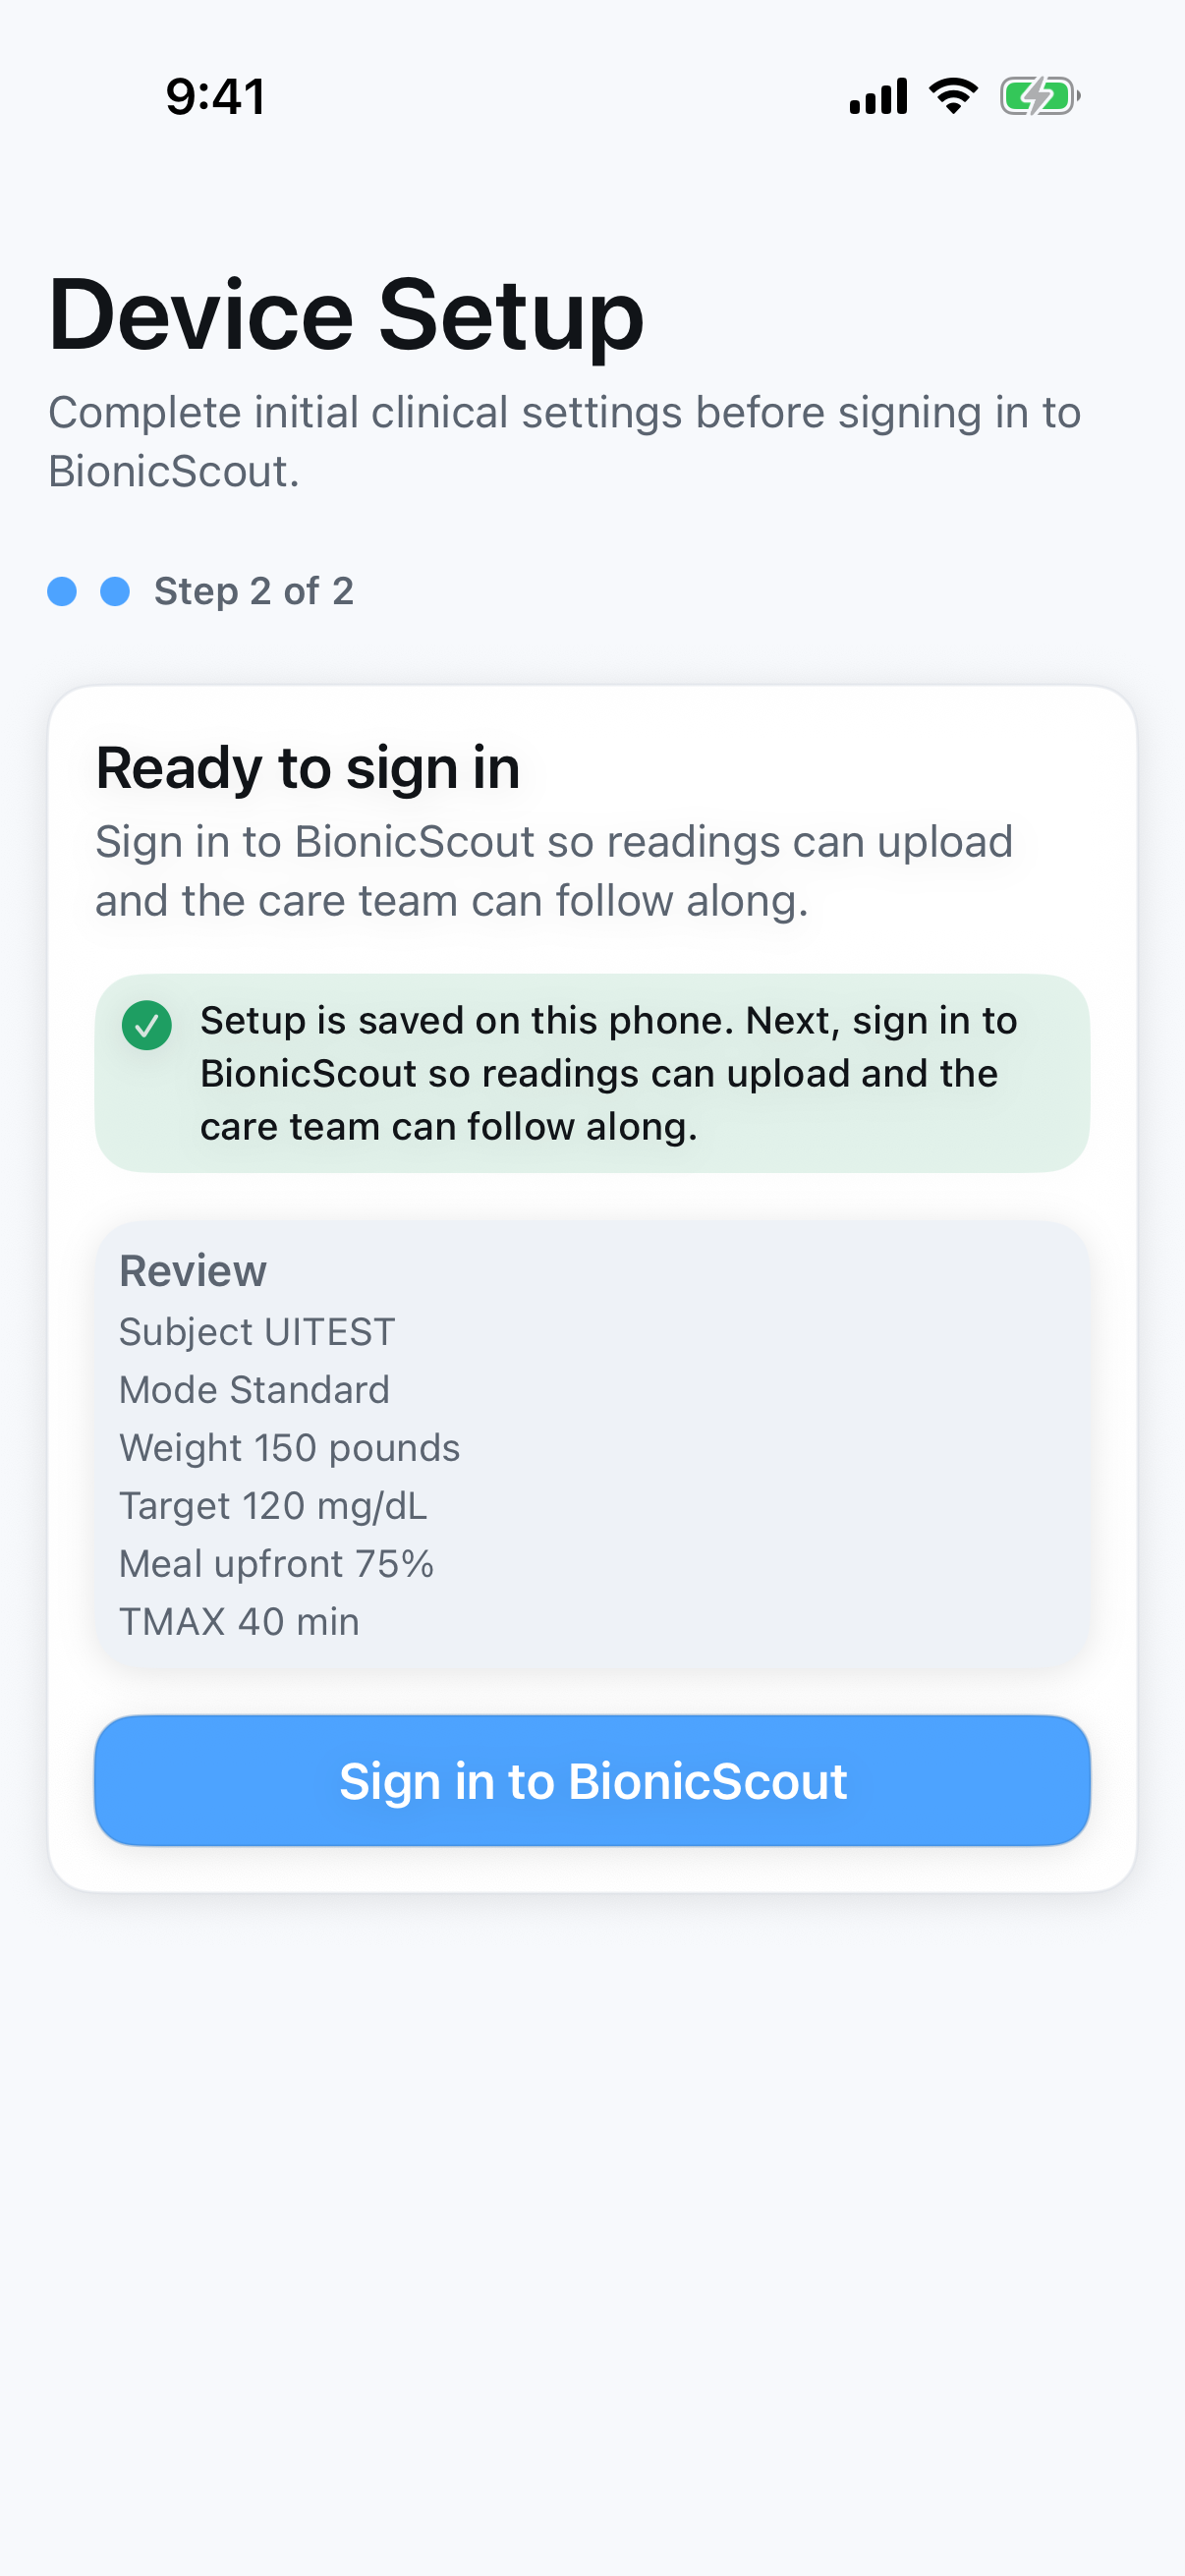
- The app confirms the setup is saved and moves to
Step 2 of 2. TapSign in to BionicScoutand sign in (the sign-in screen is shown in Part 1, Section 3).
- After sign-in, finish first-time setup from the Home settings gear:
- Dexcom G7 setup (Section 13.1).
- Pod setup (Section 13.3).
- Clinical Unlock Setup (Section 12.2), so settings can be changed later.
Notes:
- This first save does not ask for an unlock code. Every change after it requires Clinical Unlock (Sections 12.2 and 12.3).
- Double-check the target profile before saving. If a participant assigned to the Pregnancy configuration is left on the
Standarddefault, the algorithm will use higher glucose targets than intended for pregnancy. Fixing it afterward requires Clinical Unlock. - Installing the app: the study team provides the install link. Reinstalling after a deletion uses the same link; a reinstalled phone starts at this first-launch setup.
12. Settings and Clinical Configuration
12.1 Open Settings
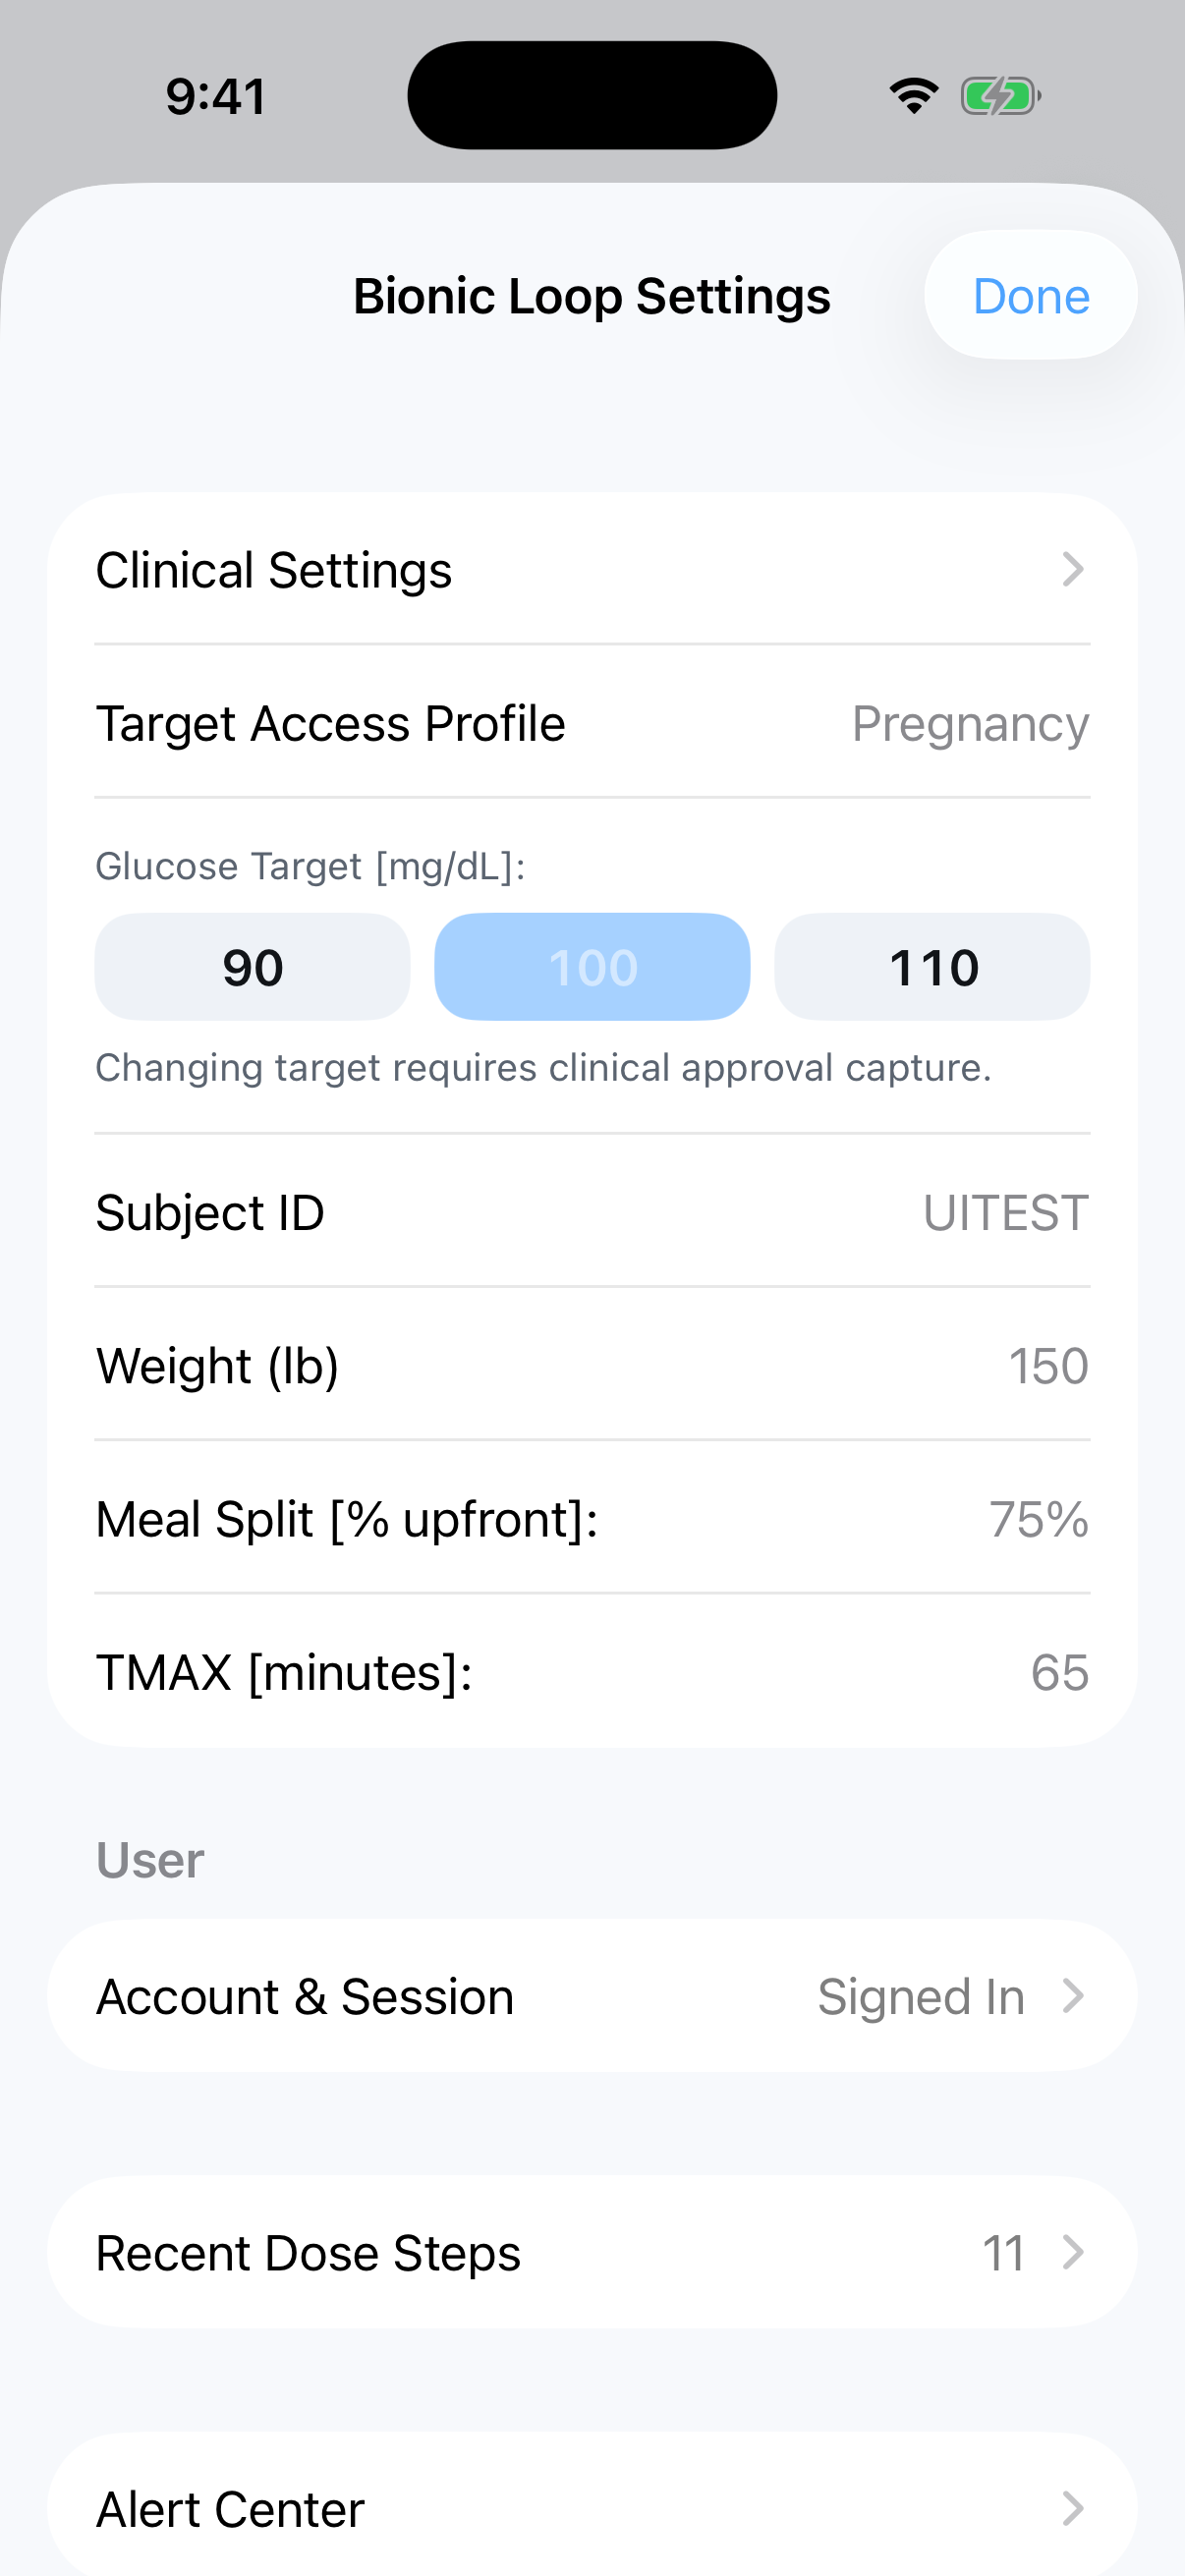
- Tap the settings gear on Home.
- Review the current target, subject ID, weight, and algorithm-input summary.
- Open
Exercise and Insulin Deliveryfor the Temporary Target (Pregnancy mode, Part 1 Section 7) and for insulin-suspension guidance. - Open device settings from this sheet when CGM or Pod setup/review is needed.
12.2 Clinical Unlock Setup (One-Time per Phone)
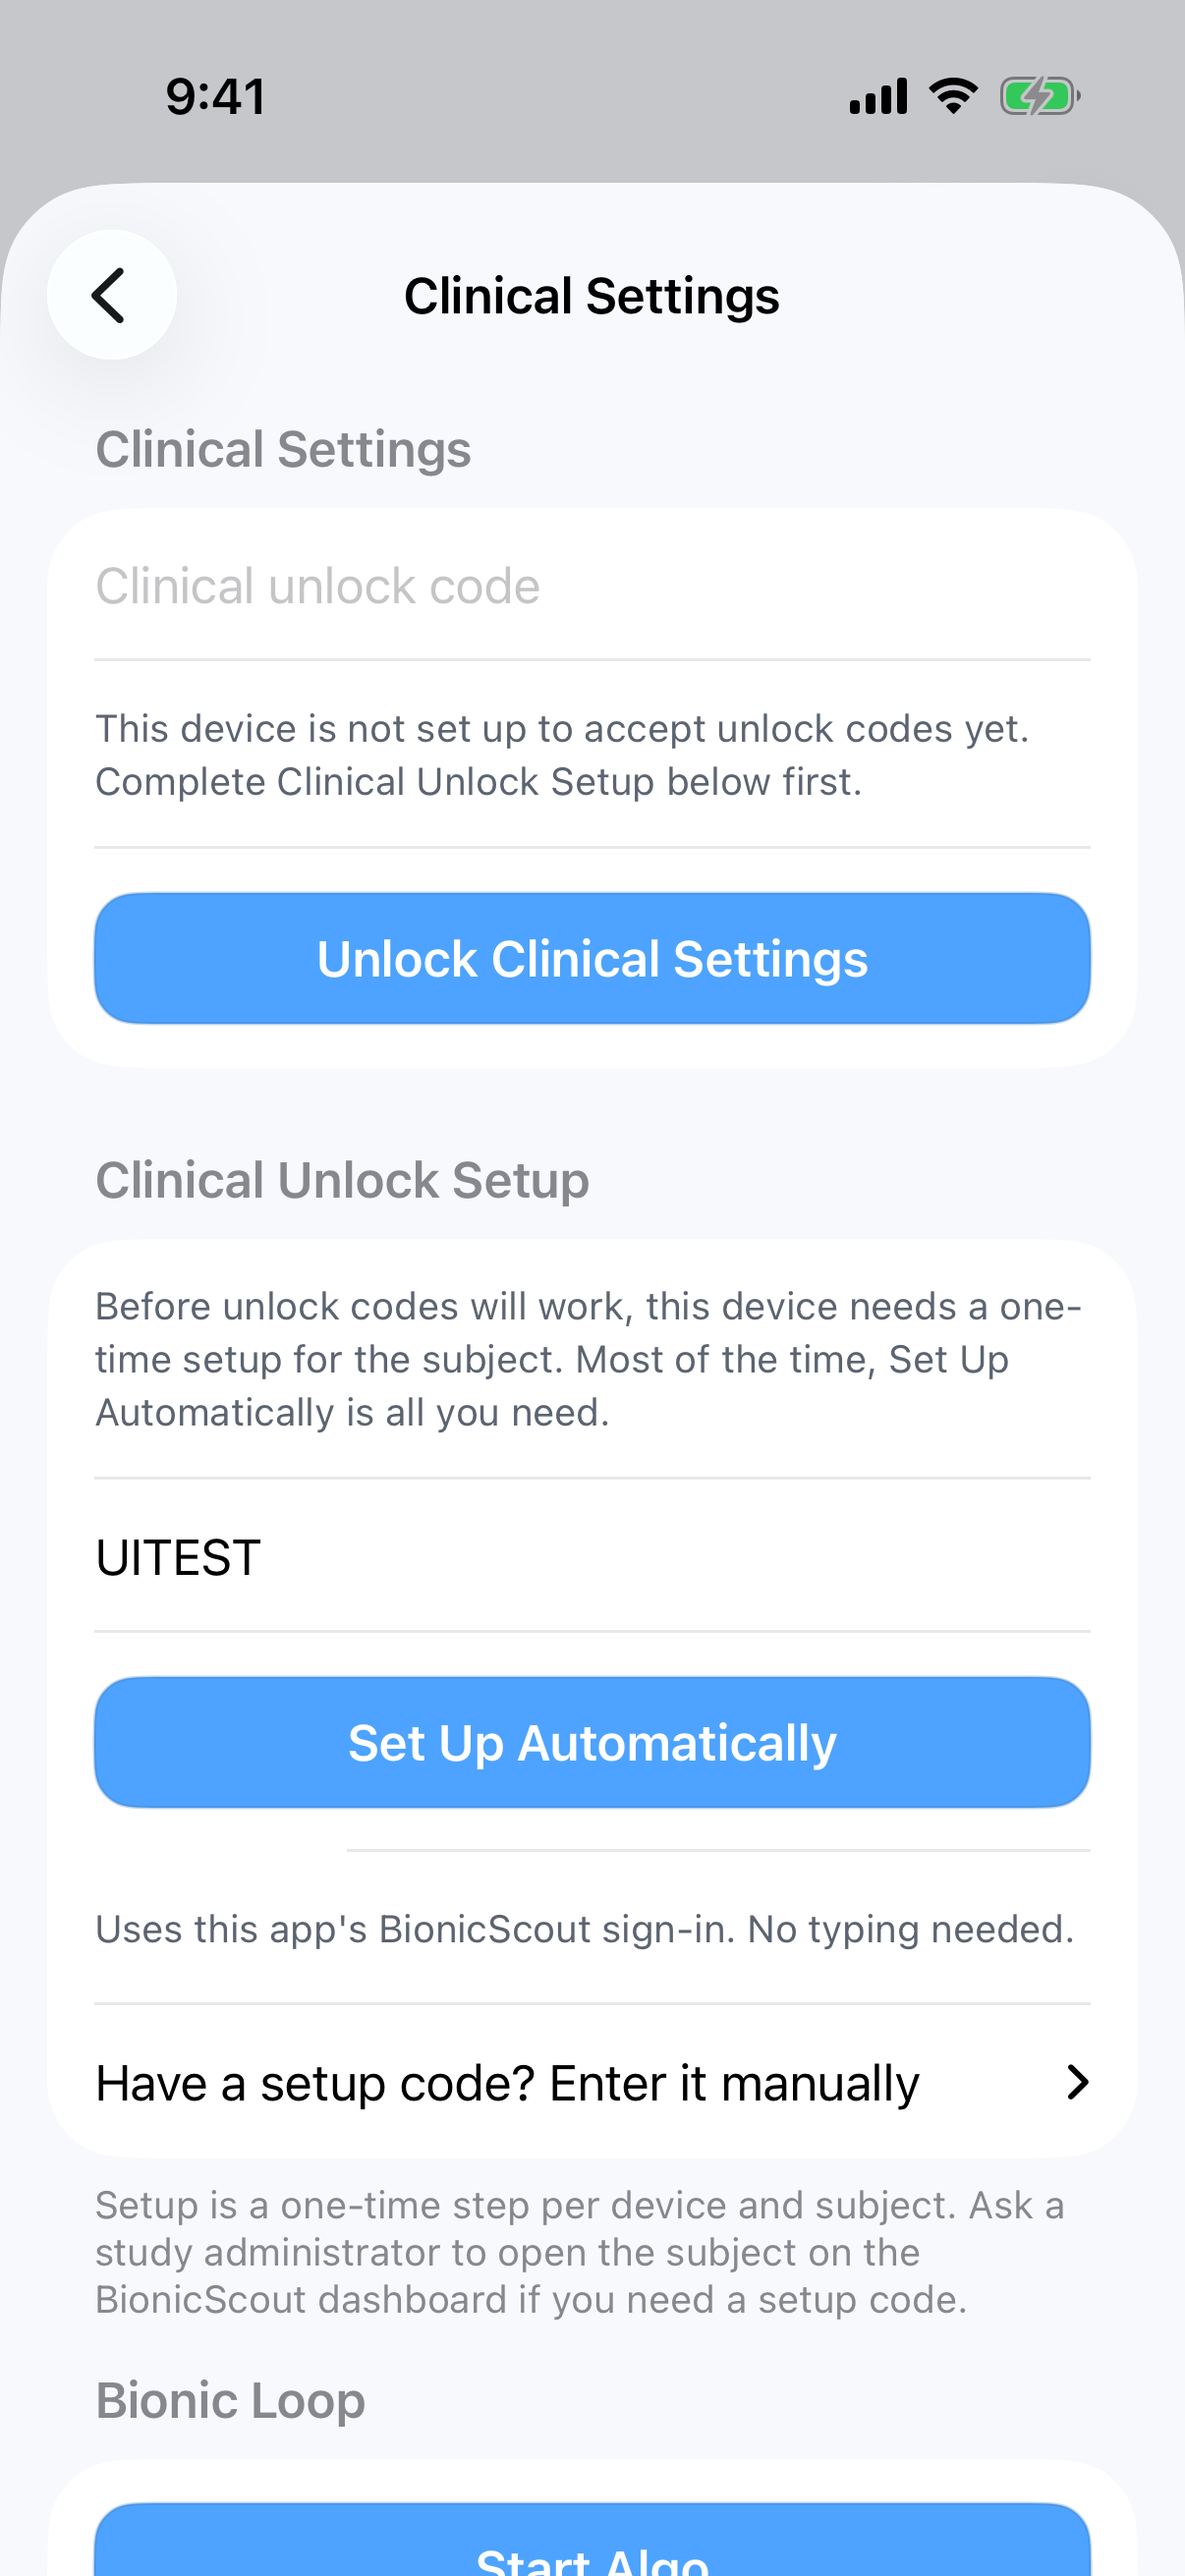
Changing saved clinical settings requires an unlock code, and unlock codes only work after a one-time setup that ties the phone to the subject. Do this once during first-time setup, after signing in.
- Open Settings, then
Clinical Settings. If the screen says "This device is not set up to accept unlock codes yet," complete this setup first. - Preferred path: confirm the Subject ID shown, then tap
Set Up Automatically. This uses the app's BionicScout sign-in - the phone must be signed in, and the subject must be assigned to this phone (that happens automatically after the first sign-in). - Alternative path: tap
Have a setup code? Enter it manually, enter the setup code provided by a study administrator from the BionicScout dashboard, then tapSave Setup Code. - When setup is complete, the screen shows the unlock setup as ready.
About unlock codes:
- Each unlock code works once. Get a fresh code from the study team (BionicScout dashboard) each time you need to unlock.
- An unlock ends on its own after a short time, or when you tap
Lock Clinical Settings. - After 5 wrong codes, the screen pauses new attempts for about a minute.
12.3 Change Clinical Settings
Clinical Settings are unlock-code protected and should only be changed by authorized users.
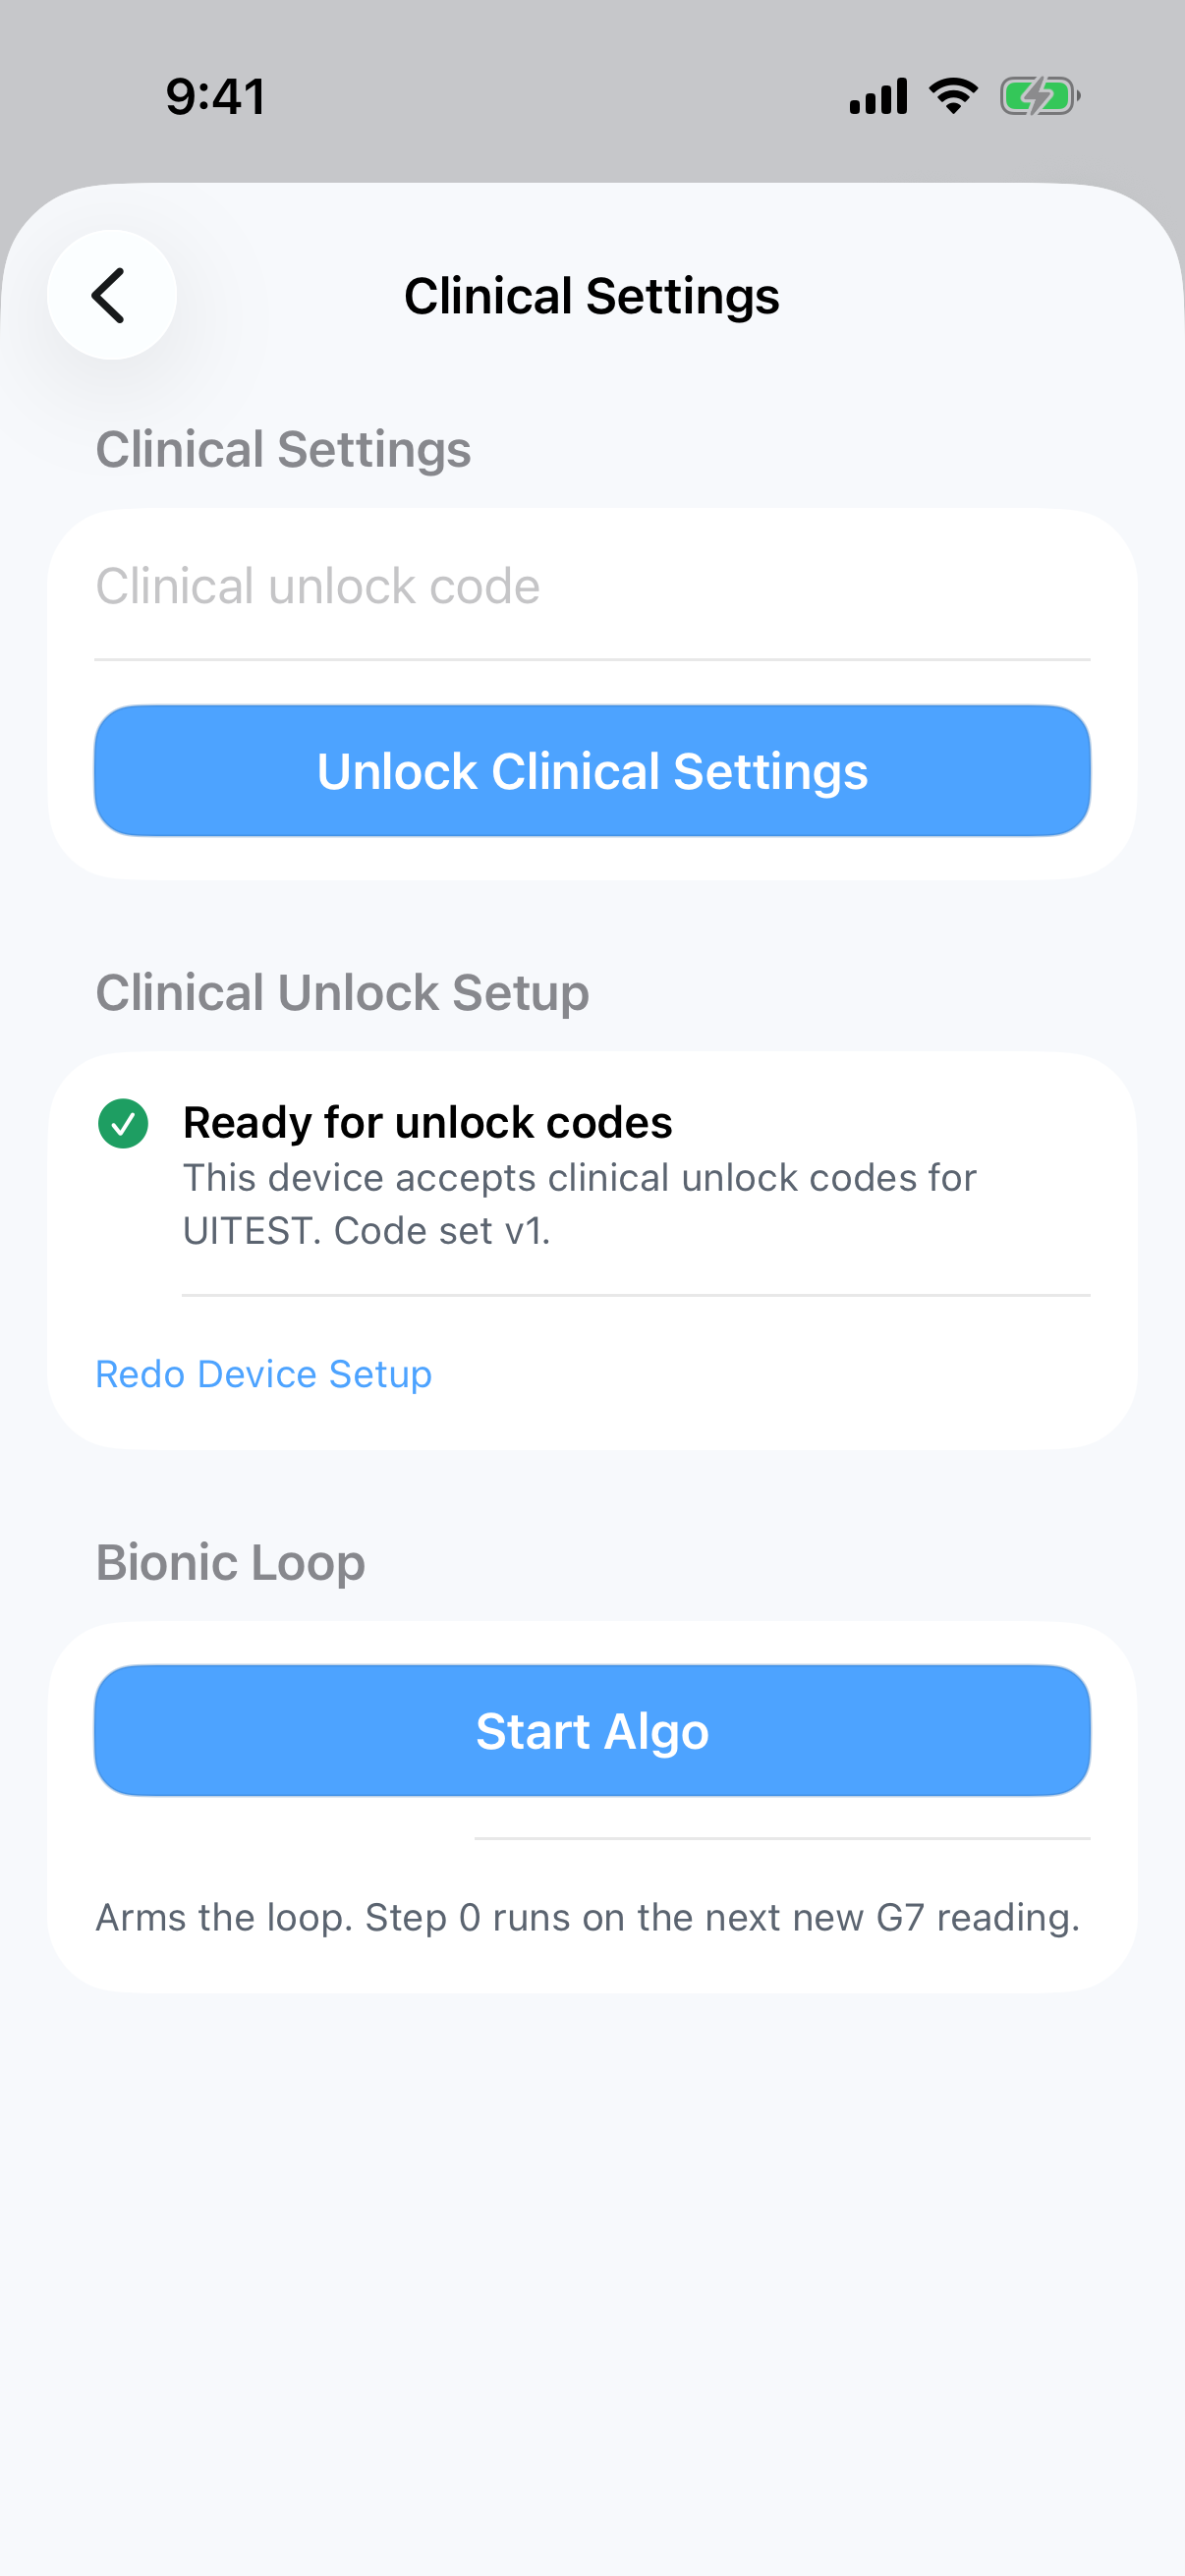
- Open Settings, then
Clinical Settings. - Enter the clinical unlock code and tap
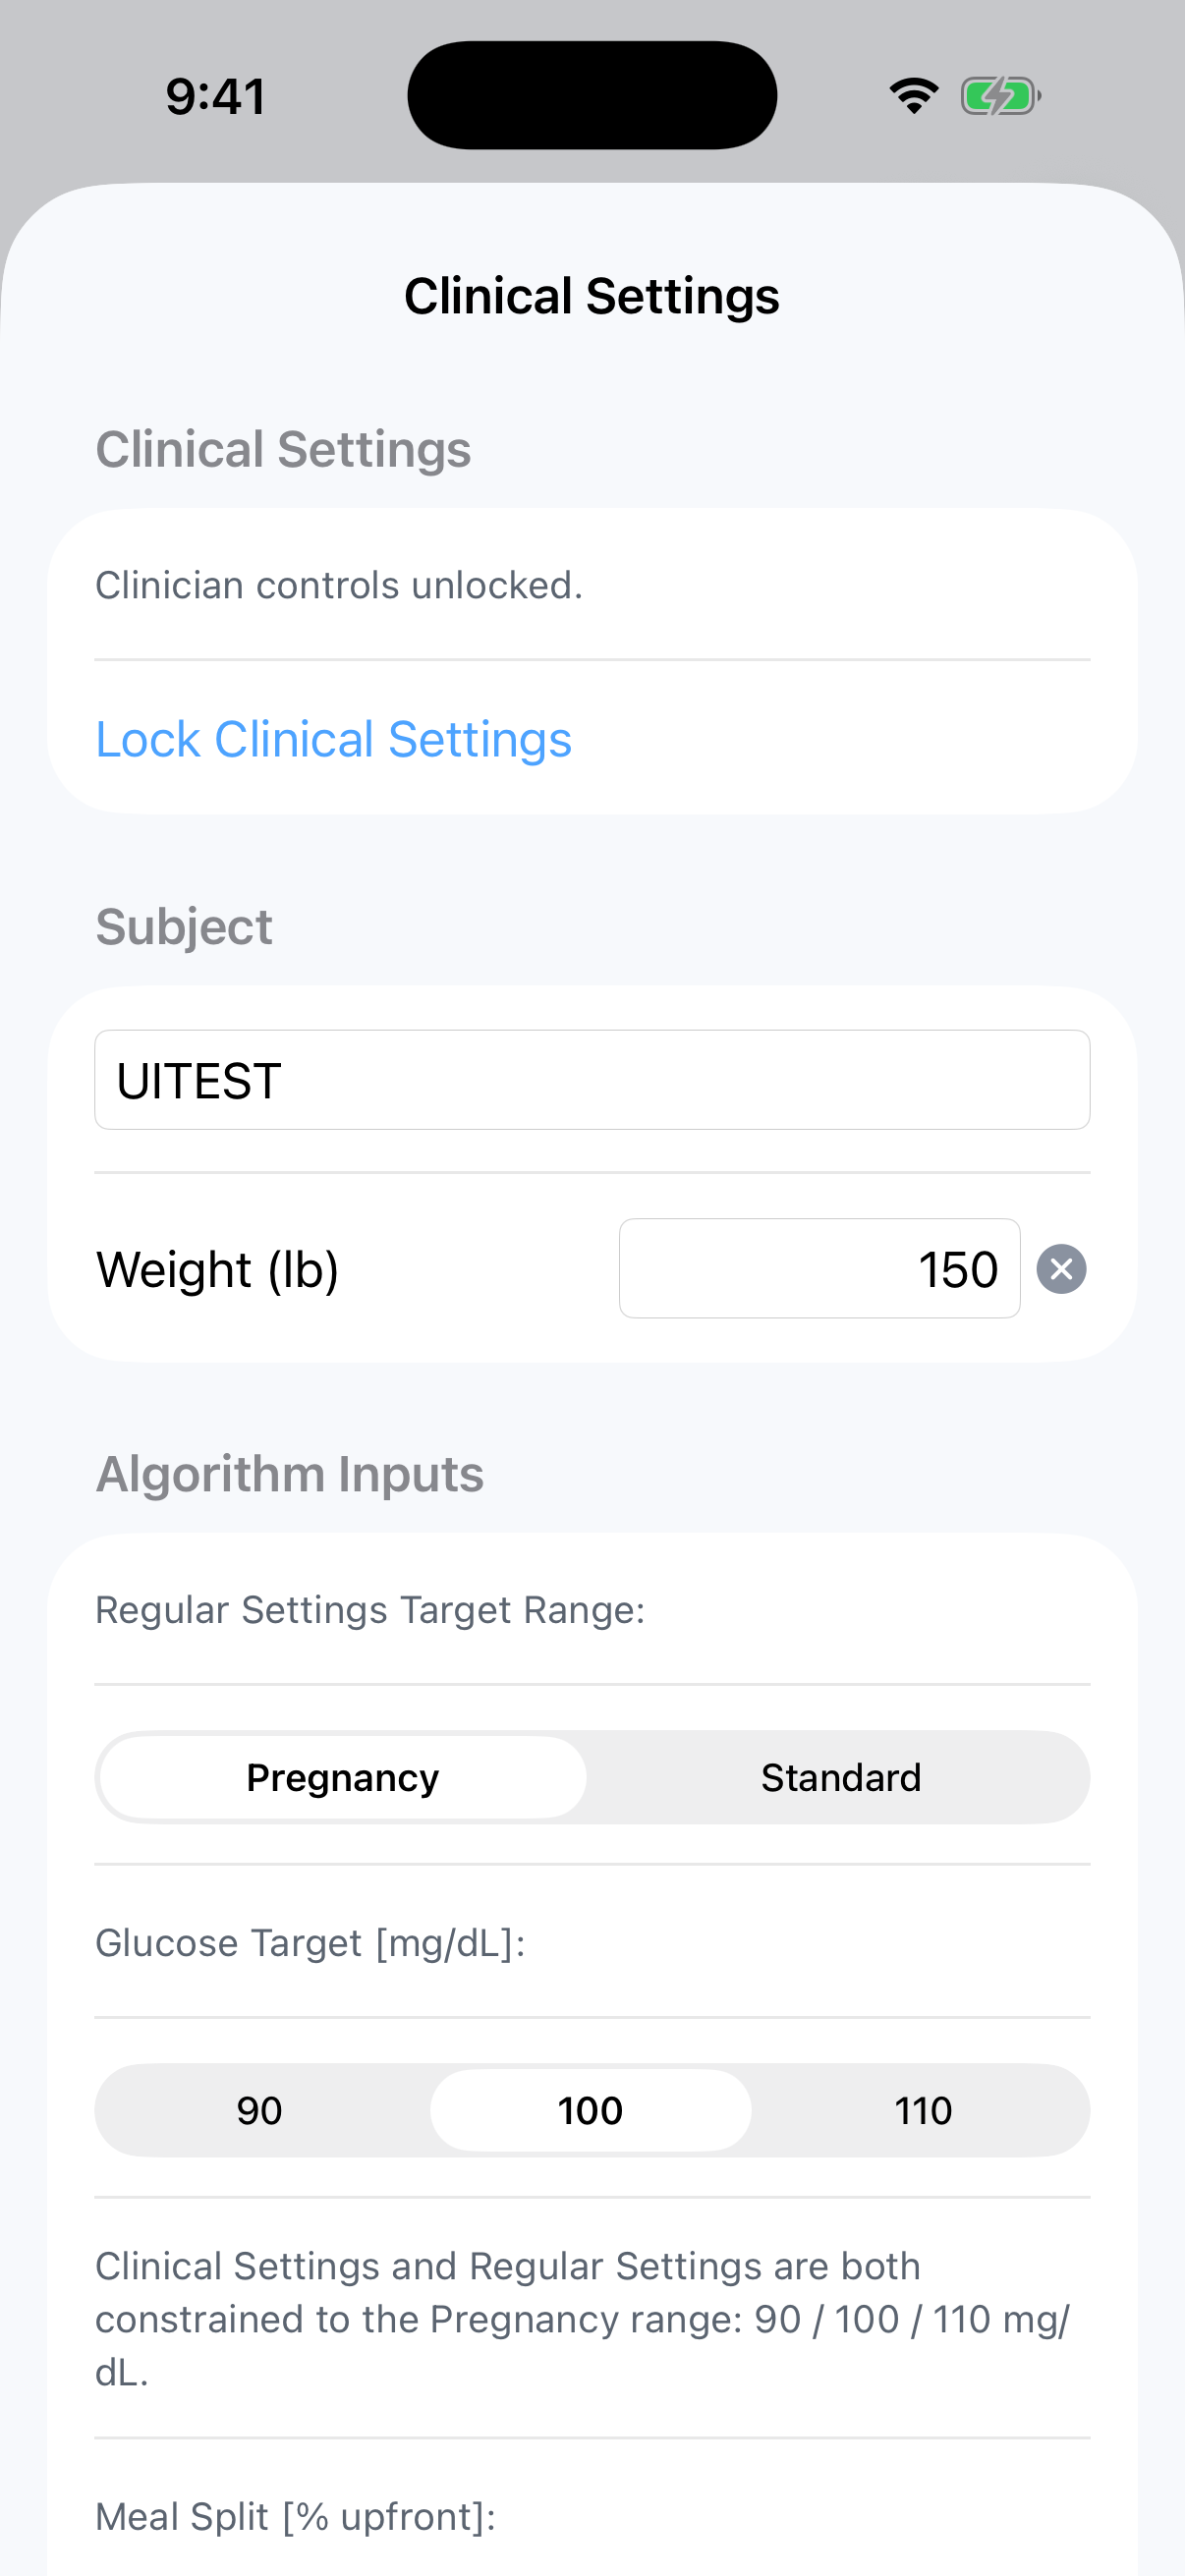
Unlock Clinical Settings. - Review or update: Subject ID, Weight (lb), glucose target, meal split, TMAX.
Switching the target profile from
StandardtoPregnancydrafts the meal split to90%(the Pregnancy default); nothing stored changes untilSave. - Changing the regular glucose target also asks for the name of the clinician who approved the change.
- Save only after confirming the values match the approved subject plan.
12.4 Start Algorithm Session
Use Start Algo only from Clinical Settings, and only when no active algorithm session is already running.
Before starting:
- Confirm subject ID and weight.
- Confirm the approved target profile and input settings.
- Confirm CGM and Pod workflows are ready enough to support the first anchored loop step.
12.5 Switching to a New Participant
Study phones are reused. When a participant finishes the study, use
New Participant Reset in Clinical Settings to prepare the phone for the
next person. (The Same-Participant Reset button next to it is different -
it restarts the algorithm for the same person and keeps their settings.)
Before the reset, deactivate and remove the Pod (Pod settings) - the reset refuses to run while a Pod is active.
Then:
- Open Settings, then
Clinical Settings, and unlock. - Tap
New Participant Reset. If an algorithm session is still running, the app first offersStop Session and Continue- confirm it. - Read the confirmation and tap
Erase and Start New Participant. - The phone erases the participant's settings, dosing history, alerts, sensor and Pod pairing, unlock setup, and sign-in, and returns to first-time setup (Section 11.3) ready for the next participant.
13. Device Workflows
13.1 Dexcom G7 First-Time Setup
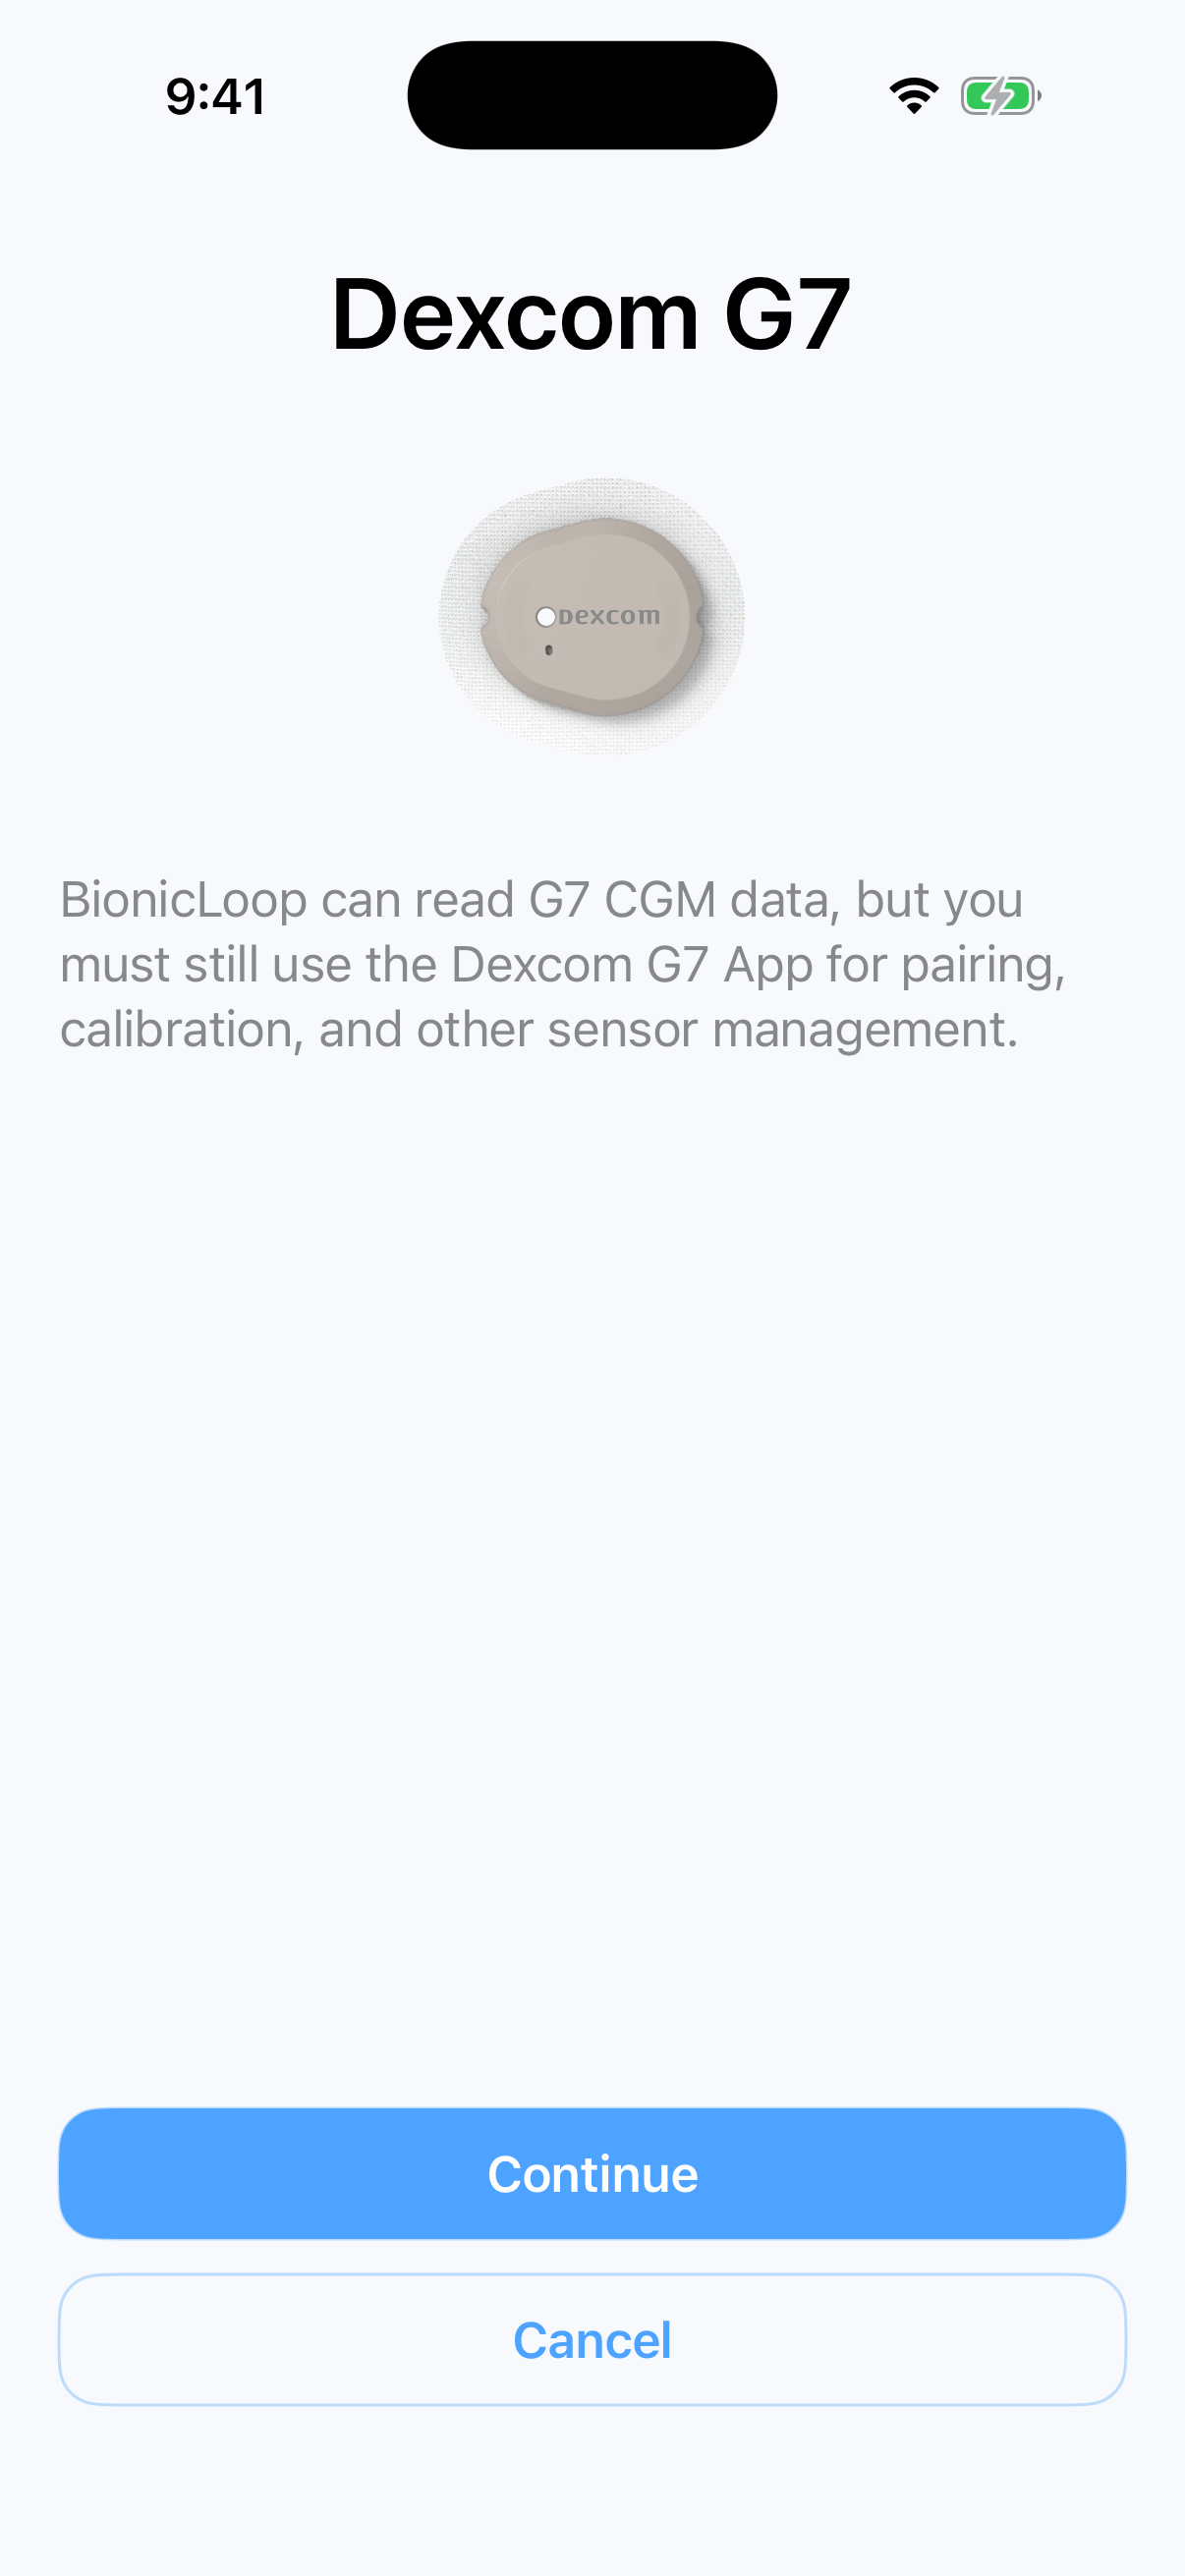
- Open Settings, then
Open CGM Settings. - Follow the guided Dexcom G7 setup path.
- Continue pairing/calibration/sensor-management tasks in the Dexcom app as required.
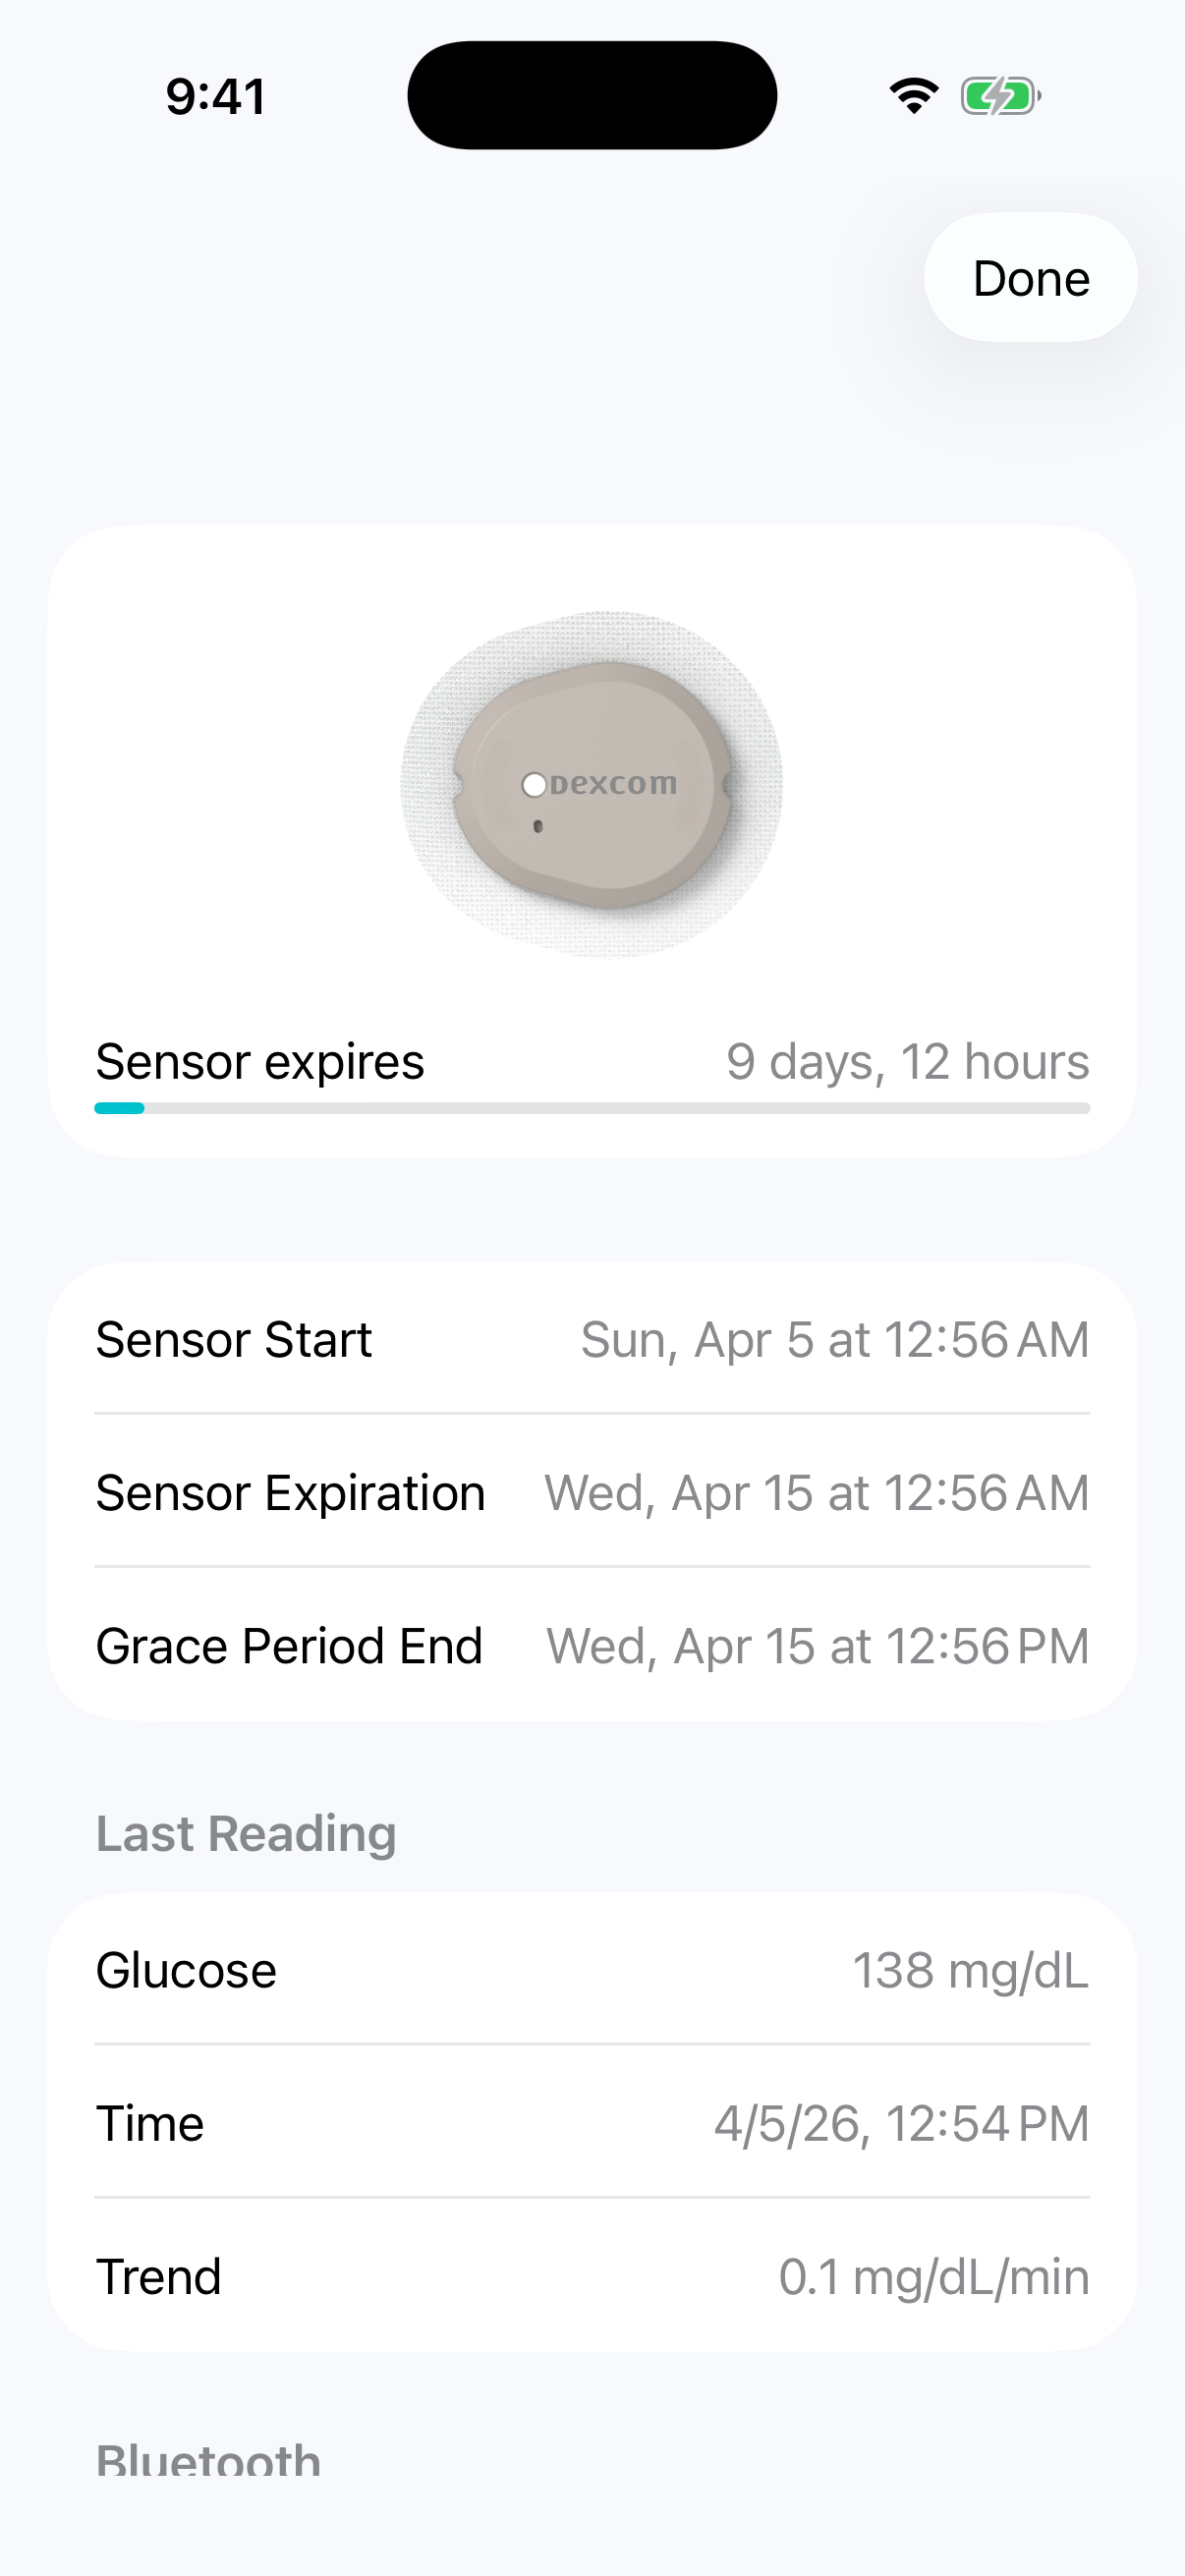
13.2 Review CGM Status
Check sensor expiration timing, last reading value and timestamp, trend information, and connection recency.
Scan for new sensor remains available even while BionicLoop is searching for
the sensor already in use. Use it only after starting a replacement G7 or when
the study team directs you to replace the current sensor. An old reading or a
temporary connection gap does not make BionicLoop release the current sensor.
After you choose Scan for new sensor, a Scanning for new sensor... row
shows that replacement acquisition is active. The replacement search survives
closing and reopening BionicLoop. If the new sensor has not connected after
10 minutes, BionicLoop shows Sensor Not Connected. Open the Dexcom app to
finish starting the replacement sensor, then return to BionicLoop Settings and
try again. Do not select replacement scanning merely to recover a temporary
signal gap from the sensor already in use.
Keep the study phone next to the intended replacement sensor and away from other active G7 sensors while BionicLoop acquires it. After BionicLoop connects, compare the sensor status and glucose reading with the intended session in the Dexcom app before relying on BionicLoop for automated dosing. Do not select a sensor by a Bluetooth name or suffix.
13.3 Pod Setup
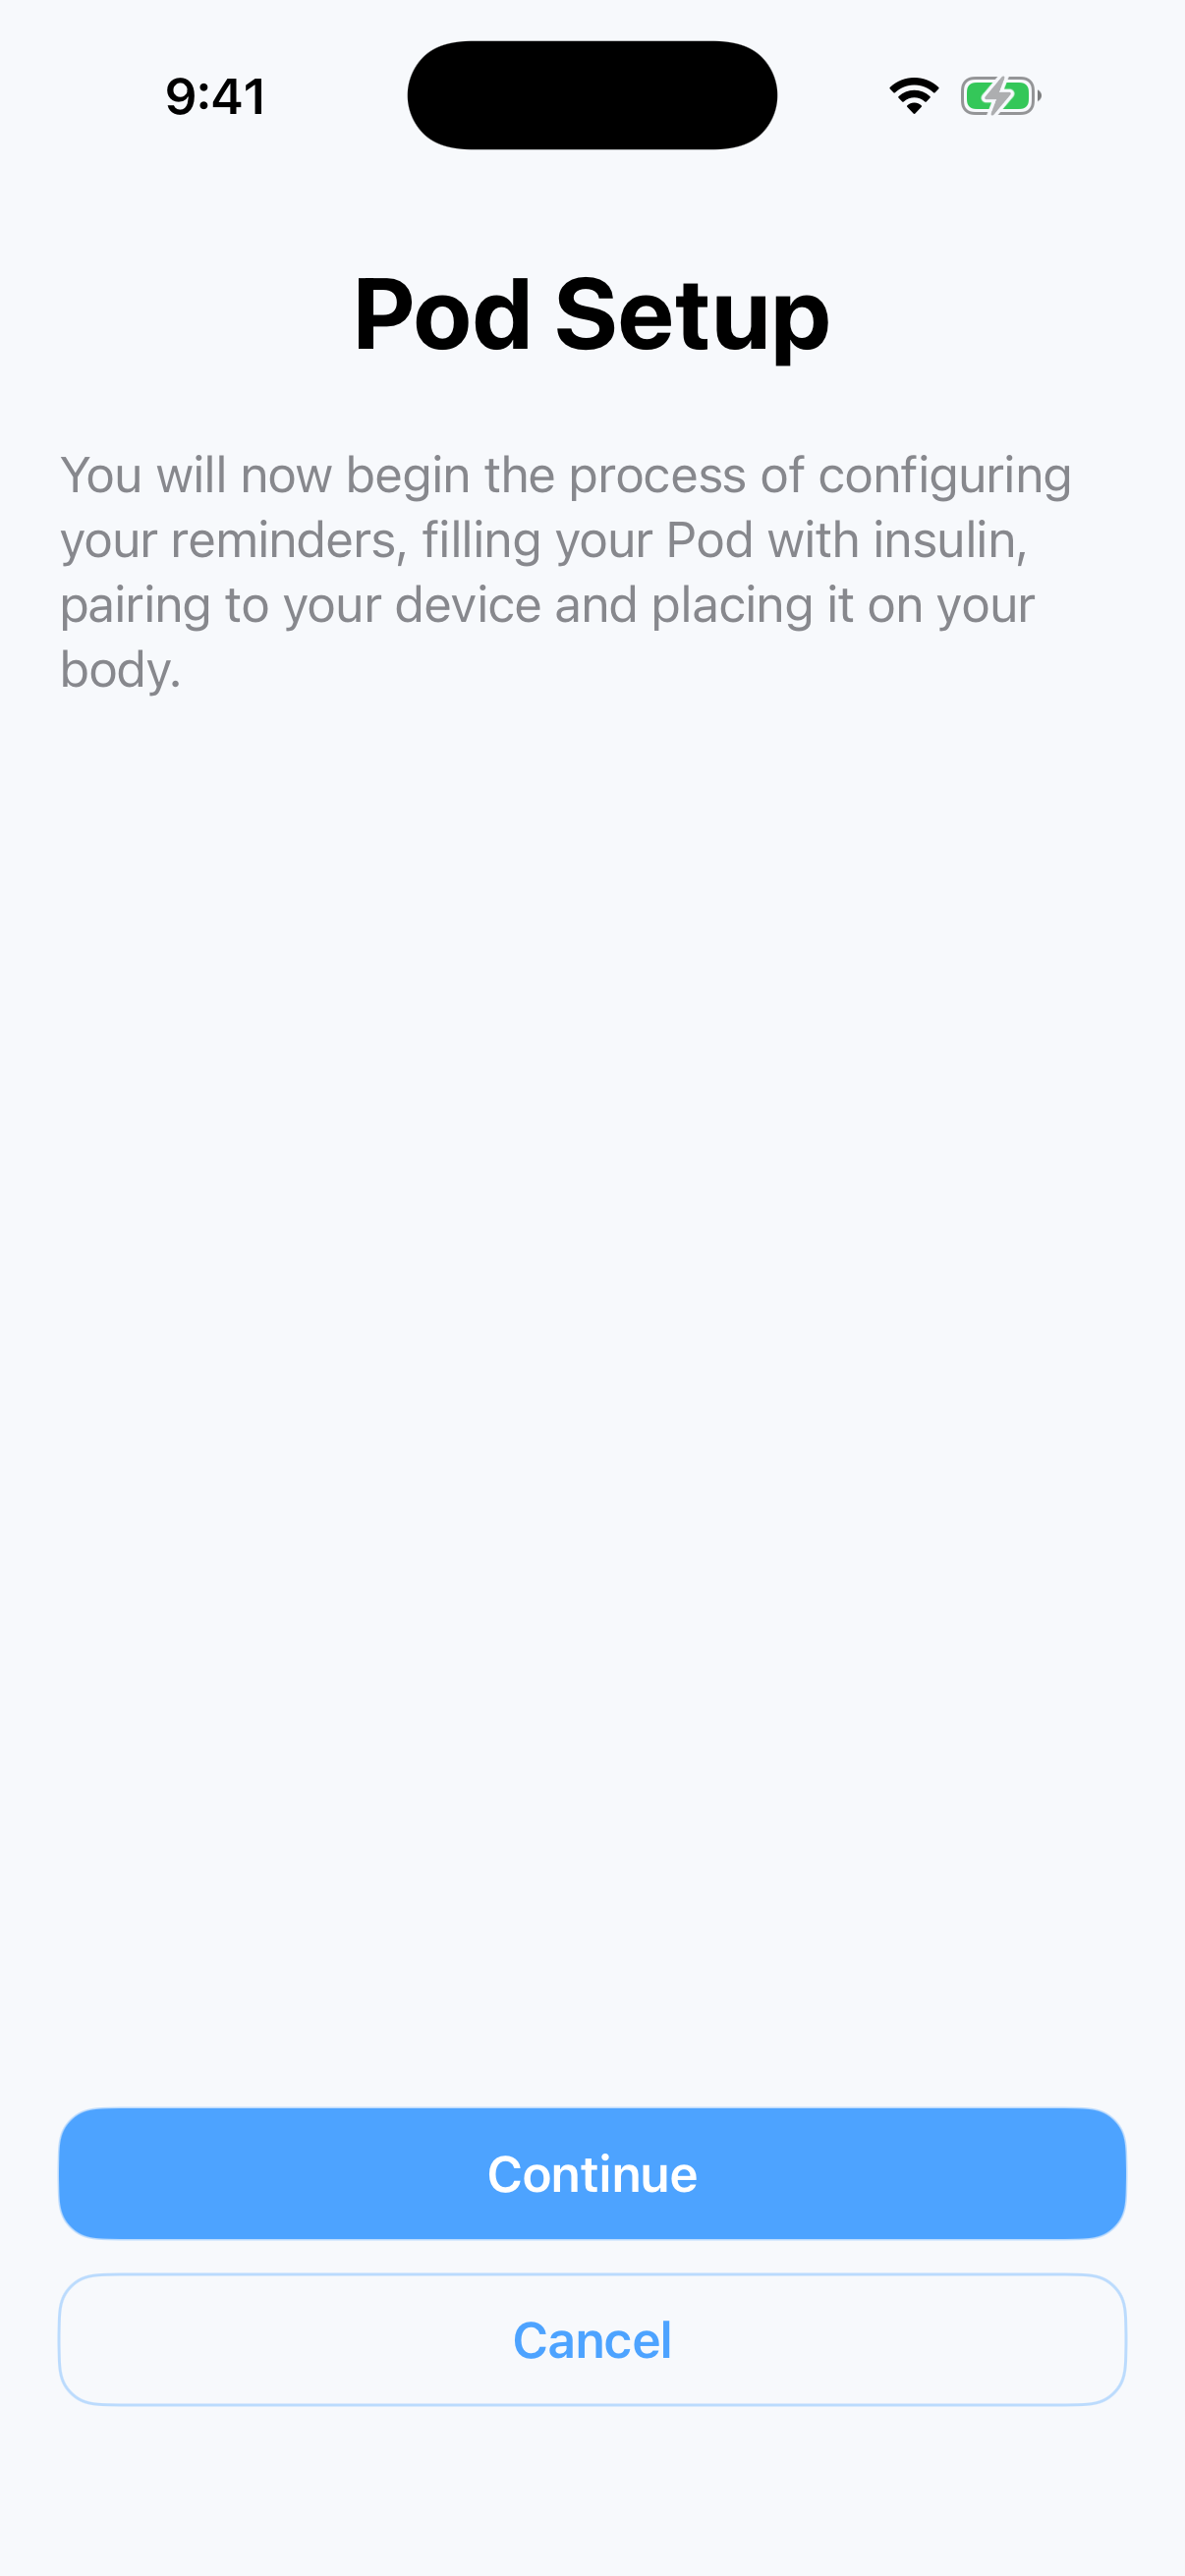
- Open Settings, then
Open Pod Settings. - Follow the Pod setup instructions for reminder configuration, fill, pairing, and placement.
- Complete all physical device steps per Omnipod instructions.
Before proceeding with Pod-dependent actions, confirm: the Pod is active, signal is present, no pump fault/incompatible/setup-incomplete alert is active, and the Pod is not beyond its usable service window.
14. Reviewing Recent Dose Steps
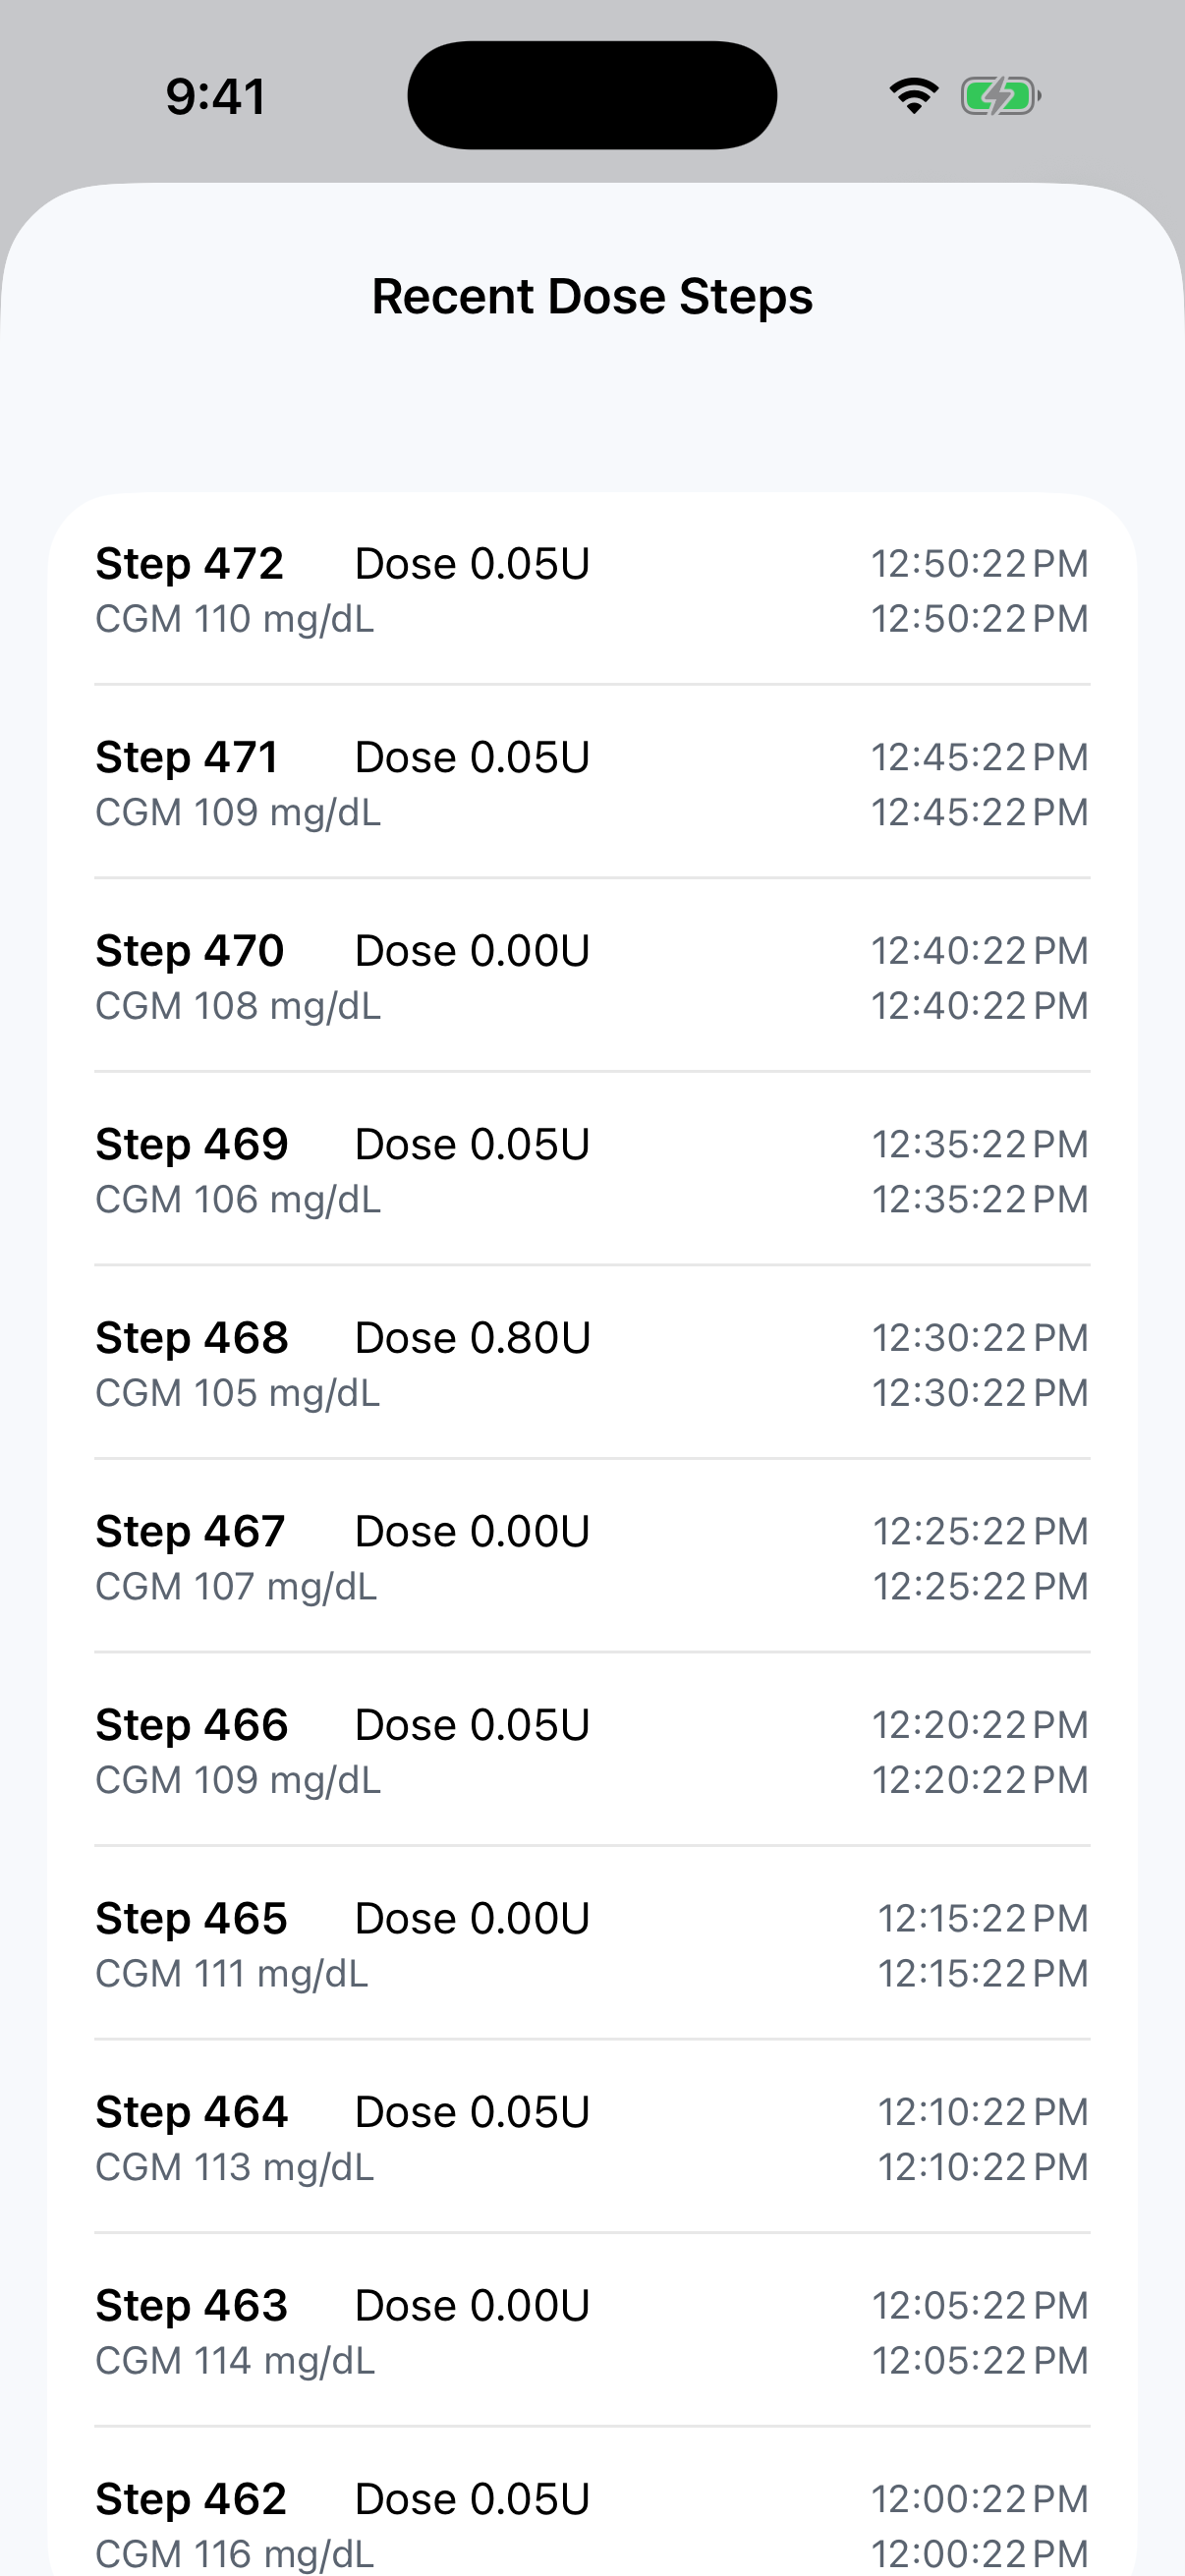
Use Recent Dose Steps (in Settings) to review what the algorithm recently asked for and what the Pod confirmed.
- Open Settings, then
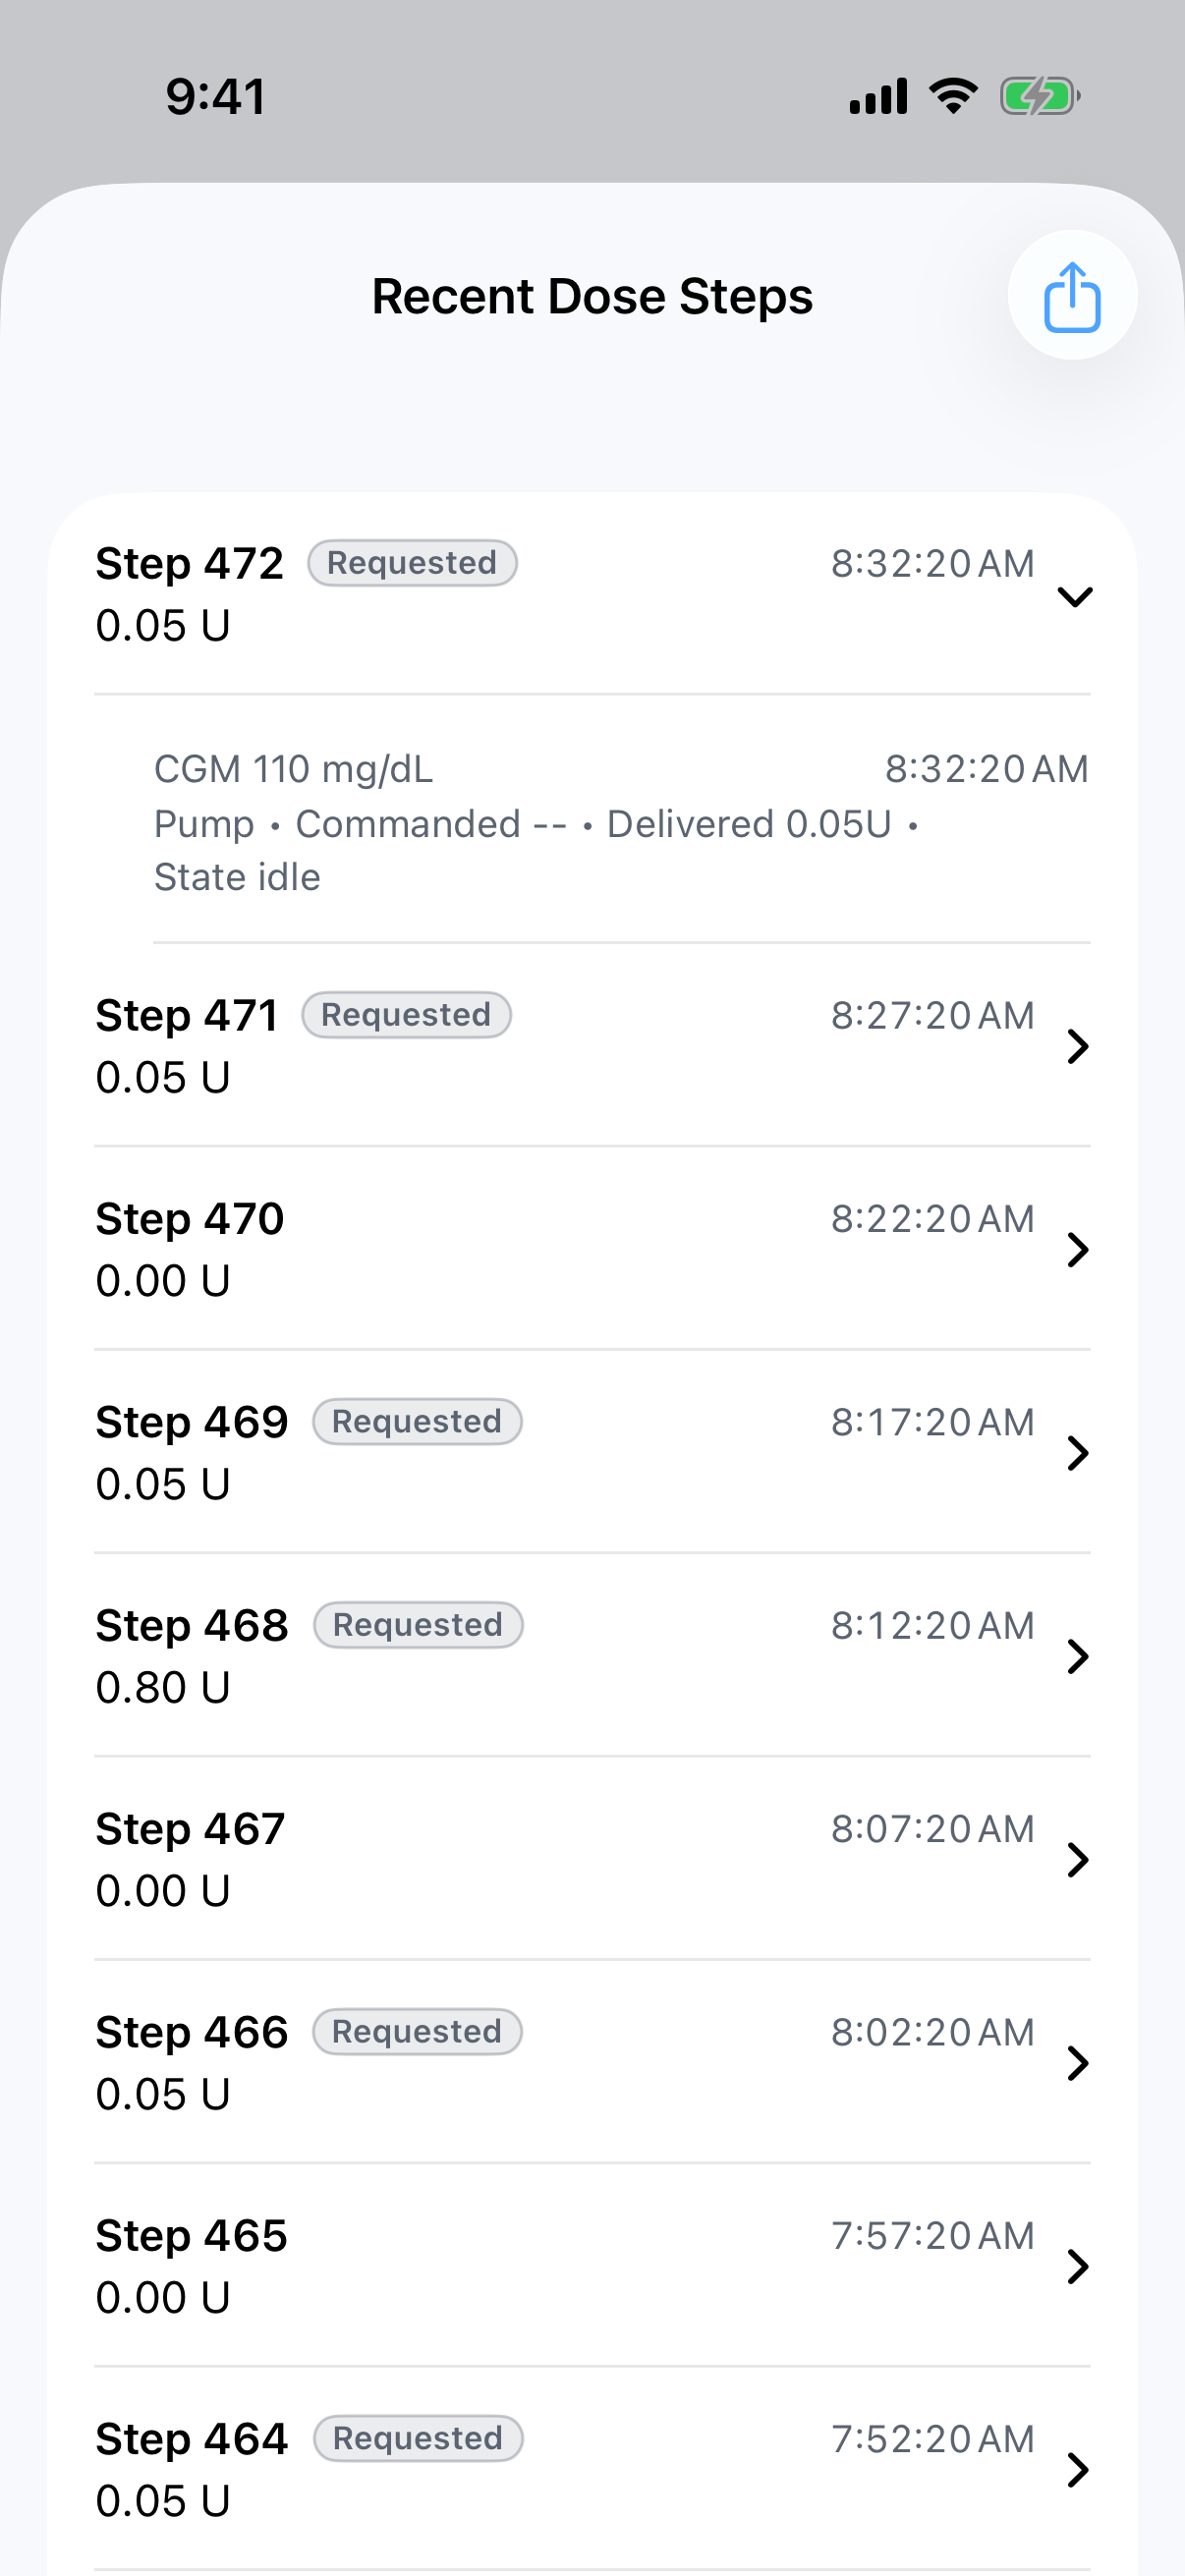
Recent Dose Steps. - Each row shows the step, the insulin amount, the CGM value used, and a status.
- Tap a row to expand its detail, including timestamps and the meal context when one applies.
14.1 What the Step Statuses Mean
The step list distinguishes what was requested from what the Pod confirmed:
| Status | Meaning |
|---|---|
| Delivered | The Pod confirmed the insulin was delivered |
| Delivering | The Pod is actively delivering this dose |
| Requested | The dose command was sent; Pod confirmation has not been received yet |
| Assumed delivered | Confirmation was impossible (for example, the Pod was replaced); the amount is treated as delivered per clinical policy |
| Replayed | A catch-up record written after a connection gap so the history stays complete |
| No dose | The step ran and no insulin was needed |
Alongside step rows, Fallback schedule rows appear whenever the Pod's
programmed backup schedule is armed, updated, or checked and found
unchanged. Each shows the four programmed segment rates and, per segment,
whether the rate was observed or imputed.
Canceled deliveries keep their evidence across an app relaunch. A partial that was capped while delivery was still active may later show a higher settled amount once the same Pod confirms it - other outcomes do not change on their own.
Treat a persistent Requested or an unexpected Assumed delivered as worth reviewing: confirm current Pod state and the surrounding steps.
15. Alert Reference
The table below is generated directly from the app's alert catalog and matches the installed software. Severity meanings: Safety-critical alerts affect active therapy and require action; Action needed alerts require a user response; Informational alerts provide context only.
On Home, when several alerts are active at once, the most severe shows first and generic alerts are hidden while a more specific active alert already explains the same problem. When that happens, a tappable "related alert in Alert Center" line appears under the visible card, so the bell count and the Home surface never silently disagree. Alert Center always shows the complete list.
15.1 Alert-Response Principles
- Check whether the alert changes therapy readiness.
- Confirm the device state directly when applicable.
- Review Home and recent dose context.
- Escalate unresolved therapy-impacting conditions instead of repeatedly retrying actions.
16. Meal Availability Reference
When meal announcement is unavailable, the composer explains why with one of the following messages (generated directly from the app source). Time-dependent messages show the actual time in the app; {time} marks where it appears.
If the composer is already open when a condition arises, the message renders inside the composer with the user's selections preserved, and clears on its own if the condition resolves.
17. Troubleshooting and Recovery
| Situation | What to do |
|---|---|
| No current CGM value shown | Check the Dexcom app, sensor state, and reading freshness before relying on BionicLoop glucose context |
| Meal announcement unavailable | Read the message and check section 16; confirm Pod, CGM freshness, timing window, and session status |
| Pod unavailable / no active Pod | Reconnect or replace the Pod per protocol before proceeding |
| Pump fault / incompatible alert | Treat as therapy-impacting; replace/recover per protocol and verify Home clears appropriately |
| Pod expired or stopping soon | Plan Pod replacement before continued therapy reliance |
| Partial delivery recorded | Review the delivered amount, confirm whether further meal announcement is still needed, and document if clinically relevant |
| Backup insulin during a connection gap could not be confirmed | Contact the study team; review Recent Dose Steps and the surrounding replayed records |
| Login required for remote monitoring | Reauthenticate when allowed; document the monitoring gap if required |
17.1 If the Screen State and Device State Do Not Match
- Stop and reassess.
- Review active alerts.
- Verify Dexcom state in the Dexcom app and Pod state in the Pod workflow.
- Capture screenshots if needed.
- Escalate per site process.
18. Documentation and Escalation
For unresolved or therapy-impacting conditions:
- Stabilize the situation per study protocol.
- Record the time and sequence of events.
- Capture the relevant Home / Alert Center / device screen.
- Note any partial delivery amount or relevant recent step context.
- Escalate to the supervising clinical/study contact.
Appendix A. Figure Index
| Figure | File | Section use |
|---|---|---|
| Figure 1 | home-default.png |
Home orientation |
| Figure 2 | home-alert-stack.png |
Alert stack, collapsed |
| Figure 3 | home-alert-stack-expanded.png |
Alert stack, expanded |
| Figure 4 | auth-login-start.png |
Sign in |
| Figure 5 | home-manual-bg.png |
Manual BG, empty entry |
| Figure 6 | manual-bg-entered.png |
Manual BG, value typed |
| Figure 7 | manual-bg-confirm.png |
Manual BG, exact-value review alert |
| Figure 8 | manual-bg-out-of-range.png |
Manual BG, out-of-range |
| Figure 9 | home-meal-announcement.png |
Meal composer |
| Figure 10 | meal-ready-to-deliver.png |
Meal ready-to-deliver |
| Figure 11 | home-meal-cancel-delivery.png |
Cancel-delivery control |
| Figure 12 | home-meal-cancel-delivery-partial.png |
Partial-delivery summary |
| Figure 13 | home-meal-cancel-delivery-ready.png |
Re-announce after cancel |
| Figure 14 | temporary-target-selection.png |
Temporary Target selection |
| Figure 15 | temporary-target-confirm.png |
Temporary Target confirmation |
| Figure 16 | home-temporary-target-active.png |
Temporary Target active (Home) |
| Figure 17 | home-alert-center.png |
Alert Center |
| Figure 18 | clinical-onboarding-settings.png |
First launch, clinical settings step |
| Figure 19 | clinical-onboarding-signin.png |
First launch, ready to sign in |
| Figure 20 | home-settings.png |
Settings |
| Figure 21 | clinical-unlock-setup.png |
Clinical unlock one-time setup |
| Figure 22 | clinical-unlock-locked.png |
Clinical settings locked, unlock entry |
| Figure 23 | home-clinical-settings.png |
Clinical settings unlocked |
| Figure 24 | cgm-setup.png |
CGM setup |
| Figure 25 | cgm-settings.png |
CGM settings |
| Figure 26 | pump-setup.png |
Pod setup |
| Figure 27 | recent-dose-steps.png |
Recent dose review |
| Figure 28 | recent-dose-steps-expanded.png |
Recent dose detail |
Appendix B. Abbreviations and Acronyms
| Abbreviation | Meaning |
|---|---|
| IFU | Instructions for Use |
| CGM | Continuous Glucose Monitor |
| BG | Blood Glucose |
| TMAX | Time to maximum insulin effect parameter |
| DASH | Omnipod DASH pump system |
Appendix C. Daily Use Quick Checklist
- Confirm the correct subject and active session context.
- Confirm CGM freshness.
- Confirm Pod readiness.
- Review alerts before acting - top alert first.
- If a Temporary Target is active, Home shows it with its end time - confirm it matches the plan.
- Use the droplet button or
Let's Eatonly when Home is ready. - Review any partial delivery or interruption summary before proceeding.
- Document and escalate any therapy-impacting mismatch or unresolved alert.
Review and Approval
This version was approved for IDE submission by controlled correspondence on 2026-09-04. The table below may be completed if the sponsor's document-control process requires additional signatures.
| Role | Name | Signature | Date |
|---|---|---|---|
| Software Developer | |||
| Clinical investigator or principal investigator | |||
| Sponsor representative |